Thincast Workstation
User manual
The latest version of this documentation can be found here.
Introduction
Overview
With Thincast Workstation you can turn your computer into a powerful remote desktop virtualization platform and share virtualized desktops with your team, while keeping the data centralized. Thincast Workstation comes with a free multi-platform client application for macOS, Linux and Windows, named Thincast Client. This allows you to gain easy access to and control of published virtual machines, desktop sessions and applications.
Thincast Workstation is currently in beta phase. See "Versions" below.
Quick-Start
In case you have already installed Thincast Workstation, you might want jump directly to the following topics:
- Installation
- Create a VM
- Install Thincast Guest Additions
- Configure your VM
- Assign a GPU to a specific virtual machine
- Global settings
- RD WebServices Lite
- Client-side installation
How does Thincast Workstation relate to VirtualBox?
The virtualization system of Thincast Workstation and the graphical user interface are derived from the VirtualBox Open Source Edition.
We've added a bunch of new features and devices, so there may be some differences between the usage and configuration of Thincast Workstation and VirtualBox.
The VirtualBox end-user documentation can be found here.
All differences will be covered in this user manual.
Versions
We provide different versions:
- Stable - Official releases. Use this for production.
- Beta - Upcoming releases. Beta versions are under qualification testing, and may include significant issues.
- Nightly - Development snapshot. Contains the latest features and improvements but isn't completely tested and may include severe issues.
The beta and nightly versions are mainly for preview and evaluation purposes. Don't use them in production!
It is the end users' responsibility to protect their systems and data when using beta or nightly software. We strongly recommend that end users back up all their data prior to using beta or nightly software.
Beta and nightly software does not carry any warranties or support services.
To select the preferred update channel, please go to chapter "Update".
Requirements
Hosts that run Thincast Workstation must meet specific system requirements:
Host System
Supported Host Operating Systems
Thincast Workstation Beta requires a 64-bit Windows operating system with the latest Service Packs installed:
- Windows 10
- Windows Server 2016 / 2019
*: Please be aware when Microsoft Hyper-V role is installed on a Windows Server 2016 or 2019, no other virtualization solution will work because Hyper-V exclusively uses the hardware virtualization layer feature, VT-D!
Architecture
The host system must have a 64-bit Intel or AMD processor with 2.2 GHz or faster core speed. Multiprocessor systems are supported.
Memory and Storage
The minimum memory required on the host system is 2 GB, but 4 GB and above is recommended. Thincast Workstation needs at least 300 MB of available disk space for the application. We recommend that you use an SSD hard drive for storing your virtual machines.
Graphics Cards
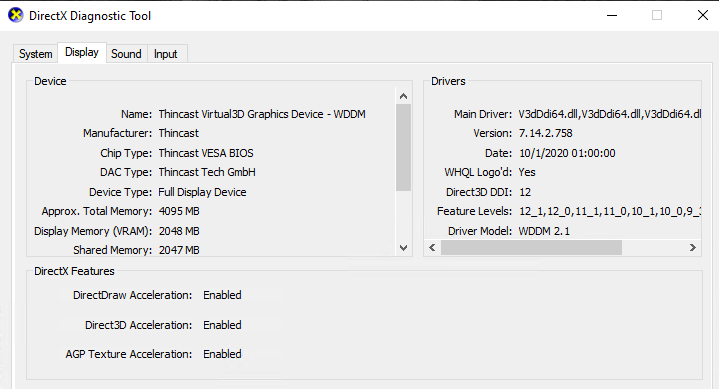
Thincast Workstation provides full DirectX, Vulkan and hardware video encoding (Direct3D12 Video/DXVA 2) support in the virtual machines. This allows you to use your 3D applications with the same smooth and visual experience as running them on physical hardware. Thincast Workstation currently supports up to DirectX 12.1 and WDDM (Windows Display Driver Model) 2.1.
In order to use hardware acceleration inside the VM, your graphics card must support at least DirectX 11. Please note that the GPU software drivers must support DirectX 11 Feature Level 11.0.
The following list shows supported GPUs but is subject to driver support for your operating system:
- AMD® Radeon HD 5000 series or higher
- Nvidia® GeForce 400 series or higher
- Intel® HD Graphics 4000 or higher
If your hardware doesn't meet these requirements, you can still run and use your VMs. Thincast Workstation will simply fall back to use software drawing for graphics operations. However, please note that this results in a much lower performance and you might be unable to run certain applications in the guest.
To improve performance for remotely accessed VMs, Thincast Workstation can offload encoding of the remote display stream to the graphics card. The following graphics cards are supported:
- AMD® Radeon HD 7000 series (with AMF support) or higher
- Nvidia® GeForce 600/700 series (with NVENC support) or higher
- Intel® HD Graphics 4200/Haswell processors or higher
The latest graphics card drivers on the host system are required!
Please note: Do not update your host's GPU driver or disable the GPU in your host's device manager while a guest machine is running on Thincast Workstation. This will cause the guest to crash.
Network
Thincast Workstation requires a properly configured network to communicate with the Thincast Client. You can use any ethernet controller that the host system supports. Overall bandwidth consumption depends on the number of connected users, used applications, screen size and frame rates.
The values in the following list will give you an approximate reference point for a single user running resource-intensive applications such as games, 3D applications or watching a UHD movie:
| Screen size | Frame rate | approx. bandwidth consumption |
|---|---|---|
| 2160p (4k) | 30 frames | 40 Mbps |
| 1440p (2k) | 30 frames | 10 Mbps |
| 1080p | 30 frames | 8 Mbps |
| 720p | 30 frames | 5 Mbps |
| 480p | 30 frames | 2.5 Mbps |
| 360p | 30 frames | 1 Mbps |
Virtual Machine
Supported Guest Operating Systems
Thincast V3D (Virtual 3D) is supported on the following guest operating systems:
- Windows 7 or later
- Windows Server 2008 R2 or later
A full list of supported guest operating systems can be found here. Please note, although all these operating systems are supported, Guest Additions are not available for all of them.
Installation
Prerequisites
Thincast Workstation supports Windows 64-bit operating systems. For more details please refer to Supported Host operating systems. Please also make sure that you have the latest Windows updates and drivers installed.
Installing Thincast Workstation
-
To download the latest version of Thincast Workstation, go to the product page and click on the "Download" button. Depending on your browser settings, the installation file will usually be located on your 'Downloads' folder.
-
Open the installation package. Setup requires administrative rights.

-
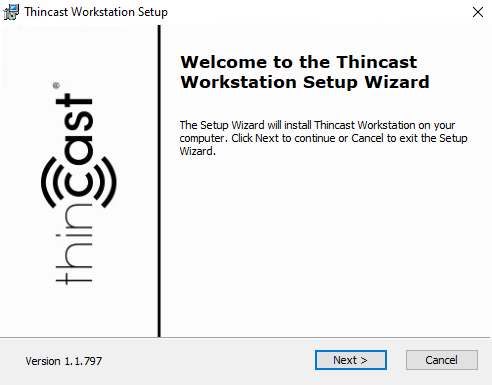
Thincast Workstation Wizard will not start. To proceed, click "Next".
-
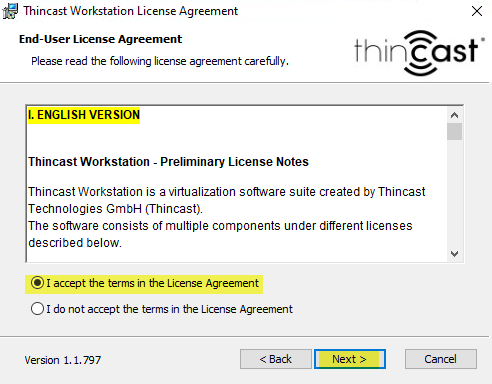
Accept the end-user license agreement and click "Next".
-
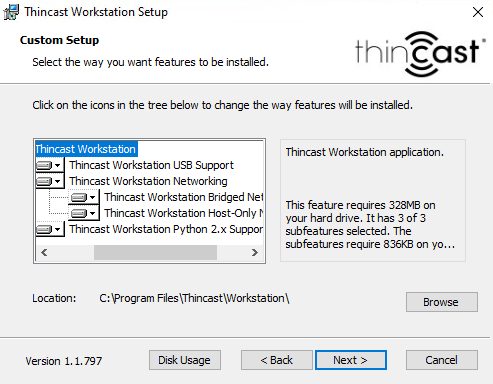
Choose the destination folder for Thincast Workstation and click "Next". Default is 'C:\Program Files\Thincast\Workstation'.
-
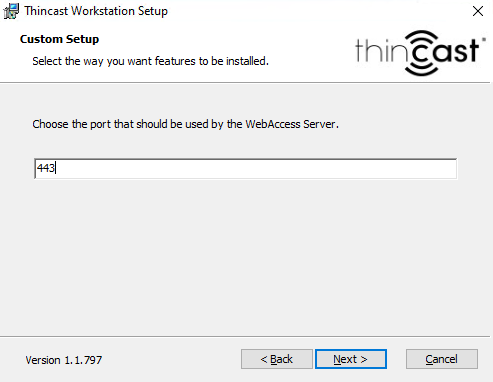
Select the port you want "Thincast Remote Desktop WebServices " to use (default is 443).
-
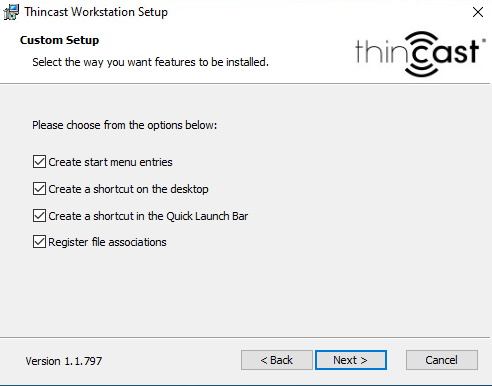
Enable or disable the shortcuts and click "Next".
-
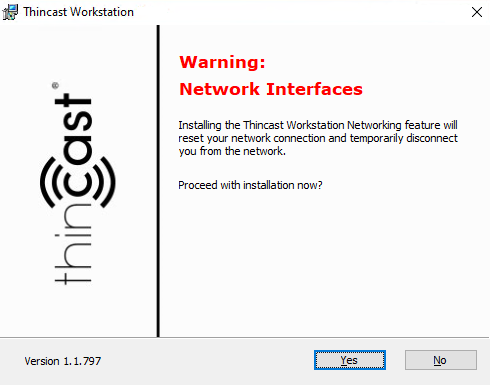
To proceed with the installation, click "Yes" Please be aware that you will get temporarily disconnected from the network if you selected the network feature.
-
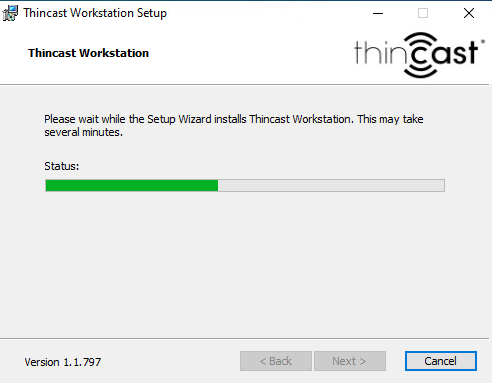
Click "Install" to begin the installation.

-
Thincast Workstation is now installing. Wait for this process to complete.
-
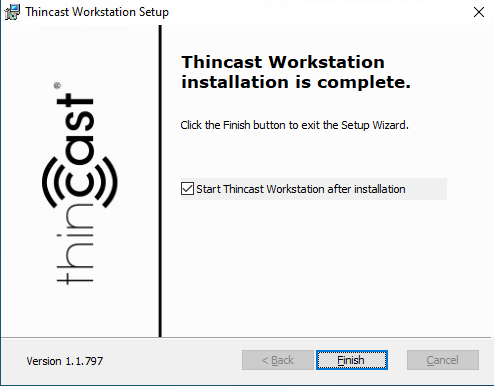
Click "Finish" to complete your installation.
-
Congratulations! You have successfully installed Thincast Workstation. You might want to create your first VM now, jump to "Create a VM".
Uninstallation
- To uninstall Thincast Workstation, open the Windows Control Panel and navigate to Programs -> Uninstall a program.
- Right-click on Thincast Workstation and select Uninstall.
- Confirm with Yes.
- You've now successfully uninstalled Thincast Workstation.
Update
Thincast Workstation has a built-in auto-update feature. By default, this feature is enabled and checks for new updates on a daily basis. You'll get a notification when a new version of Thincast Workstation is available. To change this period or to disable the auto-update feature go to Help -> Update settings in the menu bar of Thincast Workstation Manager.
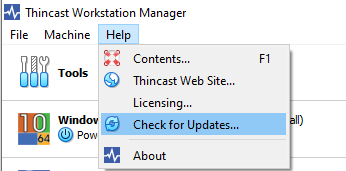
Check for updates
To check for updates go to Help -> Check for updates in the menu bar of Thincast Workstation Manager.
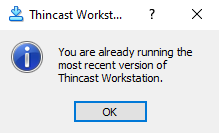
If a new version is available it will open a notification window.
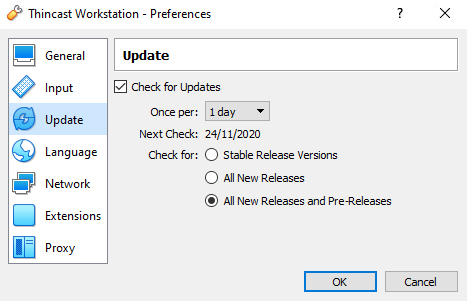
Switch update channel
You can also switch between the available update channels for Thincast Workstation:
-
Stable releases
Choose this if you wish only to be notified about stable updates to Thincast Workstation.
-
Stable and beta releases
Choose this to be notified about stable and beta updates to Thincast Workstation.
-
Stable, beta and nightly releases
Choose this to be notified about stable, beta and nightly updates to Thincast Workstation. Note: Nightly updates might be unstable!
To switch the update channel go to File -> Preferences in the menu bar of Thincast Workstation Manager or simply use the shortcut Ctrl + G to access the Preferences dialogue. After that switch to the Update - Tab. Select your preferred update channel and confirm with "Ok".
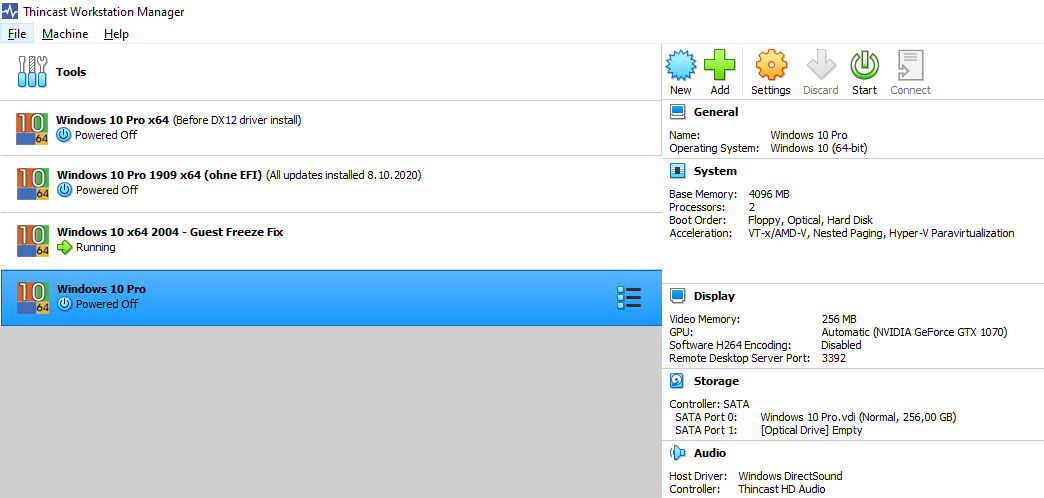
First Start
When you start Thincast Workstation for the first time, a window like the following is displayed:
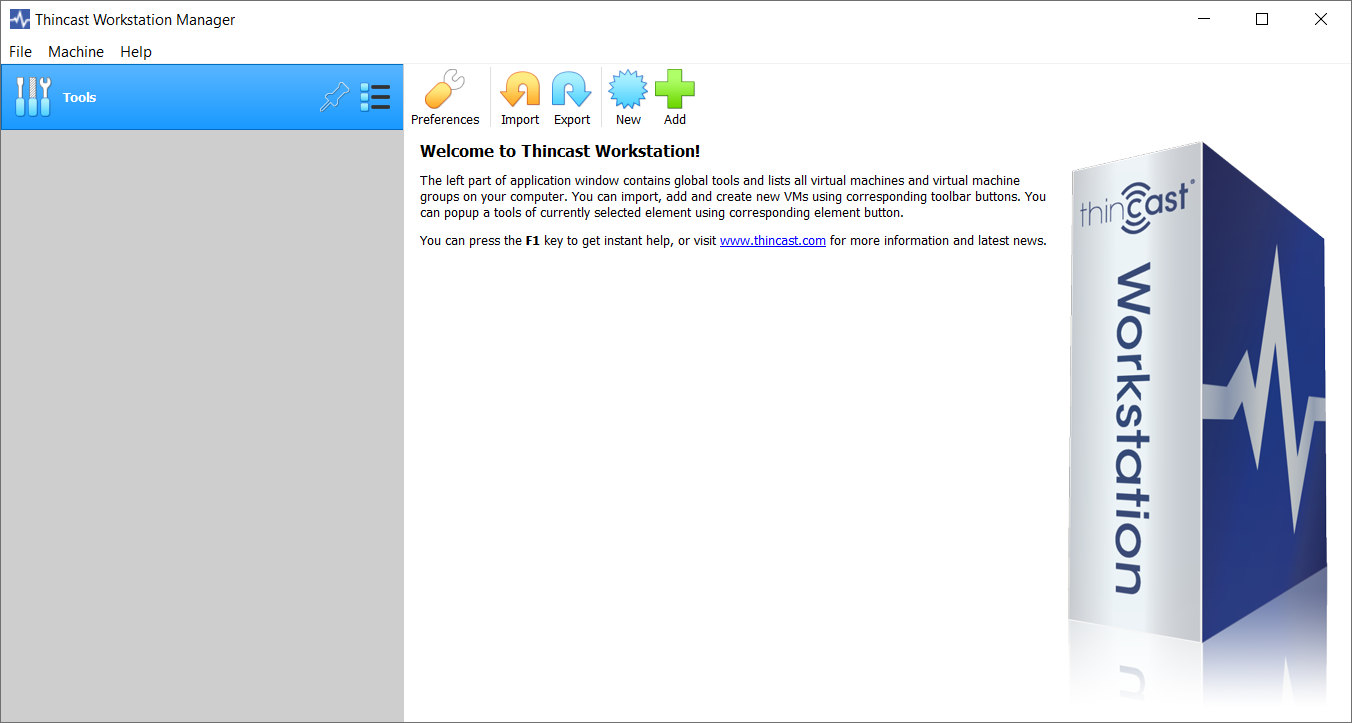
The left part of the application window contains global tools and lists all virtual machines on your server. You can import, add and create new VMs using the toolbar buttons.
Because Thincast Workstation is based on VirtualBox's virtualization system, most of the configuration is already covered in the VirtualBox end-user documentation which can be found here. All additional settings and configuration options that are introduced in Thincast Workstation will be covered in the following sections.
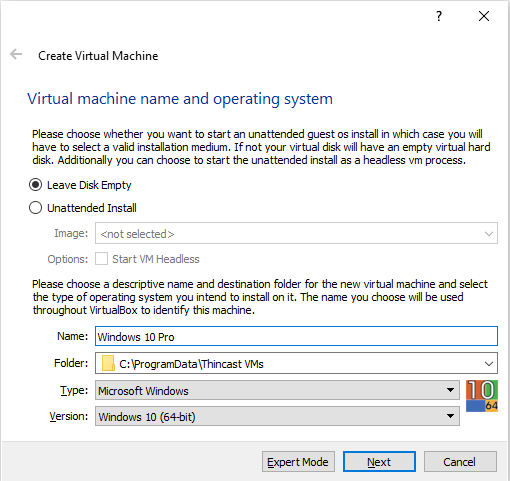
Create a VM (#create-vm)
Creating a virtual machine is very easy and user friendly, all you need is free space on the host system, an image (.iso file) of a current Windows version and we are ready to go. A full list of supported guest operating systems can be found here.
-
Click "New" in the toolbar.

-
Choose a name and changethe destination folder where the virtual machine files will be saved. After that click "Next".
-
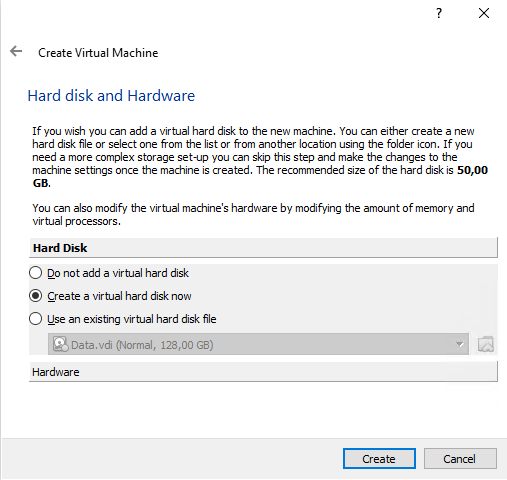
Choose "Create a virtual hard disk now" under Hard Disk. After that click on Hardware modify your virtual machine's hardware. After that click "Create".
-
Select your hard disk file type. We recommend to use VDI (VirtualBox Disk Image). Click "Next".

-
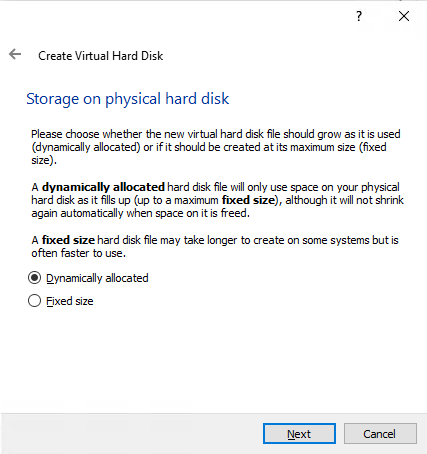
Choose between whether the new virtual disk file should grow as it is used or if it should be created at is maximum file size. We recommend to use Dynamically allocated. Click "Next" to proceed.
-
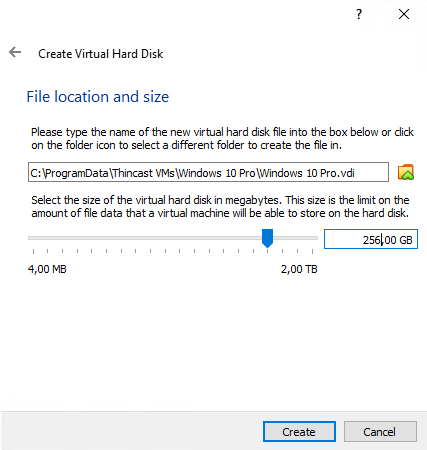
Type in the name of the virtual hard disk file and select it's size. Click "Create", to create your new virtual machine.
-
The virtual machine is displayed in the list on the left side, with the name that you entered initially.
Install guest operating system
Since the VM is created empty, we have to install your guest operating system first. If you have physical DVD media from which you want to install your guest OS, such as a Windows installation DVD, put the media into your host's CD or DVD drive. Alternatively you can also use a disk image file (.iso image).
Mount installation media
-
To mount an installation media, first select your machine in the VM list and click "Settings" in the toolbar. Now switch to "Storage" and select the disk icon, which is currently empty.
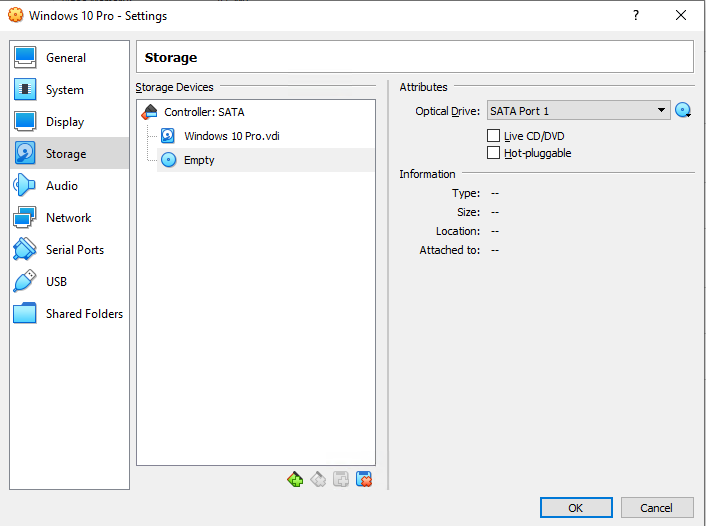
-
Click on the disc icon next to your virtual optical drive and choose between optical disc or disc image.

-
Select your disc image and click "Open".
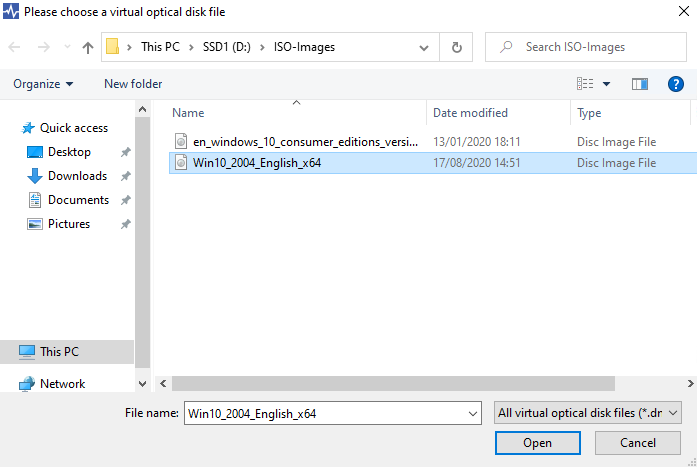
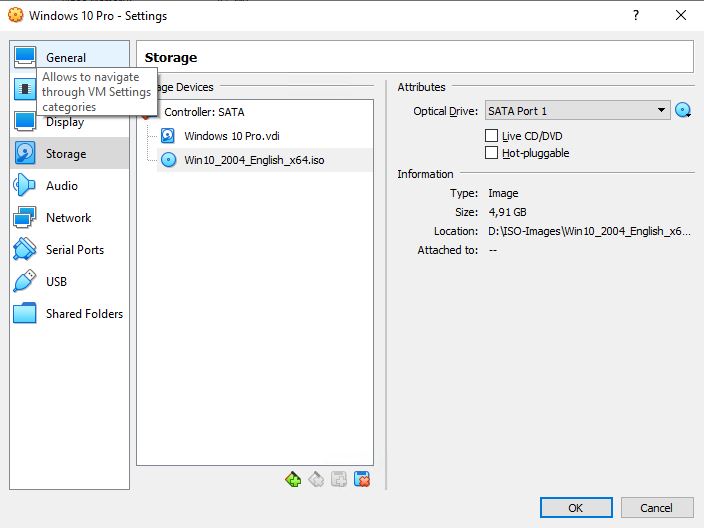
-
The installation media has been mounted. Click "Ok" in the settings dialogue to save the mounted image/disc.
Start VM
To start a virtual machine, you have several options:
- Double-click on the VM's entry in the list in the Thincast Workstation Manager Window.
- Use the "Start" button in the toolbar.
After you have started your VM, please continue with installing your guest operating system.
Thincast Guest Additions
Our guest additions contain drivers and applications that enable DirectX, audio and clipboard support in the guest operating system.
These guest additions can only be installed after the guest operating system has been installed.
The following x86/x64 Windows guest operating systems are supported:
- Windows 7 or later
- Windows Server 2008 R2 or later
Install Thincast Guest Additions
Once you have set up your guest operating system, we need to install our guest additions, to provide full Direct X12 / Vulkan and hardware video decoding support in the virtual machine.
-
To install Guest Additions, connect to a running virtual machine. Click "Connect" in the toolbar.

-
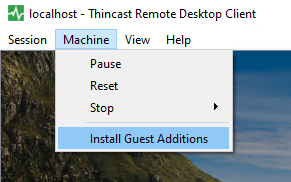
In the menu bar of Thincast Remote Desktop Client, click on "Machine" and select "Install Guest Additions" to mount the Guest Additions image file inside your VM.
-
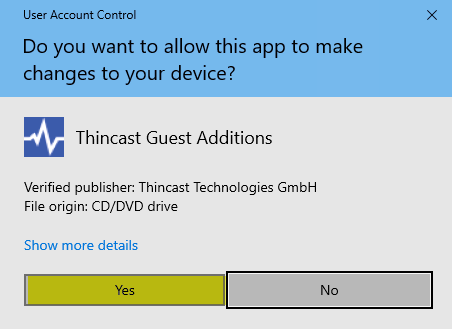
Double-click on the inserted disc in your VM -> This PC.
![ga_run][ga_run]
-
Accept with "Yes" to proceed with the installation.
-
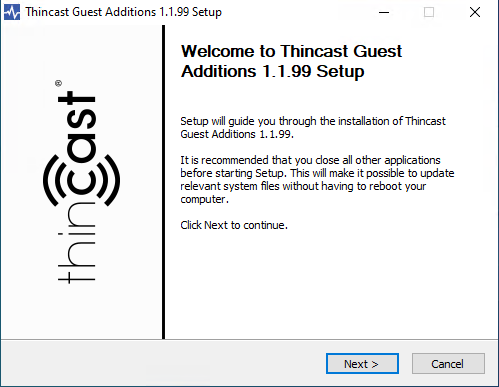
The Thincast Guest Additions Setup Wizard will open. Click "Next" to proceed.
-
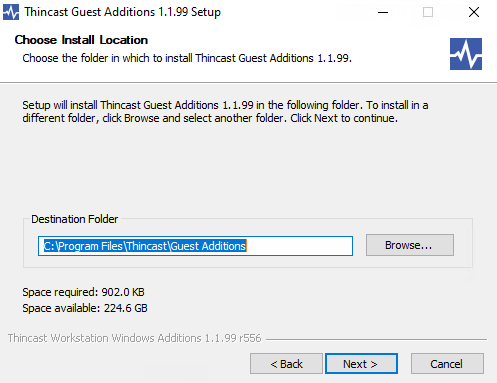
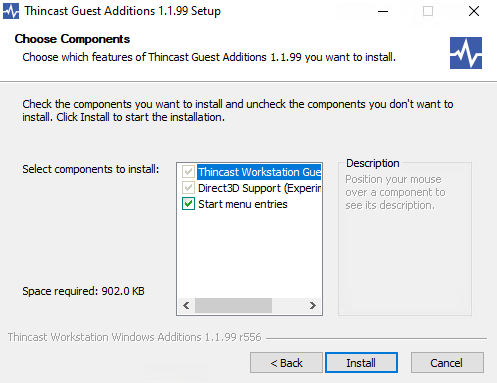
Click "Next" to install Thincast Guest Additions in the default folder.
-
Click "Install" to install Thincast Guest Additions.
-
Select "Reboot now" and click "Finish" to complete the installation of Thincast Guest Additions.
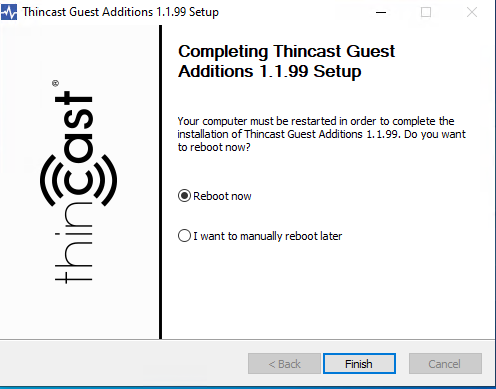
-
Your VM will reboot and the Thincast Guest Additions installation will be complete.
Configure your virtual machine
To configure your virtual machine, click on "Settings" after you have selected a specific virtual machine.
General
Advanced
Thincast Workstation contains an advanced shared clipboard that also works with files. By default, the shared clipboard operates in bidirectional mode. Drag'n'Drop support is not available.
Display {##assign-gpu}
Screen
Graphics controler
To use DirectX and hardware video encoding, a VM must be assigned to a specific GPU. Depending on the selected GPU, H.264 encoding can be fully or partly accelerated. If the GPU does not support H.264 encoding, software encoding will be used instead.
By default, the primary graphics adapter will be used automatically.
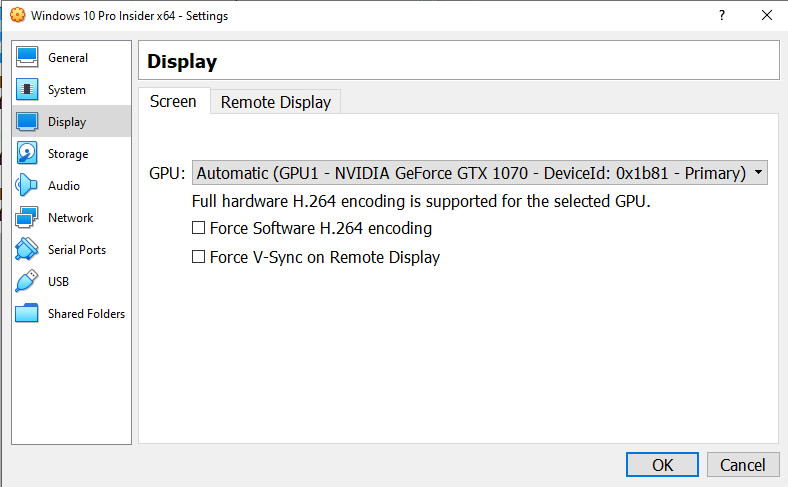
To change it, just select a graphics card from the drop down menu.
Usually the whole available video memore can and will be used. The value is at the moment not configureable.
For more information please refer to the section Graphics cards.
Force Software H.264 encoding - If checked, the virtual machine will use software H.264 encoding.
Force V-Sync on Remote Displays - If checked, the frame rate for remote displays will be limited to 30 frames/second.
Remote Display
Remote Displays are enabled on Thincast Workstation by default. Remotely connected clients access the machine via the Remote Display.
Server Port - Use this port in addition to the hostname to connect to your VM with any Remote desktop client.
Audio
The Thincast HD Audio device enables guest audio playback. It also supports audio playback for remotely connected clients.
Thincast HD Audio - If Thincast HD Audio as Audio Controller is selected, remote and local HD audio playback is enabled.
USB
USB 3.0 device redirection through the TcXhci USB Controller is enabled by default.
USB 3.0 Device Redirection
Any USB device that is physically attached to the host can be redirected to the virtual machine. Take advantage of high-speed USB 3.0 devices in your virtualized desktops.
Unfortunately, Windows 7 and Windows Server 2008 R2 do not have built-in support for USB 3.0. Installing a third-party USB 3.0 controller driver in the guest operating system will solve this issue:
Intel® USB 3.0 eXtensible Host Controller Driver for Intel® 8/9/100 Series
Global settings
Because Thincast Workstation is based on VirtualBox's virtualization system, most of the configuration is already covered in the VirtualBox end-user documentation which can be found here. All additional settings and configuration options that are introduced in Thincast Workstation will be covered in the following sections.
You can find the global settings dialog by clicking on File -> Preferences in the Thincast Workstation Manager.
General
Default Machine Folder
The default file system location for storing virtual machines is C:\ProgramData\Thincast VMs
VRDP Certificate
To verify your server's authenticity, a digital certificate file is used. By default, we create a self-signed certificate during the installation which is valid for 10 years. You can also use a custom certificate which is distributed by a certificate authority (CA).
VRDP Private Key
Specifies the private key file. This must be the private key file associated with the VRDP Certificate.
VRDP Start Port
Specifies the start port of the VRDP server. Every virtual machine gets an individual port assigned. The assigned ports are allocated in ascending order starting with port 3390, by default.
Input
Specifies the shortcuts for most common tasks in Thincast Workstation.
Extensions
Thincast Workstation includes two default extensions:
- "TcXhci" - USB 3.0 Controller
- "Virtual3D" - Hardware-accelerated graphics in the virtual machines (supporting DirectX 9 - 12.1, hardware video decoding) and Thincast HD Audio.
Virtual 3D (Direct X and Vulkan)
We have redesigned the graphical subsystem to provide full DirectX, Vulkan and hardware video decoding (Direct3D12 Video/DXVA 2) support in the virtual machines. Thincast Workstation currently supports up to DirectX 12.1, WDDM (Windows Display Driver Model) Version 2.1.
Windows Authentication
The access to virtual machines running on Thincast Workstation is secured by Windows Authentication. By default, administrators of the host machine have complete and unrestricted access to Thincast Workstation VMs. You can add additional users to the "Thincast Workstation Admins" group to grant them access to Thincast Workstation VMs.
Thincast Agent
The Thincast Agent service provides access to various functions of Thincast Workstation to connected clients. All Thincast Clients that connect to Thincast Agent have to authenticate using Windows Authentication. For more information about authentication, refer to Windows Authentication.
The Thincast Agent service must be running for Thincast Workstation to function properly.
Thincast RD WebServices Lite
Thincast Remote Desktop WebServices Lite (RD WebServices Lite) is a collection of technologies that allow you to easily access your virtual machines from anywhere. With Thincast Remote Desktop WebAccess (RD WebAccess) you gain access to a portal to control and connect to all your virtual machines using Thincast Client or any web browser. Connections to your VM are secure and can be established from any device using Thincast Remote Desktop Gateway (RD Gateway).
Configuration
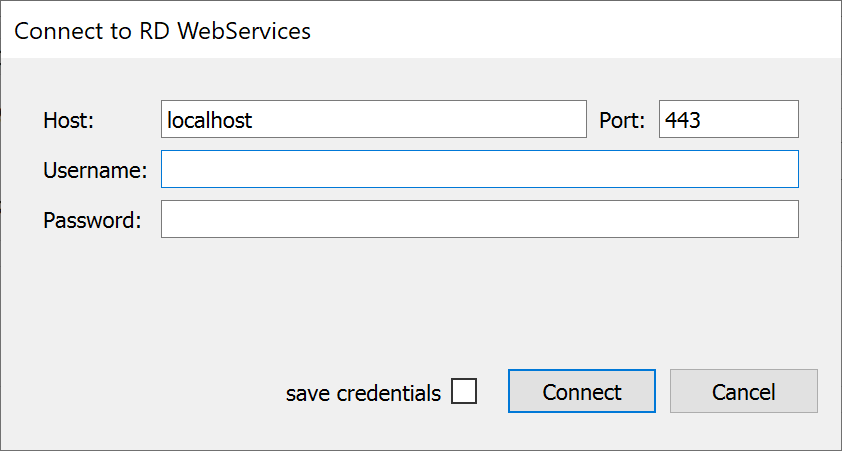
Thincast RD WebServices can be configured using the RD WebServices Lite Administration application that is located in C:/Program Files/Thincast/Workstation/RDWebServices/adminworkstation.exe. This chapter describes how to configure RD WebServices Lite and its components for use.
First, open RD WebServices Lite Administration and connect to the machine on which RD WebServices Lite is running. The user account must be a member of the local Administrator group. You also have the ability to save the credentials (not recommended).
Settings
In the settings pane, you can configure the default server port and view information about the machine running RD WebServices.
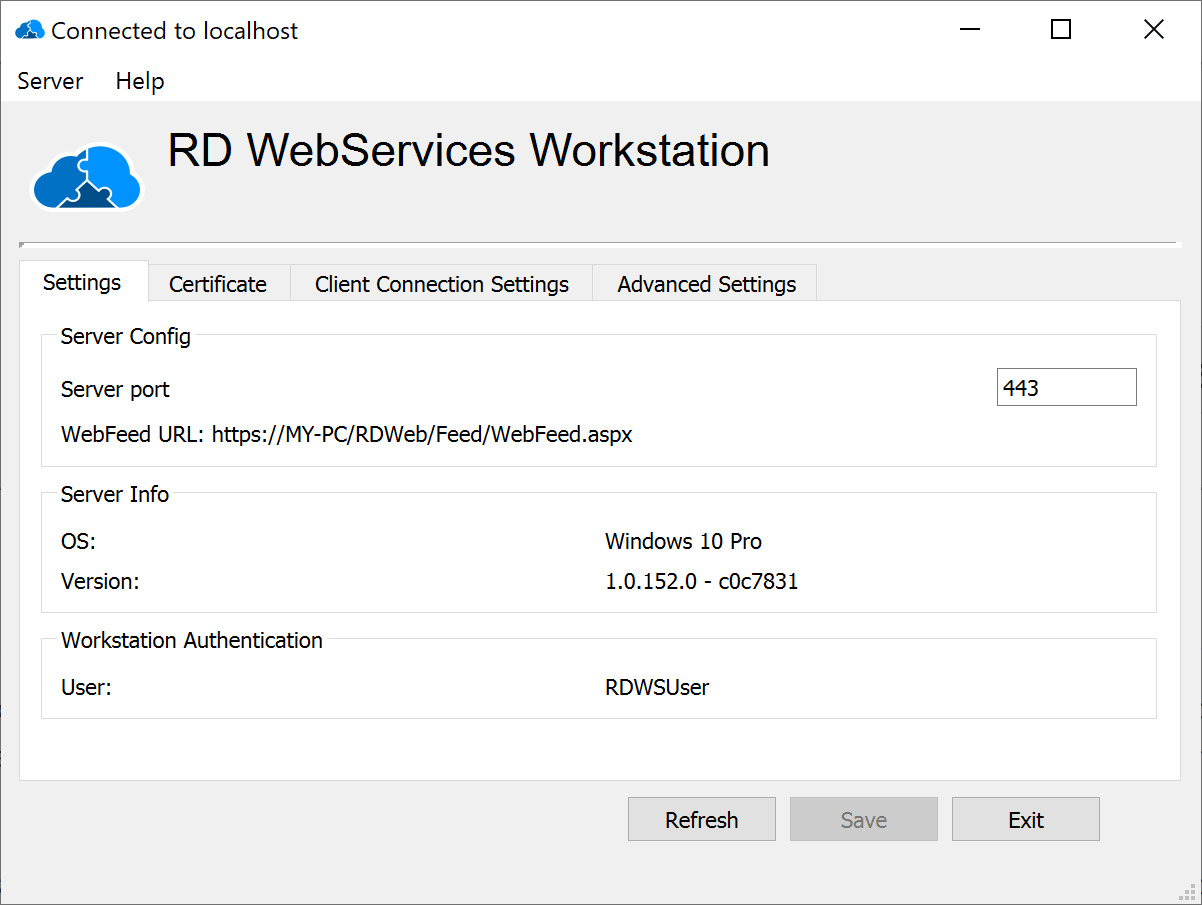
Change default port
The default server port is 443. Sometimes it is necessary to change this e.g., when you already have another service using this port:
- Type in the port number.
- Click on "Save" and confirm to restart the service.
Certificate
To establish a secure connection between the RD WebAccess and the end user, both a private key and a public key are required to encrypt the connection. These keys are included in the certificates.
You can obtain a certificate in several ways:
- Upload an existing certificate
- Create a self-signed certificate
- Purchase a certificate from a certification authority (CA)
For testing and evaluation purposes we recommended that you use a self-signed certificate.
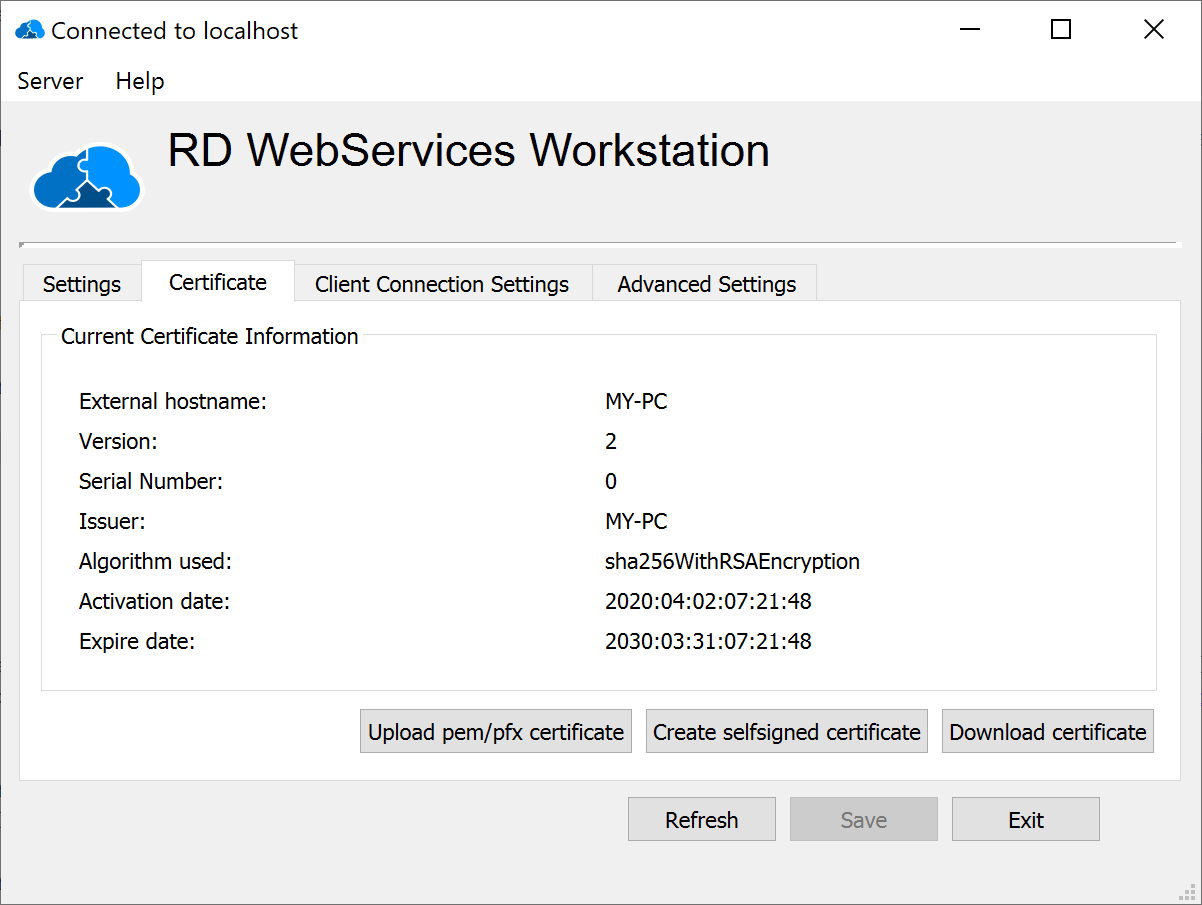
Upload an existing certificate
This chapter describes how to upload an existing certificate in the .pem/.pfx format:
- To upload/import an existing certificate, please click on Upload pem/pfx certificate and approve the notification by clicking "OK".
- Now select your existing certificate by navigating to the folder in which the certificate has been saved. The certificate must be in .pem or .pfx format.
- Upload your certificate by clicking "Open".
- If you use a certificate in pfx format, a password is required.
- Approve the notification dialogue by clicking "OK". The certificate has now been uploaded and installed.
Create a self-signed certificate
This chapter describes how to create a self-signed certificate.
You must specify a hostname, which the RDP client uses to connect to the RDP WebServices server.
Production environment:
For production usage, you should use the complete domain name of your server, also known as the Full Qualified Domain Name (FQDN).
The FQDN consists of two parts: the hostname and the domain name. For example, an FQDN for a hypothetical test server might be testserver.mycompany.com. The hostname is testserver, and the host is located within the domain mycompany.com.
Testing environment:
For testing purposes you can also use the internal hostname or the IP address (NetBIOS, FQDN or IP address).
- Click on Create self-signed certificate.
- Enter the "Hostname," which the RDP client uses to connect to the RD WebServices Lite server.
- Click on "OK".
- A new self-signed certificate is now installed. It can be found in the installation path of RD WebServices Lite.
Download certificate
To establish the SSL session with the server, the client needs to validate the server's certificate. Therefore, the client must have the certificate installed in its "Trusted Root Certificate Store".
How to obtain a certificate for the client computer:
- Click on Download certificate.
- Please select the path where RD WebServices Lite should save the client certificate. The certificate will be saved in the .crt format.
- Import this certificate into your client's certificate store.
Client Connection Settings
In the client connection settings pane you can control how the RDP connection data for the client is generated by RD WebServices Lite.
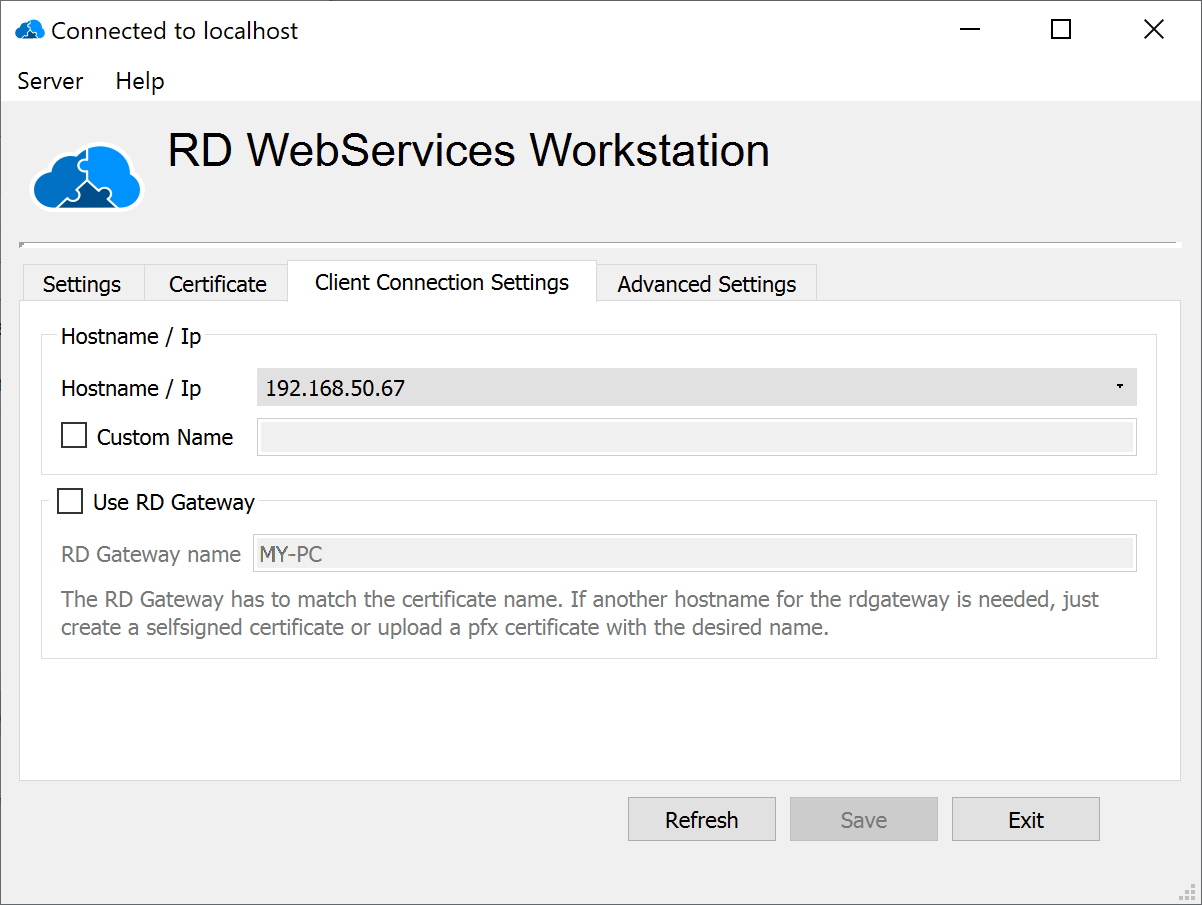
Hostname/Ip
This setting allows you to configure the target where the client will establish its connections. This can be helpful if you have multiple network interfaces. You can either select from a list of available addresses or you can specify a custom name that is resolvable with a DNS.
Use RD Gateway
If you enable this switch, RD WebServices Lite will generate client connection parameters so that connections are established using RD Gateway.
Advanced Settings

Authentication cookie
A sha256 key is used in cookie generation.
When load balancing is used to access RD WebAccess, the servers should share the same key so that the authentication cookie works for both servers, or if any cookies should be revoked forcing all users to reauthenticate, the simplest way would be to change the key.
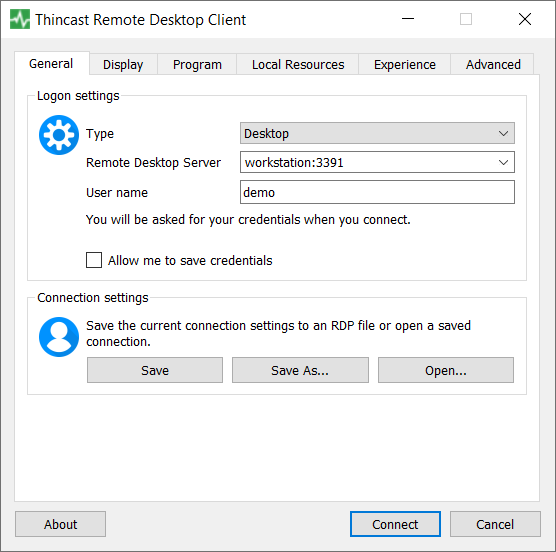
Client-side installation
After you have set-up your VM and installed the required guest additions you are ready to connect to your virtual machine.
You can connect to a VM using Thincast Client or any compatible standard RDP client. Thincast Client can be used on different machines in your network and works independently of Thincast Workstation.
To install the Thincast Client, refer to the Thincast Client - User manual or the product page.
By default, every virtual machine gets an "indivudal port" assigned. Use this port in addition to the hostname to connect to your VM.
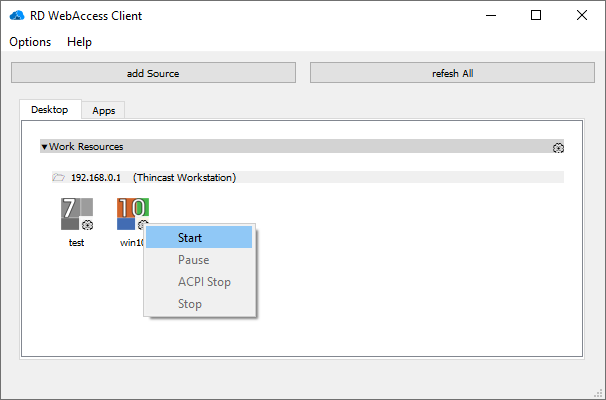
You can use also the built-in Using the Remote Desktop (RD) WebAccess Client you gain easy access to and control of published virtual machines.
Support
Please keep in mind that Thincast Workstation beta and nightly builds do not carry any warranties or support services.
However, we are eager to hear about your experiences and any troubles with Thincast Workstation beta! Please let us know by filling out our contact form.
Changelog
The changelog can be found on our website.
Third-party licenses
Thincast Workstation is based on Oracle's VirtualBox - Open Source Edition.
Open-source software licenses used in this project are located under
C:\Program Files\Thincast\Workstation\Licenses\COPYING.html