User manual
This user manual is for the Thincast Remote Desktop WebServices (RD WebServices) which consists of the two individual products Remote Desktop Gateway (RD Gateway) and Remote Desktop WebAccess (RD WebAccess).
Version 1.3
Last update on 28/05/2025
The latest version of this documentation can be found here.
Quick-Start
In case you have already installed RD WebServices, you might want jump directly to the following topics:
- Requirements
- Installation (Windows)
- Installation (Linux)
- Management interface
- Network and Firewall
- Change default port
- License activation
- Configuration of RD Gateway
- RD WebClient
- Authorization policies
- Access log
- Configuration of RD WebAccess
- Publish resources
- Access published resources
- Two-Factor Authentication
- Custom WebApp
- Silent install
- Wake On Lan Proxy Servers
Remote Desktop Gateway (RD Gateway)
Remote Desktop Gateway (RD Gateway) enables authorized remote users to connect to resources on an internal corporate or private network, from any internet-connected device that can run a Remote Desktop client. RD Gateway acts as a secure proxy for external users to connect to internal network resources. It is also a convenient way to resume the work you started on your office PC.
Access is controlled by configuring authorization policies (Client and Server policies). A Client policy specifies who is authorized to make a connection, and a Server policy specifies to which network resources authorized users may connect.
Technically, RD Gateway encapsulates the standard Remote Desktop Protocol (RDP) over HTTPS to establish a secure, encrypted connection between remote users on the internet and the internal network resources on which their productivity applications run. This also increases compatibility with firewalls in public locations such as hotels.
The three primary purposes of RD Gateway, in the order of the connection sequence, are:
- Establish connection: The external user connects to the RD Gateway.
- Authenticate: The RD Gateway authenticates the user and ensures permissions to access internal network resources.
- Pass traffic: After verification, the RD Gateway passes from the user to the destination host.
Configuration and Deployment of RD Gateway
Remote Desktop WebAccess (RD WebAccess)
Remote Desktop WebAccess (RD WebAccess) is an easy-to-use solution to allow authorized users remote access to their Windows applications and desktops on their device of choice through the internet. It provides each user with a customized view of all permissible resources.
There are two ways that users receive published resources. One way is through a webfeed, which presents the published applications in a software-parsable XML document. This feed can be used by the "RemoteApp and Desktop Connections" applet in the Windows Control Panel or by the Remote Desktop Client for iOS, macOS or Android. After the user subscribes to the webfeed, all permissible resources will be made available.
The other way is through a web browser by signing in to the web portal that is provided by RD WebAccess (https:// SERVERNAME/webaccess).
Here is an example of how your RD WebAccess URLs might look:
Where SERVERNAME is the fully qualified domain name of the server where you have installed RD WebServices.
Configuration and Deployment of RD WebAccess
RD Advanced Security
RD Advanced Security enables the use of the following features to improve security:
- GeoIP Protection
- Brute Force Protection
- Logon Hours restrictions for users/groups
- Let's Encrypt support
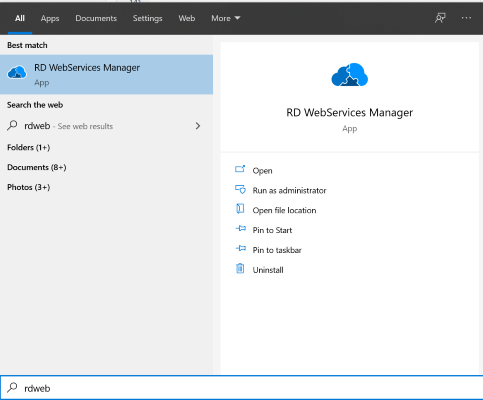
RD WebServices Manager
RD WebServices Manager is the platform independent management interface for RD WebAccess and RD Gateway. You can simply configure your Linux installations with the client installed on Windows and the other way around.
Note: The Windows installer already contains the RD WebServices Manager application. To install RD WebServices Manager under windows separately, download the RD WebServices Manager installer from here. On Linux it needs to be installed separately if required (see installation section below).
Network resources
Network resources can be any remote desktop-enabled hosts running on Windows or Linux, such as:
Windows:
- Hosts with Remote Desktop enabled
- Microsoft Remote Desktop Session Host (RDSH/Terminal server)
- Microsoft Remote Desktop Virtualization Host (RDVH)
- Thinstuff XP/VS Server
Linux/Open Source:
- ogon project: A collection of services and tools to turn any modern Linux system into a full-featured RDP server.
- freeRDP: A free implementation of the Remote Desktop Protocol (RDP), including Client(s) and server.
Requirements and supported operating systems
Thincast RD WebServices suite is available for Windows and Linux.
Basically both versions for Linux and Windows offer the same functionality, except that on Linux Active Directory access is not supported and the local user database is used. Also, there are some minor differences regarding configuration of server certificates and listen port.
Windows
RD WebServices supports 64 bit (x64) environments on all major Windows operating systems:
- Windows 7 / 8 / 8.1 / 10 / 11
- Windows Server 2008 R2 / 2012 / 2012 R2 / 2016 / 2019 / 2022
Linux
RD WebServices are currently supported on the following versions of Debian and Ubuntu:
- Debian (amd64)
- 11 (bullseye)
- 12 (bookworm)
- 13 (trixie)
- Ubuntu (amd64)
- 20.04 (Focal Fossa)
- 22.04 (Jammy Jellyfish)
- 24.04 (Noble Numbat)
Important Note: RD WebServices can be utilized with different virtualization technologies (QEMU/KVM, VMWare, Hyper-V or cloud based solutions) but container technologies, like docker, lxc, lxd, OpenVZ or similar are currently not supported.
Note: We are constantly working on expanding our support for Linux. Let us know if there is any Linux distribution you want to see supported.
Memory and Storage
The minimum memory required on the host system is 64 MB, but 128 MB and above is recommended. For RD Gateway you can roughly calculate of 1 MB additional memory per client.
RD WebService needs at least 128 MB of available disk space for the application. If you have enabled access login, this amount can increase depending on the number of connections. Icons are cached for each RD WebAccess resource.
Network and Firewall
RD WebServices requires a properly configured network.
All the data between the clients and RD WebServices is transferred by using the secure HTTPS protocol. By default, the HTTPS standard port 443 is used. Please make sure that this port is open in your external firewall. On Windows RD WebServices automatically configures your firewall during installation.
There are two different network designs for integrating RD WebServices in your environment:
- RD WebServices inside your LAN
Use the RD WebServices server inside the LAN and allow port 443 in the firewall between the internet and the RD WebServices server.
- RD WebServices in DMZ
By putting the RD WebServices in a DMZ, you can isolate the RD WebServices from your LAN. You must open port 443 between the internet and the RD WebServices server and, for example, port 3389 between the RD WebServices server and the LAN. This setup requires advanced experience with firewalls and network configuration.
Installation
Windows
- Download the latest version of RD WebServices for Windows from here.
- Open the installation package.
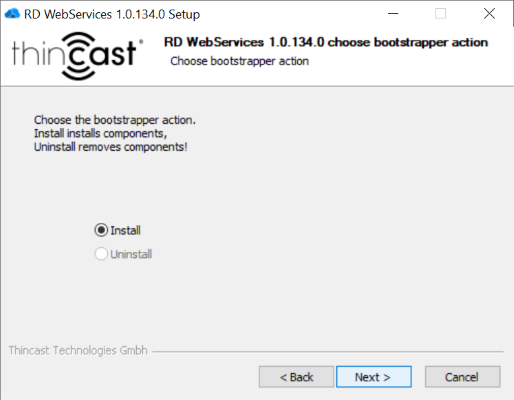
- RD WebServices Setup will now open. Continue with "Next".

- Select the "Install" Checkbox and click on "Next".
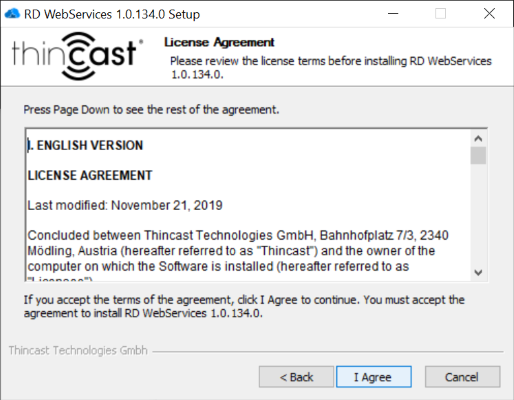
- Read and accept the End-user License Agreement and proceed with "Next".
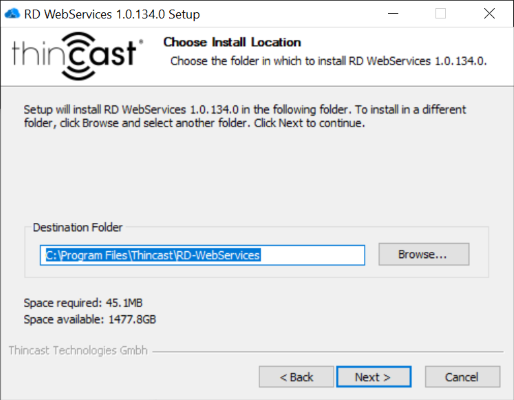
- Select the destination folder for RD WebServices and click on "Next".
- Click "Finish" to complete your installation.
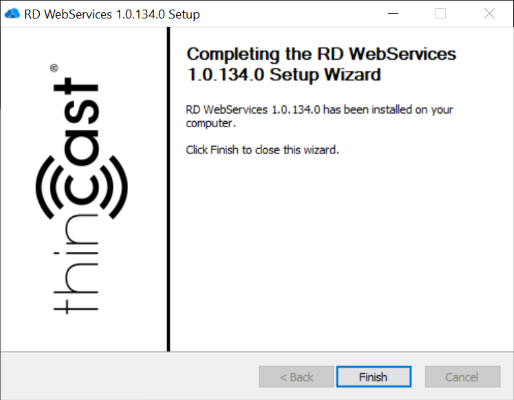
- You have now successfully installed RD WebServices. It can be found in your start menu or under the destination folder you specified.
Silent install
A "silent install" is the installation of a software program that requires no user interaction.
In order to perform a "silent install" of RD WebServices just follow these tasks:
-
Download the latest version of RD WebServices from here.
-
Open the exe with 7zip and extract the included msi installer.
-
Run the msi installer silently on the target server like this:
msiexec /quiet /norestart /i Thincast-RDWebServices-x64-1.0.550.0-stable.msior if you want to wait until msiexec completes:
start /w msiexec /quiet /norestart /i Thincast-RDWebServices-x64-1.0.550.0-stable.msiThe RD WebServices service should now be running on its default port 443.
-
In order to manage it from another machine you need to install the standalone version of the RD WebServices Manager GUI as described here.
Linux
For Linux the RDWebServices installation relies on the distribution package management. Regardless of the distribution there are three available packages:
- rdwebservices - contains the core services
- rdwebservices-manager - contains the management interface
- rdwebservices-wolproxy - wake on lan proxy server
Before you install RDWebServices on Linux please ensure that your machine has set a fully qualified domain name (FQDN). Clients that connect with the RDP gateway protocol require a certificate that matches the full hostname of the
machine. For Debian/Ubuntu you should simply add the FQDN at first in /etc/hosts. For example:
127.0.0.1 rdwebservices.testing.thincast.com rdwebservicesNote: If setting the FQDN is not possible when install rdwebservices you can still replace the certificate later.
Installation
- Install required packages
apt install curl- Add the Thincast stable repository. Note: If you want to do a pre-flight check have a look
at
install.shhere.
curl https://packages.thincast.com/deb/install.sh | sudo bash- Install RD WebServices
apt install rdwebservicesAfter running the commands from above RD WebServices is installed and started with a default configuration.
If you want RD WebServices Manager installed as well run:
apt install rdwebservices-managerNote: As RD WebServices Manager requires a full X11 and Qt environment we do not recommend to install it on the same machine as the WebServices in production.
Update
Windows
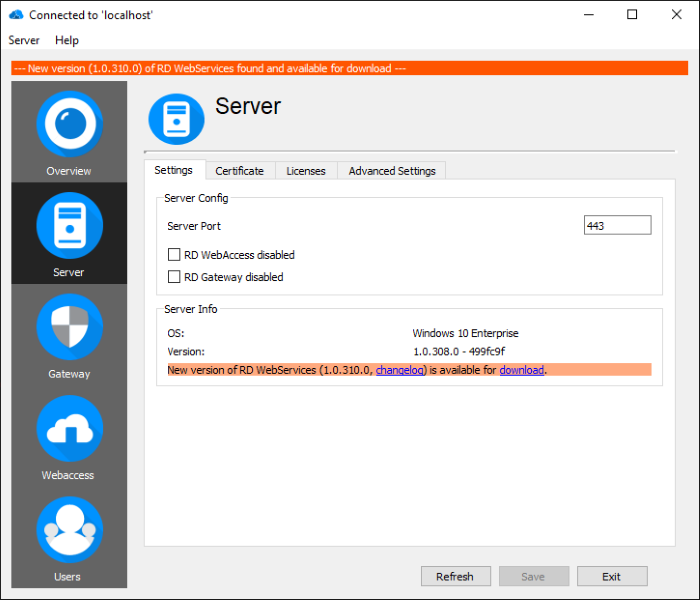
RD WebServices has a built-in check for updates. Every time an RD WebServices Admin GUI connects to an RD WebServices service, a check for a new version for that service is performed. If a new version is available, an info bar is shown in the RD WebServices Admin GUI and can be downloaded in the 'Server' section under the 'Settings' tab.
Check for updates
To check for updates, go to Help -> Check for updates in the menu bar of RD WebServices Manager.

If a new version is available, a notification window will be displayed.
Linux
All installed RD WebServices packages are automatically updated if you update your distribution. For example with:
apt update
apt full-upgrade
Uninstallation
Windows
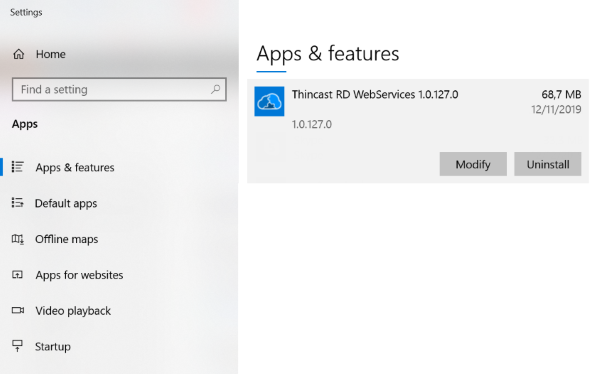
- To uninstall RD WebServices, open your Settings and navigate to Apps & features. Select RD WebServices and click on " Uninstall".
Linux
Simply remove the package using apt:
apt remove rdwebservicesConfiguration and Deployment
This chapter describes how to configure RD WebServices and its components for use.
Open the RD WebServices Manager and connect to the machine where RD WebServices are running.

- Windows: You can use any user account that is a member of the local Administrator group.
- Linux: For initial configuration you can use the user Administrator with the password found
in
/etc/rdwebservices/RDWSUsers.administrator.overwrite.cfg(Note: Once you have set a password for the Administrator user the file is removed automatically)
To simply get the password:
grep . /etc/rdwebservices/RDWSUsers.administrator.overwrite.cfgOverview
In the overview pane you can see the overall status of RD Gateway, RD WebAccess, RD WebClient and RD Advanced Security, if they are running, and if the licensing is valid. For quick access, the WebFeed URL and the link to the web frontend of RD WebAccess are displayed.

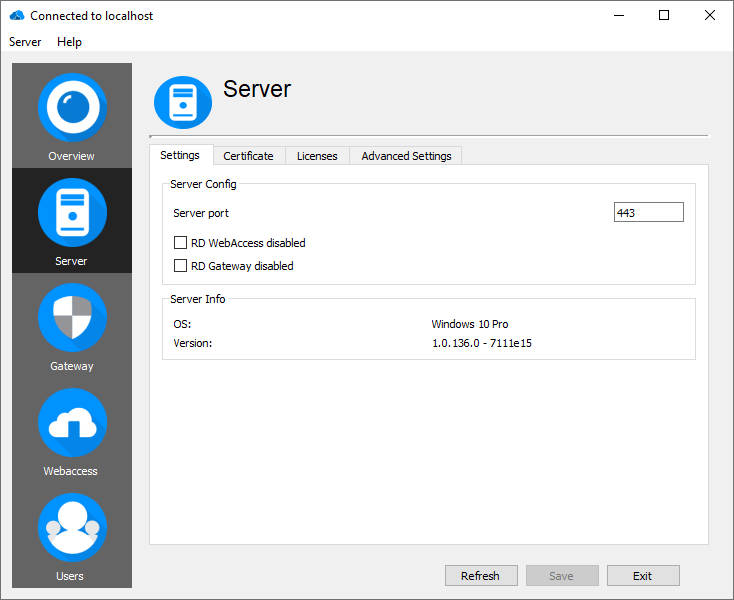
Server
Server settings
In the server settings pane, you can configure the overall settings for RD WebAccess such as changing the default server port, enabling or disabling services, importing a certificate or installing a license.
Change default port
The default server port is 443. Sometimes it is necessary to change this, such as when you are already running another service on this port.
Windows
- Type in the port number.
- Click on "Save" and confirm the service restart.
Linux
You can change the port of the service by changing the PORT setting the file
/etc/default/rdwebservices:
For example if you want the service to listen on port 8443, you would change PORT to:
PORT="-p 8443"After modifying the file make sure you restart the systemd service:
systemctl restart rdwebservicesDisable/Enable services
If you wish to disable RD WebAccess, RD Gateway or RD WebClient manually and prevent it from starting, check the box and click "Save". Currently opened RD Gateway connections or opened webapp connections will continue to work until the client or browser closes the connection.
Certificate
To establish a secure connection between RD WebAccess and the end user, a private and a public key are required to encrypt the connection. These keys are included in the certificates.
You can obtain a certificate in several ways:
- Upload an existing certificate.
- Create a self-signed certificate.
- Purchase a certificate from a certification authority (CA).
For testing and evaluation purposes, we recommend to use a self-signed certificate.
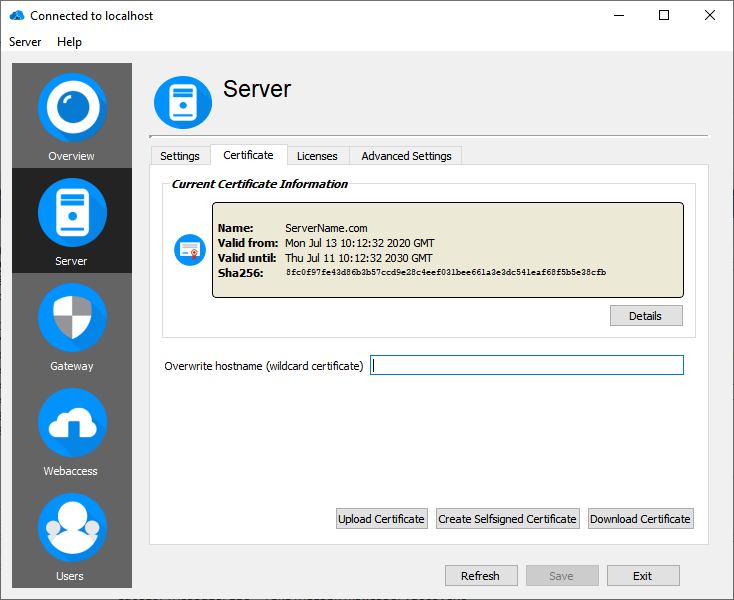
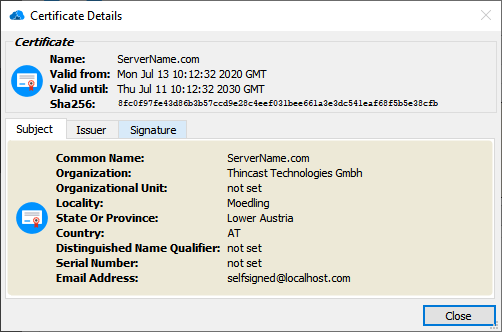
To view the details of the currently used certificate just click on "Details" next to the certificate.
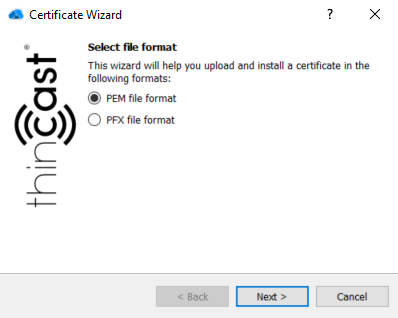
Upload an existing certificate (Windows only)
This chapter describes how to upload an existing certificate in the .pem/.pfx format using the built-in Certificate Wizard.
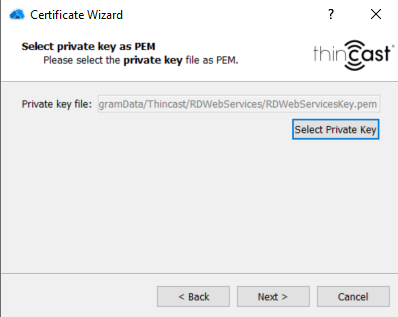
- To upload/import an existing certificate please click on "Upload certificate" in order to open the built-in Certificate Wizard, then select the file format of your certificate. The certificate has to be in either .pem or .pfx format.
- Click on "Select Certificate" and navigate to the folder containing your certificate file, select it and click "Next".
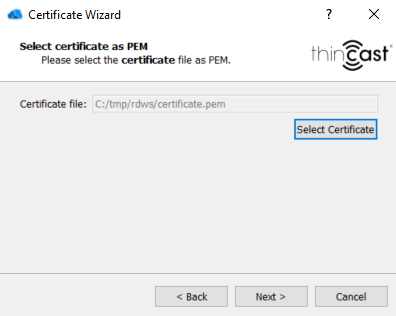
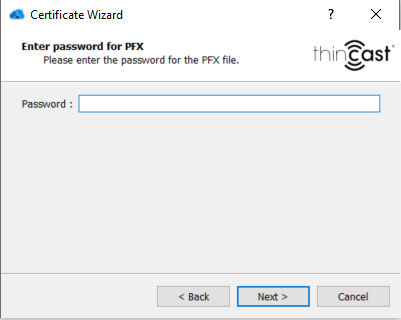
- Depending on the file format of your certificate either select your private key file or enter the required password for the certificate.
-
.pem certificate:
Select your private key file by clicking on "Select Private Key" and click on "Next".
-
.pfx certificate: Enter the password for your certificate and click on "Next".
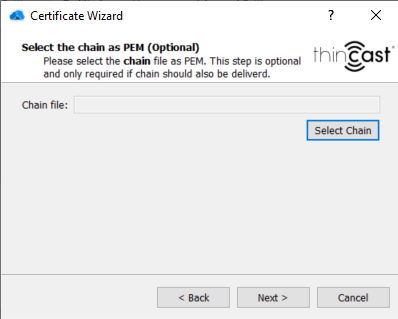
- In case you have imported a .pem certificate you can also deliver the certificate chain. Select your chain file by clicking on "Select Chain" and click on "Next". This step is optional and does only apply to .pem certificates.
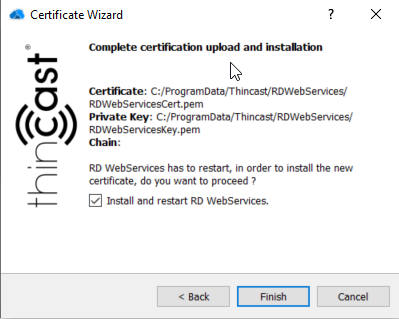
- To complete the certificate upload click on the checkbox and click on "Finish". The certificate will be uploaded and installed. Please note that RD Web Services will be restarted.
Create a self-signed certificate (only on Windows)
This chapter describes how to create a self-signed certificate.
You need to specify the hostname which the RDP client uses to connect to the RDP WebServices server.
Production environment:
For production usage, you should use the complete domain name of your server, also known as the Fully Qualified Domain Name (FQDN).
The FQDN consists of two parts: the hostname and the domain name. For example, an FQDN for a hypothetical test server might be testserver.mycompany.com. The hostname is testserver, and the host is located within the domain mycompany.com.
Testing environment:
For testing purposes you can also use the internal hostname or the IP address (NetBIOS, FQDN or IP address).
- Click "Create self-signed certificate".
- Enter the "Hostname" that the RDP client uses to connect to the RD WebServices server.
- Click "OK".
- A new self-signed certificate is now installed.
Certificate configuration on Linux
On Ubuntu and Debian the snakeoil certificate provided by the ssl-cert package is
used. To change the certificate, modify the KEY and CERT variables in the file /etc/default/rdwebservices.
For example, this is the configuration to use the my-corp certificate (assuming they are in the standard certificate location):
KEY="-k /etc/ssl/private/my-corp.key"
CERT="-c /etc/ssl/certs/my-corp.pem
After modifying the file, make sure you restart the systemd service:
systemctl restart rdwebservicesDownload certificate
To establish the SSL session with the server, the client needs to validate the server certificate. Therefore, the client must have the certificate installed in its "Trusted Root Certificate Store".
You can obtain a certificate for the client computer by doing the following:
- Click on "Download certificate".
- Select the certification format. Use DER encoded certificate for Android and IOS devices.
- Select the path where RD WebServices should save the client certificate. The certificate will be saved in .crt format.
- Import this certificate into your client's "Trusted Root Certificate Store".
Licensing
When you purchase a product from Thincast via our website, a corresponding license is created and added to My licenses
in your account once the order is completed (paid).
Licenses issued by Thincast can only be used on one device at a time. You need to activate your license to be valid. The activation binds a license to a specific computer.
More information can be found in our Licensing documentation.
Advanced Settings
Allowed Manager
Thincast RD WebServices allows to restrict the access of the RD WebService Manager, to only allow management from known secure IP addresses.
To enable the access restriction, add an IP address or an IP address range, from where the RD WebServices Manager should be allowed to connect from. To allow any IP addresses, remove all configured IP addresses and ranges.

Authentication
A sha256 key is used in cookie generation.
When load balancing is used to access RD WebAccess, the servers should share the same key, so the authentication cookie works for all servers. If a cookie is revoked, causing all users to re-authenticate, the simplest way is to change the key.

SSL
RD WebServices uses Transport Layer Security (TLS), to ensure a secure communication between server and client. TLS has different versions (1.0, 1.1, 1.2 and 1.3), versions 1.0 and 1.1 were deprecated in 2020.
RD WebServices uses the following default settings:
| TLS protocol level | enabled |
|---|---|
| 1 (1.0) | no |
| 1.1 | yes |
| 1.2 | yes |
| 1.3 | yes |
Per default version 1.0 is disabled and versions 1.1 to 1.3 are enabled.
In some situations - like if there are older RDP clients in the field or a tightened security is required - it might be necessary to overwrite the defaults.

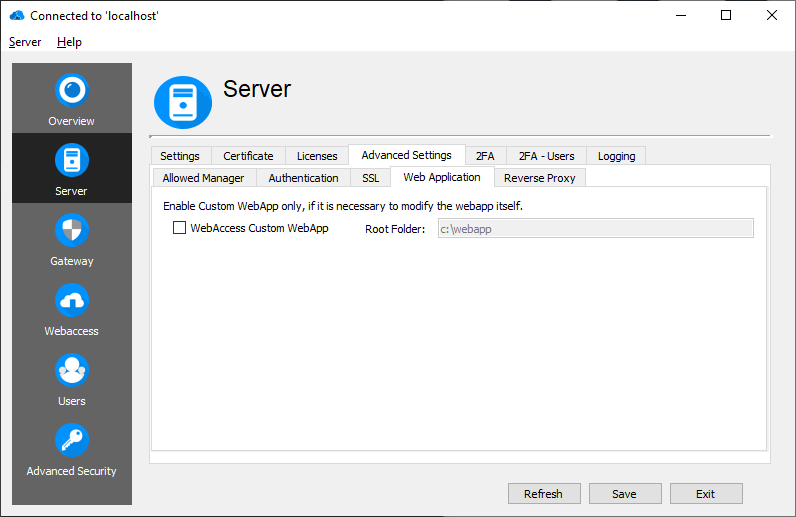
Web Application
Thincast RD WebServices comes with integrated web applications. By providing the web application sources, you can customize the web application and adapt it for your clients.
By default, the integrated web application will be displayed. In case you want to deliver your customized version of the Logon web application do the following:
- Tick the checkbox "Logon custom WebApp".
- Specify where the folder is on your system (e.g. C:\temp\logon-webapp-external).
- Click on "Save".
You can find the source code (webapp-external-weblogon.zip) in the direcotry
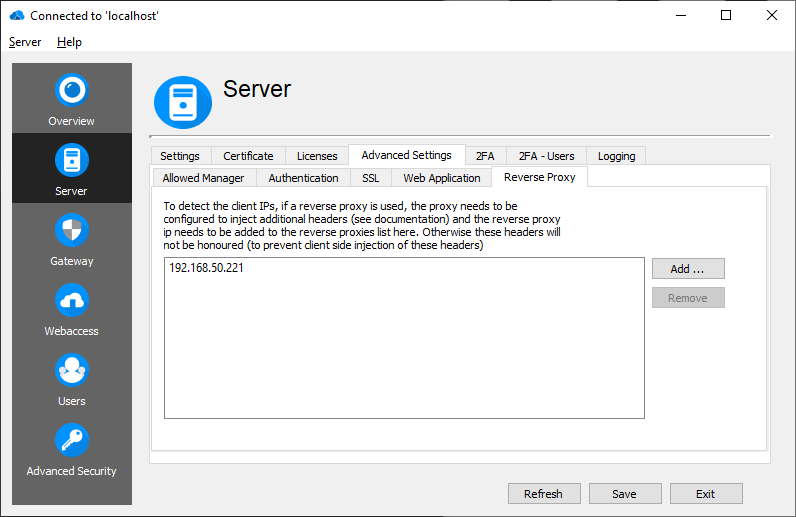
Reverse Proxy
If a reverse proxy is used, the connections are opened from the reverse proxy and the client IPs would always be the reverse proxy itself. To forward the real client IP to RD WebServices, the reverse proxy injects the real client IP address in the http header (for ha proxy this option is 'option forwardfor'). These headers are only honoured if the connection was made from a registered reverse proxy, otherwise clients could fake their IP address.
Add your reverse proxies here.
Wake on Lan (WoL)
RD WebServices is able to send out Wake On Lan (WoL) packets on connect to a specific host.
- Enable Wake On Lan
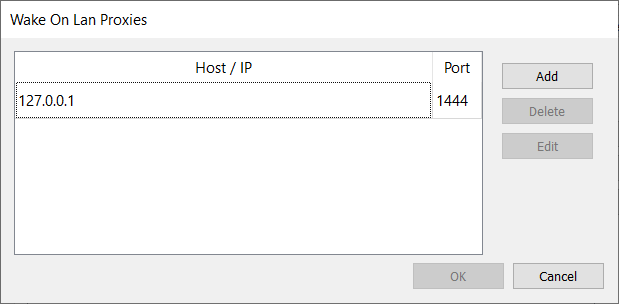
- Configure the hosts
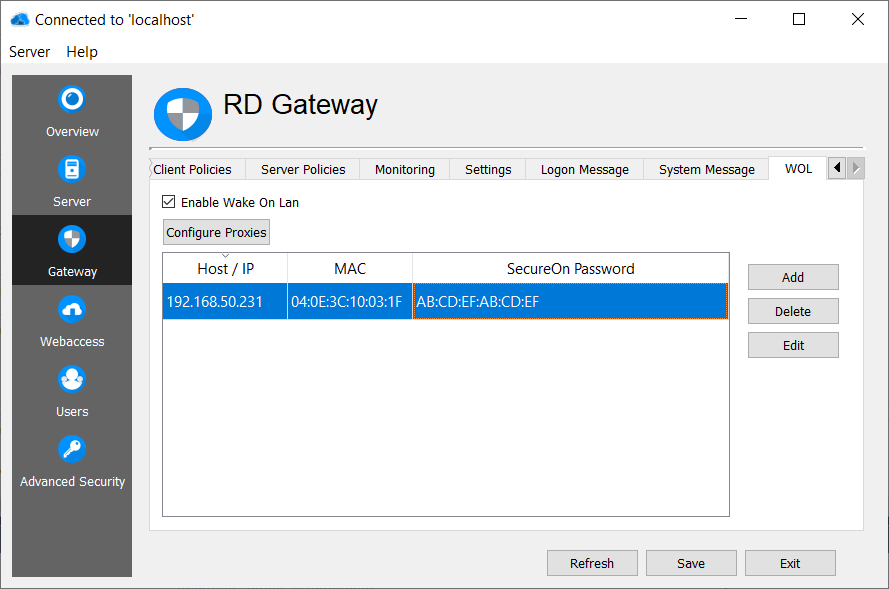
Configure WoL Hosts
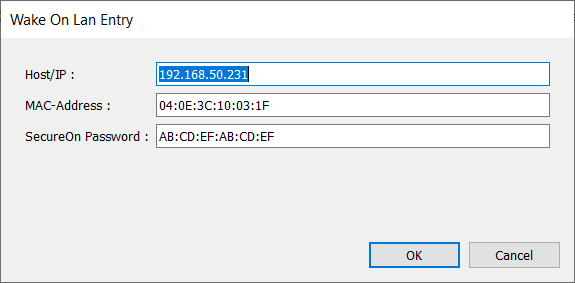
Host/Ip
If an IP address is used, the WoL packet is sent if a connection to this address is established, even if the client uses a DNS or NETBIOS name. On the other hand, if a DNS or NETBIOS name is used (useful if your clients use DHCP and the IP addresses change), the hostname entered by the client must match the hostname configured.
MAC-Address
The MAC-Address of the client using the following hexadecimal format: XX:XX:XX:XX:XX:XX.
SecureOn password
Some clients support a so called SecureOn password, and only start if the correct password is sent along with the WoL packet.
The SecureOn password is 6 bytes long and configured in the following hexadecimal format: XX:XX:XX:XX:XX:XX.
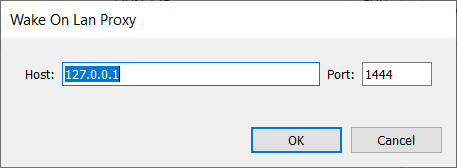
Wake on Lan Proxy Servers
To wake up a computer, Wake on Lan uses broadcast packages, which are not routed by default. If RD WebServices is installed on the same broadcast domain, no Wake on Lan Proxy server is needed. If RD WebServices is installed in a DMZ or on another routed network, the Wake on Lan packages would not reach the clients. To overcome this limitation, without reconfiguring your routers/firewalls, the Wake on Lan Proxy Server is used. A Wake on Lan Proxy Server is installed (see Wake on Lan Proxy Server installation section) on each network and RD WebServices is configured to use this proxy.
Backup
To enable backup functionality, check 'Enable backup' and hit the save button.
Upgrade Backup
RD WebServices will back up the full configuration if there is a version update. So if an upgrade goes wrong, it is easily possible to roll back to the previous working state. This requires following steps:
- Stop RD WebServices
- Uninstall the current RD WebServices version
- Open the backup archive of the desired version (zip) and copy back the configuration to its specific location (the location is the path inside the zip file)
- Install the desired RD WebServcies version
RD WebServices will keep backups for the last 10 upgrades, older ones will be deleted.
Automatic Backup
RD WebServices can do an automatic back up of the configuration. Enable automatic backup and configure the backup interval in days. It is also possible to change the number of backups kept.
Manual Backup
To do a manual backup, for example before doing a big configuration change, hit the 'Create manual backup' button.
Manual backups remain saved. To delete a manual backup it is necessary to delete the corresponding zip archive from the filesystem.
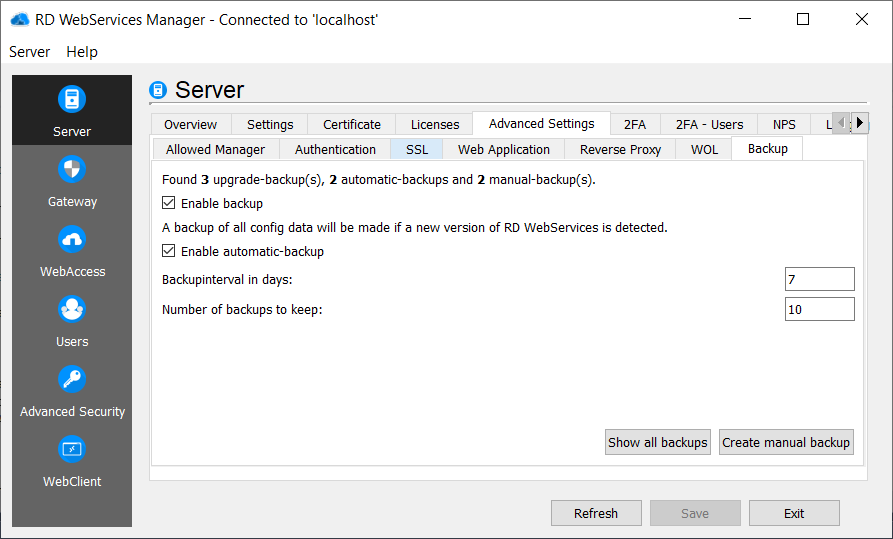
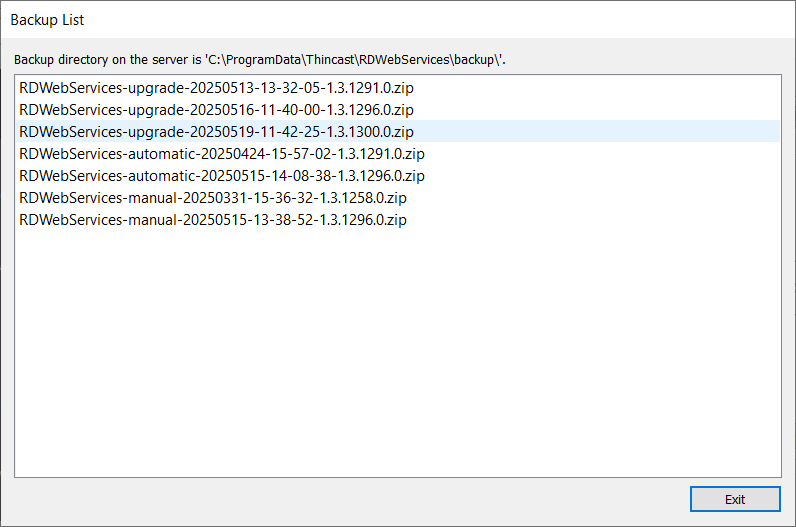
Show all backups
Lists all backups and the backup-location.
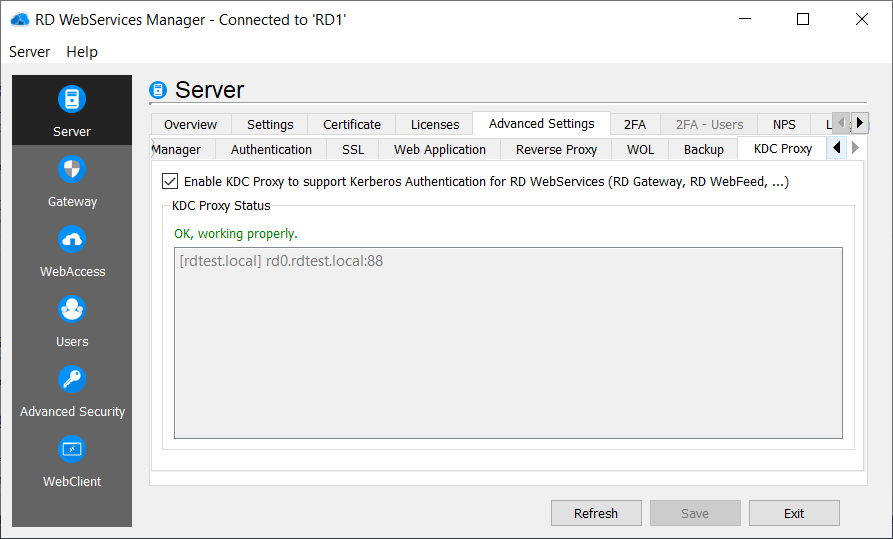
KDC Proxy
Prerequisites: KDC Proxy support requires a domain-joined Windows host. Additionally, the RDP client must support Kerberos authentication for RD Gateway connections. At present, only
mstsc.exe(Remote Desktop Connection) implements this capability, and it must also be executed from a domain-joined machine.
To authenticate against RD Web Services using Kerberos — distinct from Kerberos over NLA for the target terminal server — a KDC Proxy must be deployed. This is necessary because mstsc.exe expects the RD Gateway host to act as its KDC proxy when obtaining Kerberos service tickets for the RD Web Services HTTP endpoint. Without a KDC Proxy in place, the client will silently fall back to NTLM authentication, even when direct line-of-sight to a domain controller exists.
When the KDC Proxy is enabled, its operational status is displayed as shown in the screenshot below. Any configuration or connectivity errors are reported directly in the status view. The list also enumerates all KDC hosts discovered for the current domain.
Two-Factor Authentication (2FA)
RD WebServices supports two-factor authentication, using the Thincast Authenticator App available for Android and iOS.
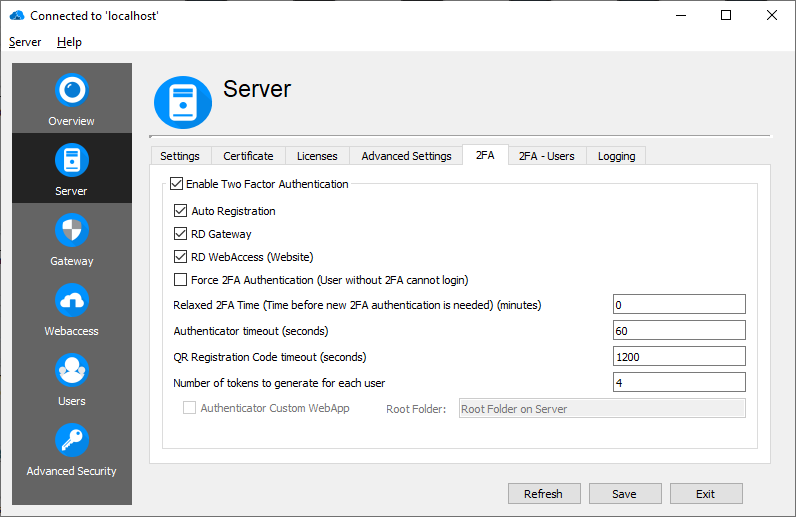
Enable Two-Factor Authentication
Enable Two-Factor Authentication support.
Auto Registration
The Auto Registration mode allows users to register an authenticator without using a token, only using username and password. The Auto Registration mode allows to register only one device without a token and only if the user was not registered before. Use the Auto Registration Mode with care.
RD Gateway
Enable two-factor authentication support for RD Gateway. If enabled (and a two-factor authentication user was created or 'Force 2FA Authentication' is set) users have to confirm each login to the RD Gateway. If the user denies the confirmation or the confirmation request times out, the RDP connection is disconnected.
RD WebAccess (Website)
Enables two-factor authentication support for the RD WebAccess Website. If enabled (and a two-factor authentication user was created or Force 2FA Authentication is set), users have to confirm each login to the RD WebAccess website.
Force 2FA Authentication
Forces all users to use two-factor authentication. If there is no 2FA-User created, access will be denied. If 2FA is disabled, users without 2FA-User can log in without passing the Thincast Authenticator.
Relaxed 2FA Time
If a user has successfully authenticated with the Thincast Authenticator (2FA), authentication with the Thincast Authenticator is only necessary after the Relaxed 2FA Time expires. The maximal Relax Time is twelve hours (720 minutes) and setting the time to 0 disables the relaxed behaviour.
For example, if the Relaxed 2FA Time is set to 60 minutes (one hour), users do not need to do a 2FA authentication with the Thincast Authenticator after the first successful authentication for one hour. After that another 2FA authentication is necessary.
Authenticator timeout
Defines the period of validity for an authentication request. If the authentication request times out, login will be denied.
QR Registration Code timeout
Defines the period of validity for a created QR Registration Code in the QR Client WebApp and the RD WebServices Manager. If the period of validity is over, the QR code can not be used for registering a new Thincast Authenticator App anymore.
Number of tokens to generate for each user
Defines the number of registration tokens which will be created for each user if a user is newly created or if a new set of tokens is requested through the RD WebServices Manager.
Authenticator Custom WebApp
Thincast RD WebServices comes with an integrated web application to allow input-less registration of a Thincast Authenticator App after logging in to the webapp and scanning the generated QR code with your Thincast Authenticator App. By providing the web application sources, you can customize the web application and adapt it for your clients.
By default, the integrated web application will be displayed. In case you want to deliver your customized version of the web application, do the following:
- Tick the checkbox "Authenticator Custom WebApp".
- Specify where the folder is on your system (e.g. C:\temp\webapp-external-qrclient).
- Click on "Save".
You can find the source code (webapp-external-qrclient.zip) in the direcotry
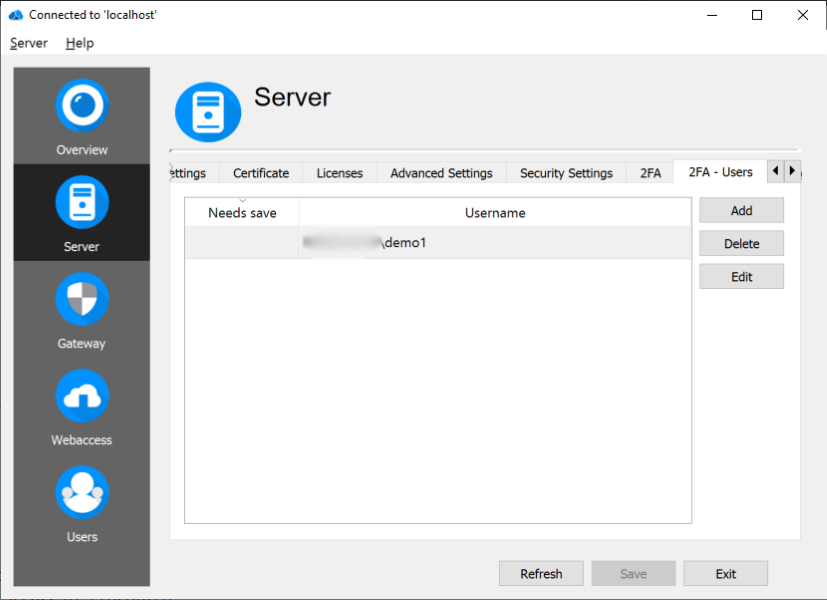
Two-Factor Authentication Users (2FA-Users)
To use two-factor authentication a 2FA-User is required for each user. If no 2FA-User is defined, that user can not login if two-factor authentication is required (Force 2FA Authentication is enabled). Users with temporarly disabled 2FA will be marked yellow.
Edit 2FA-User
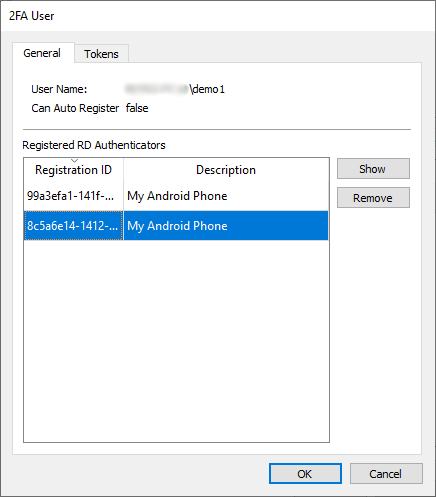
Display details about the 2FA-User like 'username' (with domain) and if the user is still allowed to use the auto registration feature. Also, all registered Thincast Authenticator apps are listed. To temporarily disable a Thincast Authenticator, select the time range and press 'Disable 2FA'. The 2FA authentication will be automatically enabled after the selected time is over. If the RD WebServices Server restarts, any temporarily disabled 2FA users are reset and require 2FA authentication again.
Click 'Show' to display the currently selected Thincast Authenticator registration.

Tokens
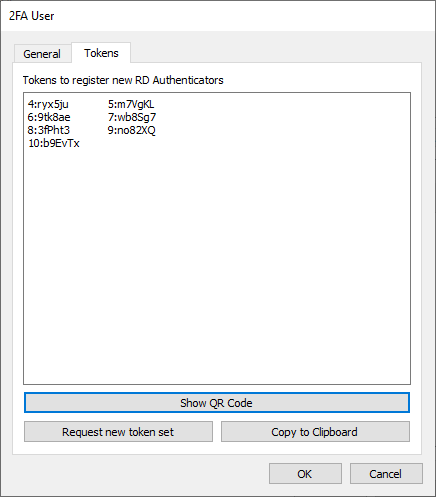
The 'Tokens' tab displays the currently active token set. Used tokens are removed from the token set automatically and therefore only usable tokens will be displayed.
An RD WebServices Administrator can generate tokens in behalf of the user to register a bunch of Thincast Authenticators for example if a bunch of new phones are prepared for employees.
Therefore, click Show QR Code and select the token which you want to use for generating the QR image.
If a token set is used up or got out of hand, a new set of tokens can be generated by clicking 'Request new token set'. After that it's important to save the configuration, because the new token set is generated by RD WebServices.
To copy the whole token set into the clipboard, click Copy to Clipboard.
Network Policy Server (NPS) with RD Gateway or RD WebClient
Network Policy Server (NPS) is Microsoft’s RADIUS server implementation, commonly used to centralize authentication, authorization and accounting (AAA) for network access — including Remote Desktop Gateway (RD Gateway) connections.
When NPS is used in conjunction with RD Gateway, the authentication process works differently compared to typical RADIUS use cases. RD Gateway handles the user’s authentication internally before it contacts the NPS server.
As a result, the RADIUS packets sent from RD Gateway to NPS do not contain any user password or other authentication information. The packets only include connection attributes such as the username, client IP, requested resource, and other metadata required for NPS to apply authorization policies.
This is an important distinction from other RADIUS scenarios (like VPN or wireless), where the RADIUS protocol may carry password-related data — whether obfuscated or in the form of a challenge-response. With RD Gateway, the password is never part of the RADIUS flow.
NPS Server configuration
Use Host, port and secret to specify the NPS Server which should be used as RD Gateway/RD WebClient NPS server (remember the radius packet contains no password and the NPS server has to support this use-case). It is also possible to change the default timeout (60 seconds).
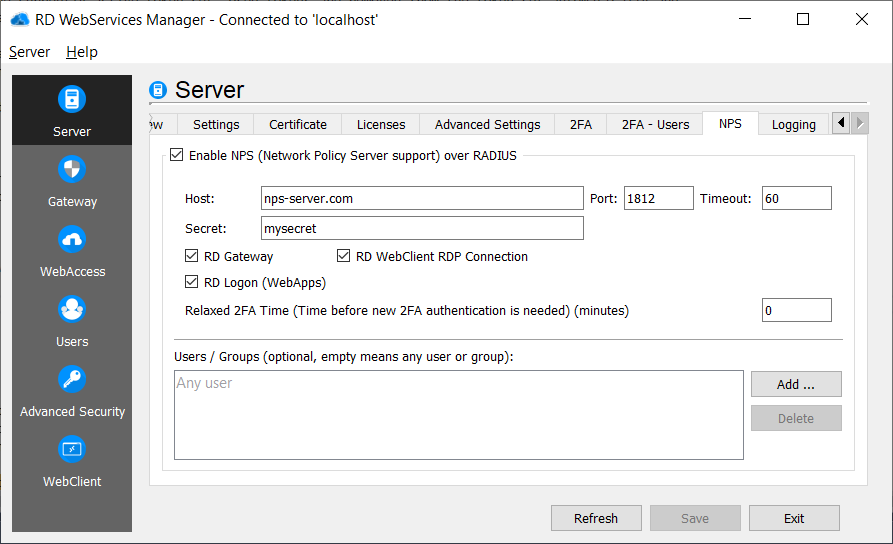
It is also possible to disable the NPS authentication for some parts of RD WebServices:
- RD Gateway
- RD WebClient connections
- RD Logon (Authentication for all webapps)
Relaxed 2FA Time
If a user has successfully authenticated with the Thincast Authenticator (2FA), authentication with the Thincast Authenticator is only necessary after the Relaxed 2FA Time expires. The maximal Relax Time is twelve hours (720 minutes) and setting the time to 0 disables the relaxed behaviour.
For example, if the Relaxed 2FA Time is set to 60 minutes (one hour), users do not need to do a 2FA authentication with the Thincast Authenticator after the first successful authentication for one hour. After that another 2FA authentication is necessary.
Users / Groups
NPS authentication is done for all users/groups if no users/groups are specified. Often it is sufficient to do the extra NPS authentication only for specific users or groups (For example the 'Remote Desktop Users'). Just add the desired users/groups and the NPS extra authentication will only be done for these users or if the user is member of a specified group.
Logging
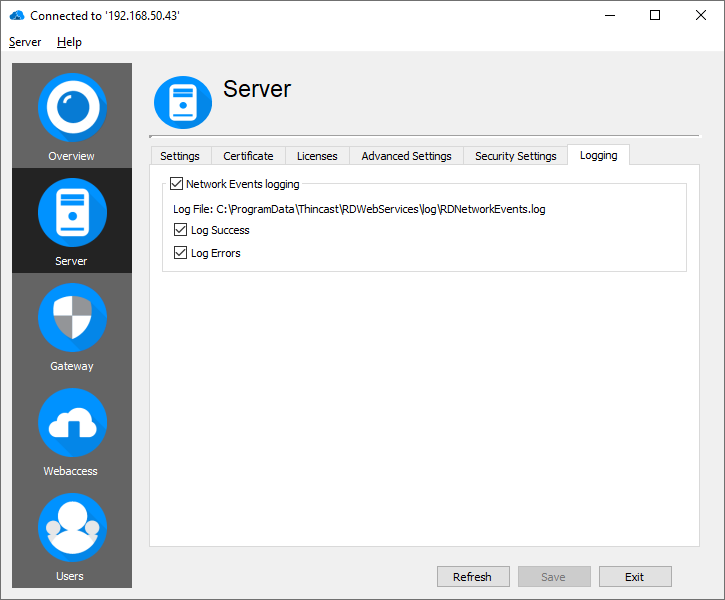
Network Events logging
To use tools like fail2ban or similar to prevent Brute-Force attacks, RD WebServices writes logs for each access to a resource or each authentication. It's also possible to log only errors or successful access to a resource.
Network Events log format
The logfile uses the comma-separated values (csv) format.
The following values are logged:
- time : The time of the event.
- event type: The event type, like 'ERROR' or 'OK'.
- module: The module which created this log entry.
- clientIP: The client IP address.
- username: The authenticated username, if available.
- status: The status code, which led to the result of the request.
- url:The request URL.
Example logfile:
time,event type,module,clientIP,username,status,url
2021-Jul-26 11:14:37,OK,http,192.168.50.43,,200 OK,/webaccess/index.html
2021-Jul-26 11:14:38,OK,http,192.168.50.43,,200 OK,/webaccess/webaccess.css
2021-Jul-26 11:17:38,OK,auth-basic-thrift,192.168.50.43,demo1,SUCCESS,-
2021-Jul-26 11:27:41,ERROR,http,::1,-,404 Not Found,/webaccess/index.html.test
2021-Jul-26 11:28:14,ERROR,auth-basic-thrift,::1,notauser,1326,-
Gateway
In this chapter we will walk through a typical RD Gateway configuration.
Using the RD Gateway Manager tool, the RD Gateway can enforce client policies to restrict which users are allowed to connect. You can also enable or disable specific device redirection in the client policies.
Furthermore, Server policies provide restrictions based on group membership. These restrictions allow to manage access to network resources.
Overview
In the RD Gateway overview tab you will see all status information about your RD Gateway server, such as:
- Total number of connections
- Number of connected users to RD Gateway
- Number of resources that these users are connected to
- Number of configured policies

Authorization policies
RD Gateway uses authorization policies to control remote user access and remote connections to internal network resources behind your firewall:
- Client policies
- Server policies
A Client policy specifies who is authorized to make a connection, and a Server policy specifies to which network resources authorized users may connect.
RD Gateway will evaluate the configured policies in ascending order. If the first criteria is not met, RD Gateway will evaluate the second policy, etc. until one policy fits. If none of these settings is met, the remote access is denied.
If you want to delete or edit any of the existing policies (Client or Server), right-click in the context menu and select 'Delete' or 'Edit'.
Client policies
Client policies allow the administrator to specify connection criteria that have to be met to connect to the RD Gateway server:
- Define the user- and computer-groups who are allowed to establish connections to the RD Gateway.
- Disable/restrict device redirection for specific client devices.
By default, one policy is preconfigured to allow all users (i.e., user-group) to access the internal network. It is likely that you will want to narrow the scope of access for production environments.
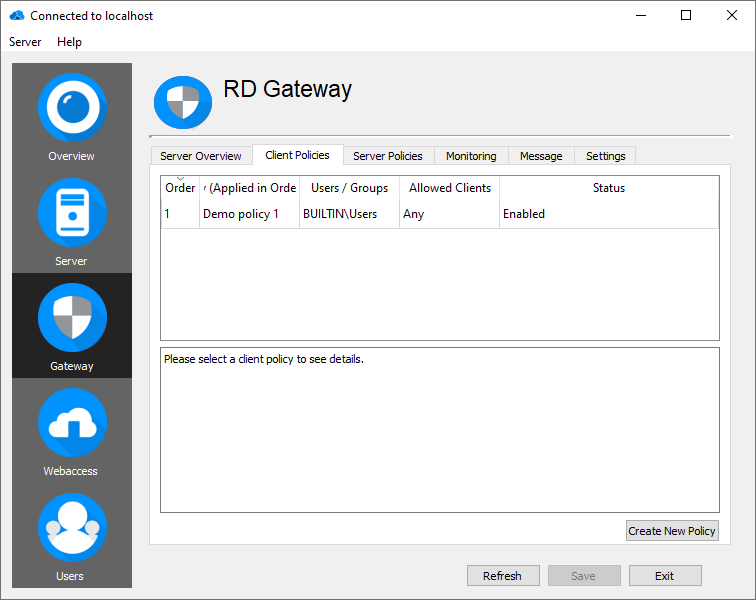
Create a Client policy:
In the "Client Policies" tab you will find the Create New Policy button at the bottom right.
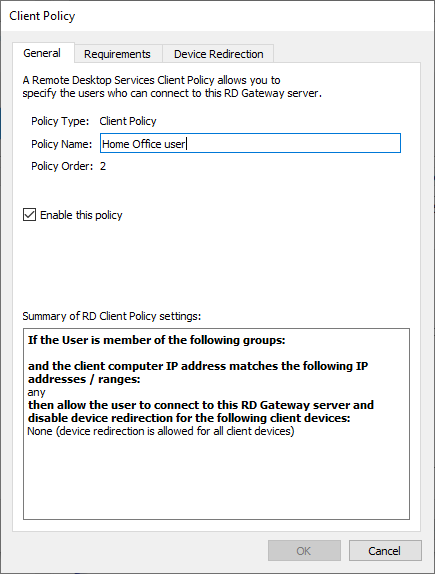
A Client policy is divided into 3 sections:
- General
- Requirements
- Device redirection
Once the policy configuration is done, click "OK" to enable the new policy.
General
Specify the name of the new policy – in our example, "Home Office Users".
You can also enable/disable the policy and find a summary of the Client policy here.
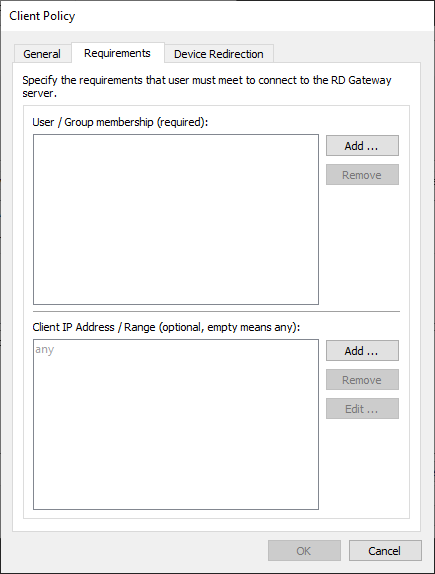
Requirements
-
User-group membership (required)
Add the users or user-groups that are allowed to use internal resources. To specify a user-group (i.e., which members can connect to the RD Gateway), click "Add Group".
-
Client computer IP addresses
Specify the client’s computer IP address/range to allow or restrict access to RD Gateway for specific IP addresses.
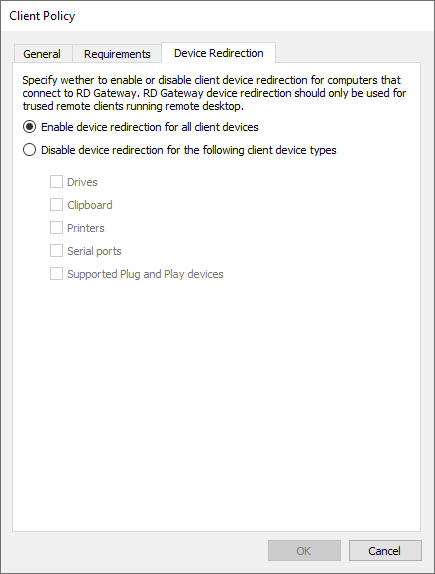
Device redirection
Enable or disable client device redirection for computers that connect to the RD Gateway.
You can choose between the following settings:
-
Enable device redirection for all client devices.
-
Disable device redirection for all client devices except for smart card.
-
Disable device redirection for specific client device types (select separately between Drives, Clipboard, Printers, Serial Ports and Supported Plug and Play devices).
Note: The device redirection settings provided here are only recommendations from the server to the clients which might be ignored or not fully enforced by the client software!
Server Policies
Server policies allow to specify the internal network resources (remote desktop hosts, computers, etc.) that remote users can connect to through the RD Gateway:
- Define which user-groups can establish connections to specific RDP-enabled hosts in your private network.
- Restrict access to specific ports (e.g. 3389).
By default, one policy is already preconfigured to allow all users to access the internal network on all ports. It is likely that you will want to narrow the scope of access for production environments.
An example for a Server policy would be:
You might specify that external employees (members of group "External") may only connect to terminal server 1, while internal employees (group "Internal") might access terminal server 2.
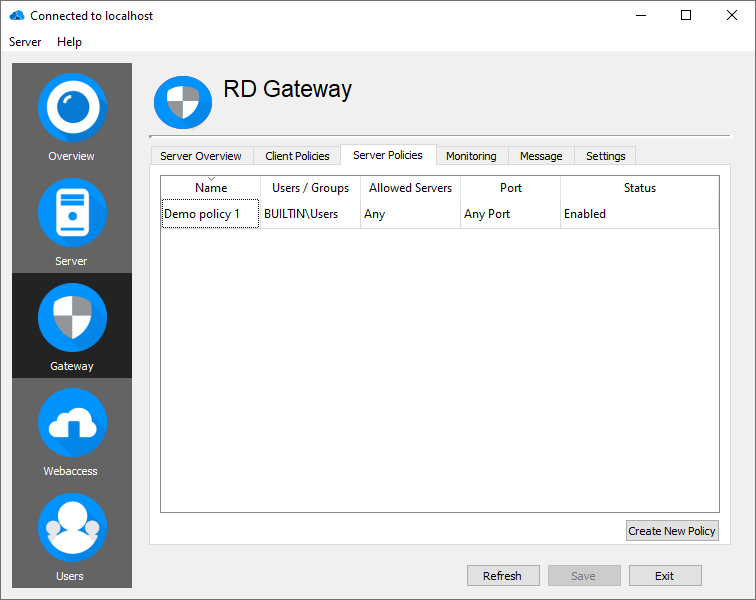
Create a Server policy:
In the "Server Policies" tab you will find 'Create New Policy' on the bottom right.
A Server policy is divided into 4 sections:
- General
- User / Groups
- Address / Range
- Allowed Ports
Once configuration for the policy is completed, click "OK" to enable the new policy.
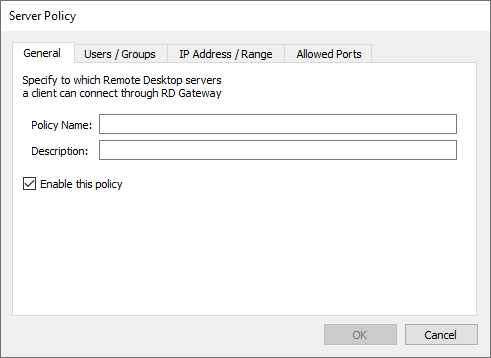
General
Specify the name of the new policy and add a description.
You can also enable/disable the policy and find a summary of the Server policy here.
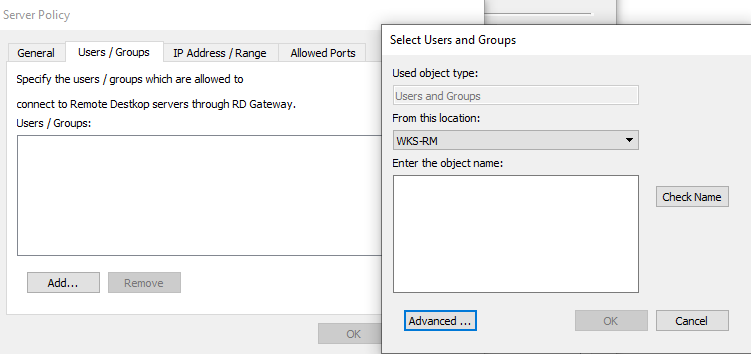
User / Groups
A Server Policy is applied to user-groups. To add a user-group, click 'Add Group'.
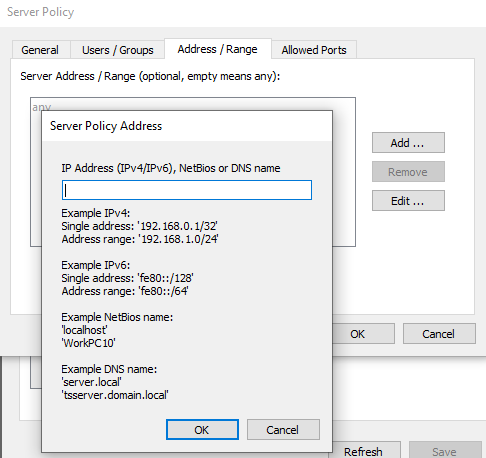
Address / Range
Specify the server computer IP address(es)/range to which this Server policy should apply. Click "Add Address" and enter either a single host (as IP address with a host range, NETBIOS name or DNS name) or a range of IP addresses (as IP address with a range).
Example: Suffix "32" specifies one specific host
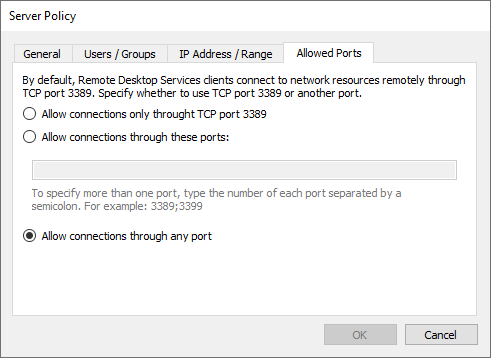
Allowed Ports
By default, remote desktop clients connect to network resources remotely through TCP port 3389. Specify whether to use the default RDP port or a different one.
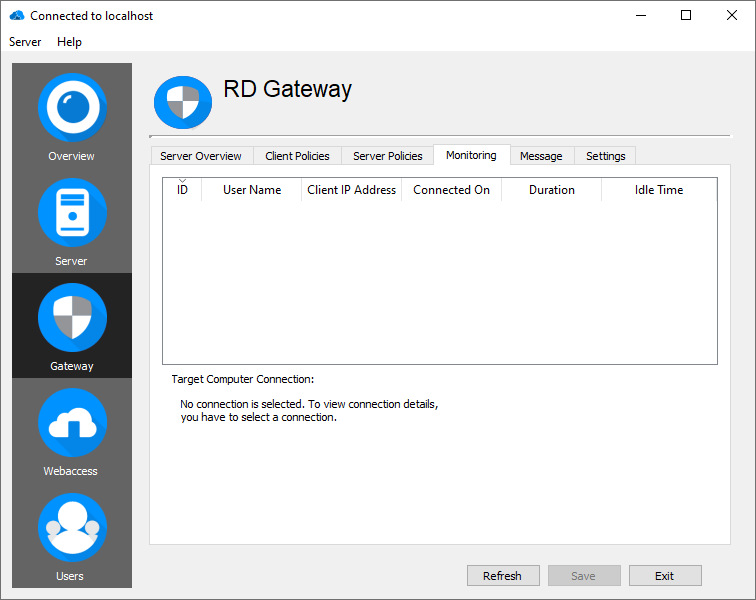
Monitoring
Live monitoring
To observe all active connections using the live monitoring of RD Gateway, switch to the tab called "Monitoring".
The following connection details can be observed:
- ID
- User Name
- Client IP Address
- Connected On
- Duration
- Idle Time
Disconnect a session/user
To disconnect a session/user, select the session, right-click and choose from the context menu:
- Disconnect this session
- Disconnect this user
Settings
Only allow connections from clients that support Remote Desktop messaging
Enabling these settings will check if Remote Desktop Messaging is supported by the Remote Desktop Client in use, otherwise the connection will be rejected by the RD Gateway.
To enable this setting tick the checkbox "Only allow connections from Remote Desktop clients that support Remote Desktop messaging" and click on "Save".
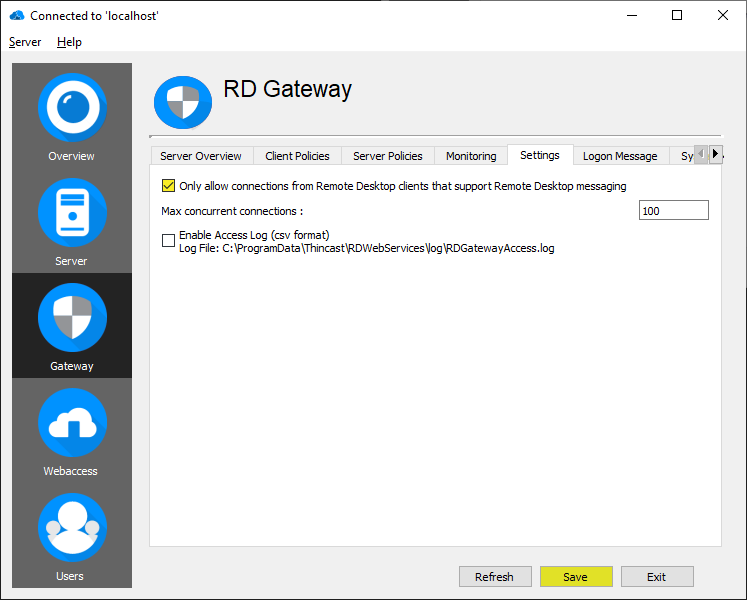
Limit the number of concurrent connections
RD Gateway accepts the number of connections limited by the installed License. But, you can also limit the maximum number of concurrent connections here.
Access log
To enable the access log, tick the checkbox and click "Save".
By default, the log file is located under:
- Windows: C:\ProgramData\Thincast\RDWebServices\log\RDGatewayAccess.log
- Linux: /var/log/rdwebservices/RDGatewayAccess.log
Windows Event Access log (Windows only)
To enable the access log in the Windows Event Log, tick the checkbox and click "Save".
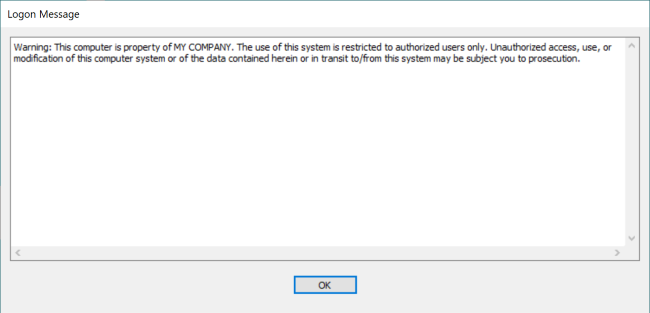
Logon banner message
Logon message
Create a message, such as a legal notice, to display to users each time they log on to a remote computer:
- Enter log on message.
- Click "Save".
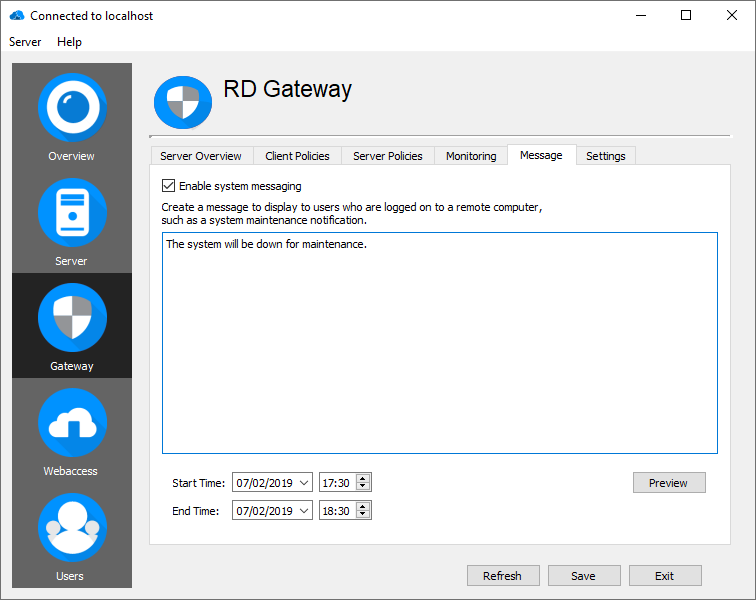
System Message
Create a message to display to users who are logged in to a remote computer, such as system maintenance notification. Note: Not all Remote Desktop clients support such messages.
- Enable system messaging.
- Enter system message.
- Specify start time / end time for this message.
- Click "Save".
Webaccess
Remote Desktop WebAccess (RD WebAccess) allows authorized users to remotely access their Windows apps and desktops on their device of choice through the internet. It provides each user with a customized view of all resources that have been published to that user.
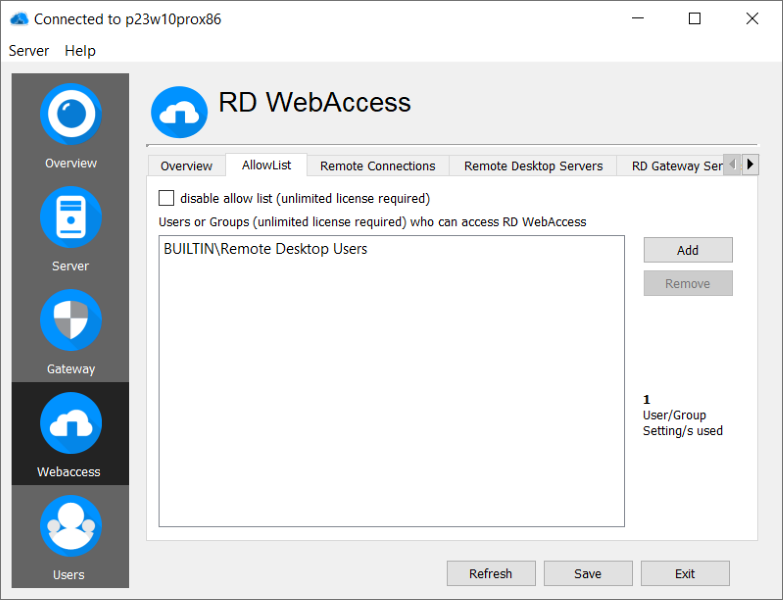
Allow-List
When using RD WebAccess with a "Basic" and "Standard" license, the users or groups must be individually pre-selected and given access. Whitelisting is mandatory here!
In the "Pro" version of RD WebAccess this is optional, but you can still specify and whitelist users and groups for access.
WebAccess Settings
RDP Signing
RD WebAccess has built-in support to distribute signed RDP files.
If enabled, the installed certificate is used to sign your distributed remote desktop resources. By signing RDP files with trusted certificates, the client verifies that important settings have not changed since the creation of the RDP file.
This enables clients to recognize your organization as the source of the remote resource, and allows them to make more informed trust decisions about whether to start the connection.
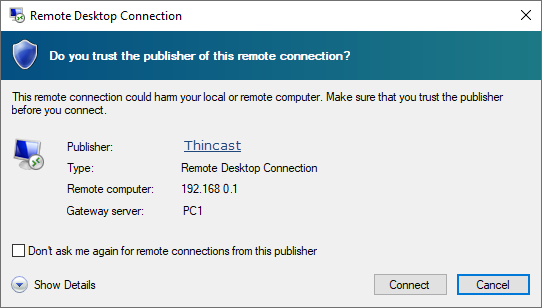
To enable the distribution of signed RDP files through RD WebAccess please tick the checkbox "Sign all generated RDP Files" and click "Save".
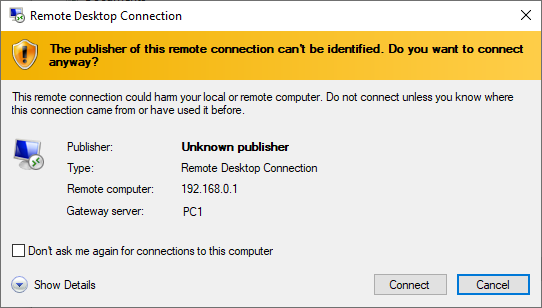
In case a client opens an RDP file which has not been signed, a warning message, saying that the publisher of this RDP file is not trusted, will be displayed.
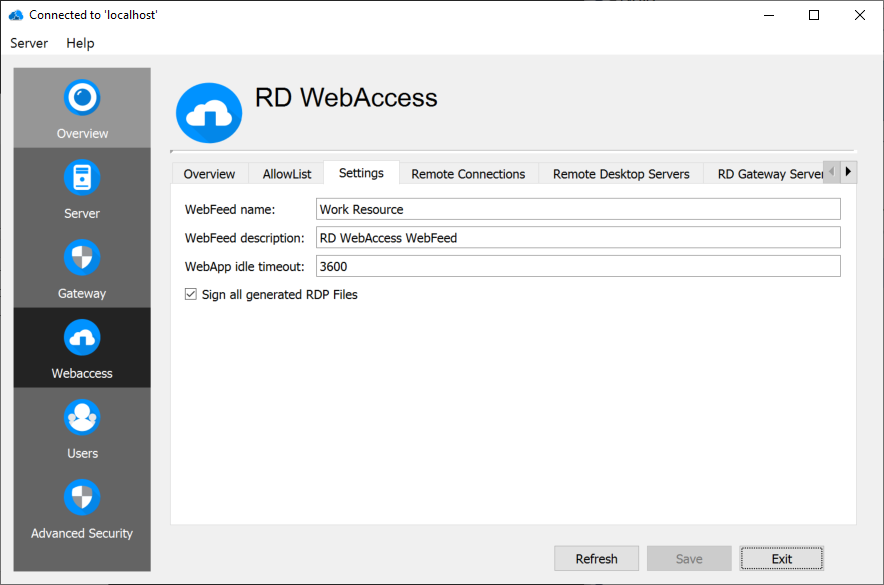
WebFeed name and Description
Configure the RD WebFeed name and description. The usage of these attributes highly depends on the WebFeed client.
- The Microsoft RD WebFeed client integrates the RDP connections in the Windows start menu and uses the RD WebFeed name as sub menu name and appends it in brackets behind the actual connection name.
- The Thincast RD WebAccess client uses the RD WebFeed name in the headline of each RD WebFeed connection.
WebApp idle timeout
Sets an idle timeout after which the user gets logged out. Setting the idle timeout to 0 disables the idle logout.
Disable WebAccess WebApp
If the RD WebAccess WebApp is not used, you can disable the web application including all its handlers here.
Custom WebAccess WebApp
Thincast RD WebServices comes with integrated web applications. By providing the web application sources, you can customize the web application and adapt it for your clients.
By default, the integrated web application will be displayed. In case you want to deliver your customized version of the WebAccess web application do the following:
- Tick the checkbox "WebAccess custom WebApp".
- Specify where the folder is on your system (e.g. C:\temp\webaccess-webapp-external).
- Click on "Save".
You can find the source code (webapp-external-webaccess.zip) in the direcotry
Import certificate (required for self-signed certificates)
In case you have used a self-signed certificate for signing your RDP files, the client needs to validate the server certificate. Therefore, the client must have the used certificate installed in its "Trusted Root Certificate Store".
Publish resources
In this chapter you will learn how to publish customized views of remote applications and full desktop experiences for individual users or user-groups and assign them to Remote Desktop servers.
Depending on your users' needs, you can choose between publishing a full desktop experience or a remote application:
Desktop
Provide a fully managed desktop solution to your end users. This allows IT to control everything, from the application installs to the security policies, and even where the data is stored.
RemoteApp
RemoteApp delivers only the specific application to the end user device. The application still "runs" on the Terminal server, but appears as if it is running directly on the user's device.
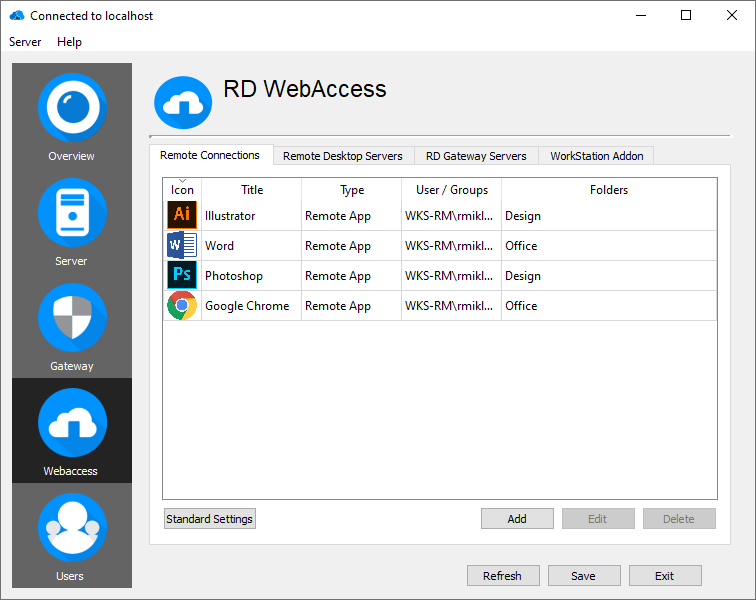
A typical example for RD WebAccess could be:
All members of the user-group "Sales" will find their sales application in their webfeed which runs on the internal Remote Desktop server ("192.168.0.3")
In this case, we have to add a remote app resource for the sales application. Additionally, we have to add the Remote Desktop server ("192.168.0.3"), where the application is installed.
Remote connections
This section allows preconfiguring remote connections (downloadable RDP files), adapted to users' needs.
To add a resource click "Add" in the Remote Connection tab.
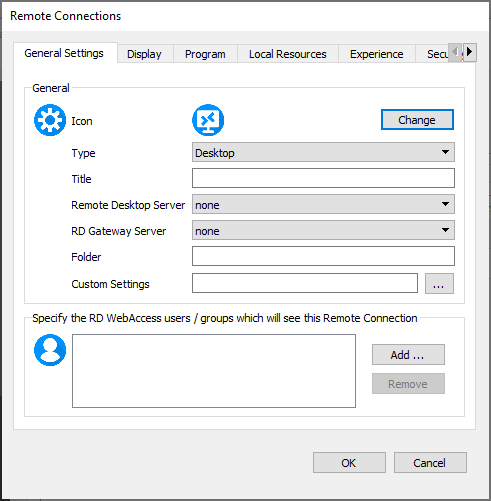
General Settings
| Setting | Description |
|---|---|
| Icon | Specify the application icon |
| Type | Specify if RemoteApp or Desktop |
| Title | Title of resource |
| Remote Desktop Server | Select the destination host |
| Folder | Specify a folder |
| Custom Settings | Add specific custom settings to your resource |
Icon
Select the icon to use for this remote connection (RDP file).
Type
From this list, you can choose the type of connection you want to establish. This can be either a full desktop session or a seamlessly integrated remote application.
Title
Title of the resource is shown in all clients as the name of the remote connection (RDP file).
Remote Desktop Server
Select a previously defined Remote Desktop server or create a new one.
Folder
If supported by the RD WebAccess client, the resources are grouped and displayed in folders.
Custom Settings
It is possible to specify custom RDP file settings. These settings are added to the generated RDP file.
Display
The display settings are only available if you have selected Desktop as connection type.
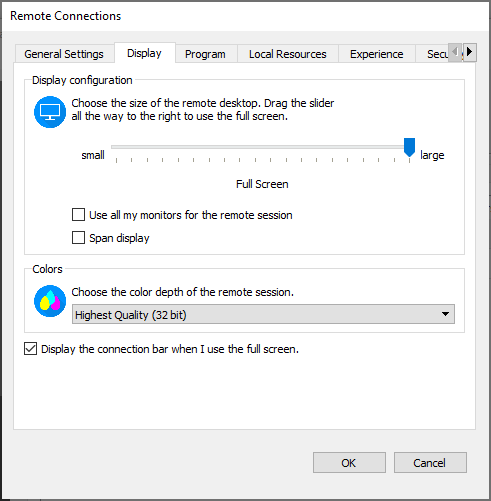
Display Configuration
- The slider lets you choose the resolution of the remote desktop. If you move the slider to the far right side, the remote desktop will use the same resolution as your local desktop and the session will be displayed in full screen mode.
- If you want to use all your monitors for the remote session the application automatically uses full screen mode.
- Select Span if your target session’s desktop should become a huge rectangle that equals the whole area of your physical monitors.
Colors
Colors allow you to configure the color depth. The options are as follows:
-
High color (15 bit)
-
High color (16 bit)
-
True color (24 bit)
-
Highest color (32 bit)
Connection bar
Select if the connection bar should be displayed in the remote session when using full screen.
Program
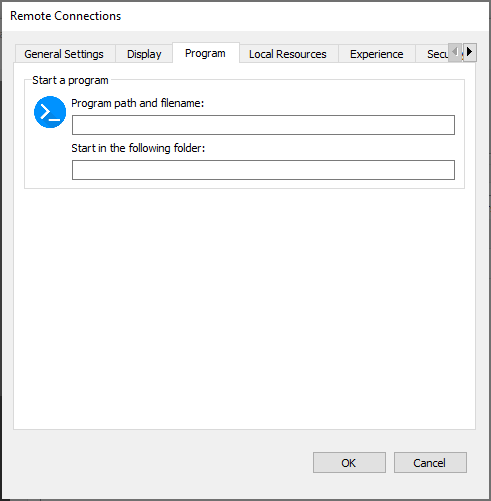
Program path and filename
Specify the path of the application that you want to launch e.g., C:\Windows\notepad.exe.
Use the following command line arguments
Depending on your application you might want to add additional command line arguments e.g., C:\data\test.txt to open a file.
Start in the following folder
Select the folder that the application should use as its working directory.
Local Resources
The Local Resources tab is an important one. It is used to configure whether resources on the client system can be accessed inside the Remote Desktop session. The configuration includes remote audio, keyboard, and local devices and resources. From a security standpoint the local devices and resources option is the most important.

Remote Audio
The remote audio option is used to configure audio playback and recording.
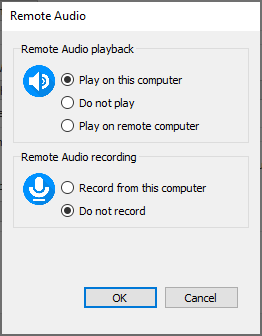
- Remote Audio Playback: Choose if audio should be played on the remote computer, local computer or be muted.
- Remote Audio Recording: Choose if you want to record audio from your local computer.
Keyboard
Lets you specify how keyboard commands like WIN or ALT+TAB will be processed. The default is to send them to the session only when the connection is in full screen mode.
Local devices and resources
You must be careful when allowing local resources to be used within a Remote Desktop session. If you enable local resources, then the server you are connecting to can gain access to resources on your system. If you do not trust the remote system, you should not redirect local resources. You can configure the following items:
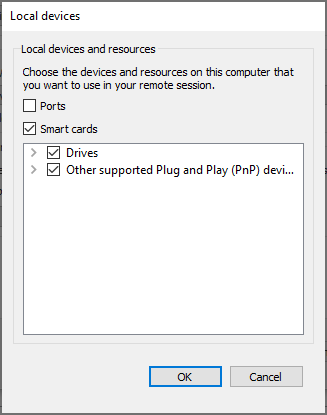
- Ports
- Smart cards
- Drives
- Plug and Play devices
One of the key items that can be configured here are disk drives. Enabling disk drives can potentially give harmful code on a remote server access to all the files on your local system. Therefore, you must be especially careful when enabling this option.
Experience
The experience tab allows you to configure options that affect the user experience.
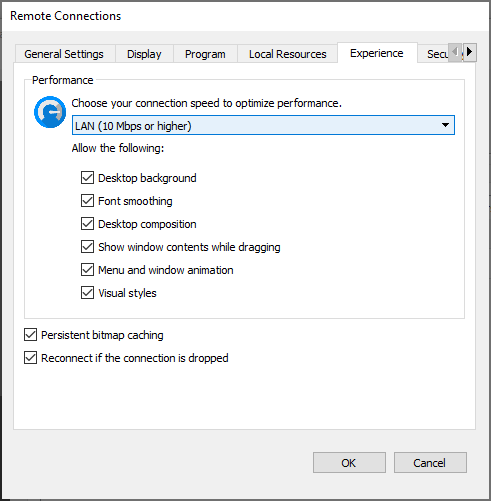
Performance
The list provides a selection of predefined profiles for different connectivity scenarios. If you do not know exactly what you are doing you should always use the default option which allows the client to automatically detect and adjust to your current network characteristics:
- Modem (56 Kbps).
- Low-speed broadband (256 Kbps – 2 Mbps).
- Satellite (2M bps – 16 Mbps with high latency).
- High-speed broadband (2 Mbps – 10 Mbps).
- WAN (10 Mbps or higher with high latency).
- LAN (10 Mbps or higher).
Based on the bandwidth option chosen, the following features will be enabled or disabled by default:
- Desktop background
- Font smoothing
- Desktop composition
- Show window contents while dragging
- Menu and window animation
- Visual styles
The 'Experience' tab also allows you to enable the "Persistent bitmap caching" and "Reconnect if the connection is dropped" options.
Security
Server authentication is used to verify that the server you are connecting to is the server you intended to connect to. Here you can configure the behavior in case the server authentication fails.
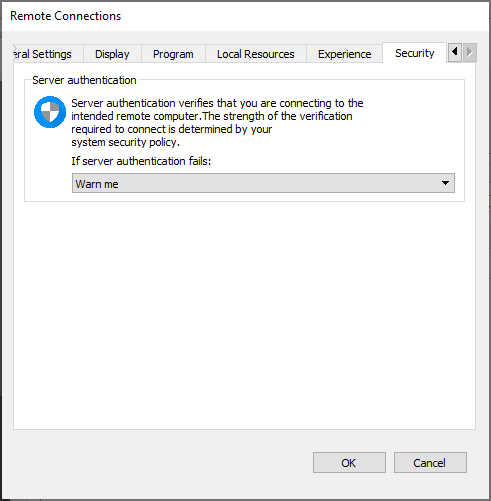
- Connect and don’t warn me: This is the least secure option. If the server authentication fails, the connection will still be made. In addition, the user will not be notified of the failure.
- Warn me: This option is more secure, and it gives the user a choice. If the server authentication fails, the user will be notified. The user can choose whether to make the connection or drop it.
- Do not connect: This is the most secure option. If the server authentication fails, the connection will not be made to the remote server.
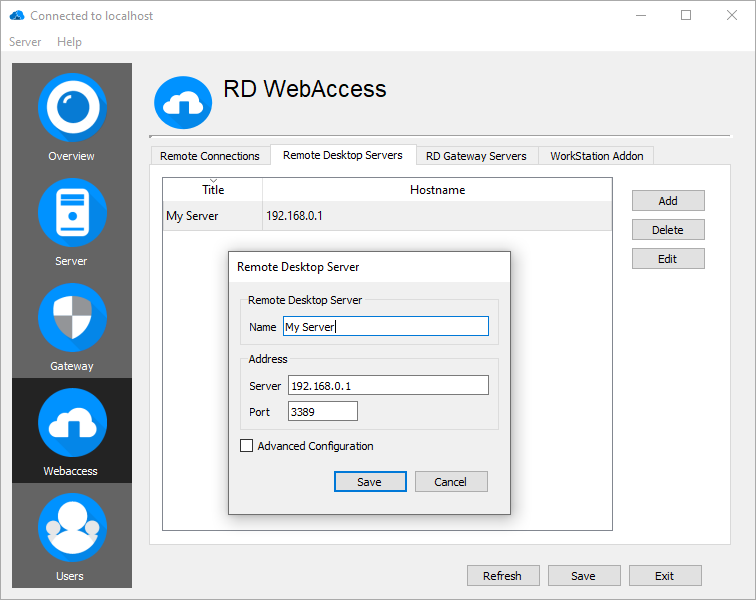
Remote Desktop Servers
This is where you specify the remote computer to which you would like to connect. You can use a NetBIOS name, a FQDN or an IP address.
Name
Specify the name of your Remote Desktop Server. This will be displayed when you assign a resource to a specific RD Gateway server.
Server
This is where you specify the remote computer to which you would like to connect. You can use a NetBIOS name, a FQDN or an IP address.
RD Gateway server
This section allows you to configure settings for using a Remote Desktop Gateway. An RD Gateway server allows you to secure Remote Desktop connections from outside your organization. The options are as follows:
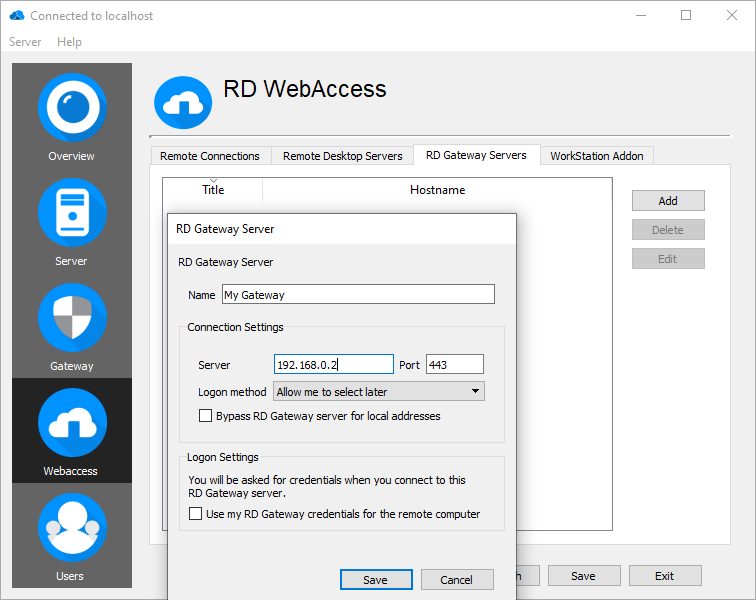
Name
Specify the name of your RD Gateway server. This will be displayed when you assign a resource to a specific RD Gateway server.
Connection Settings:
- Server name
- Logon method
- Allow me to select later
- Ask for password
- Bypass RD Gateway server for local address
Logon Settings:
- Use my RD Gateway credentials for the remote computer
RD WebClient Settings:
- If this gateway server is the same server which provides the RD WebClient application (handles the websocket connection), then it is not necessary to check the policies twice and let through the connection if the client and server policies match for that connection. The RD WebClient Server and Client policies are taken per default from the RD Gateway, but it's possible to define different policies for RD Gateway and RD WebClient.
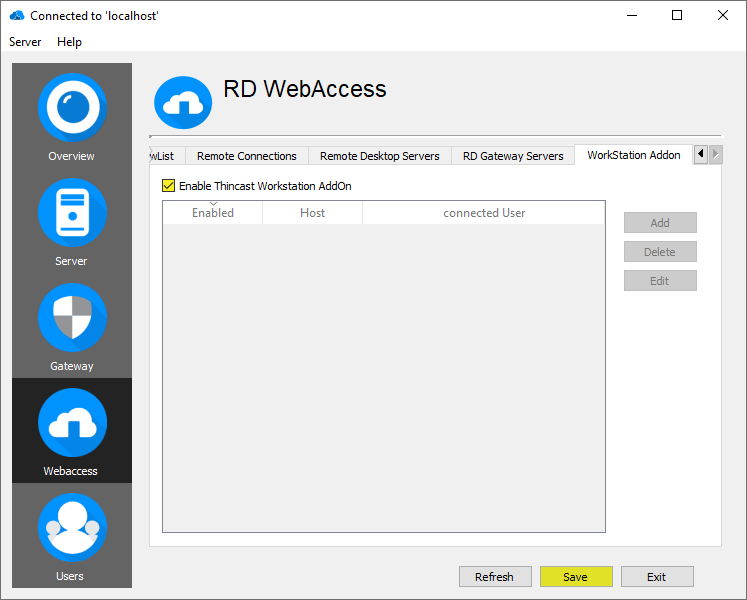
WorkStation Add On
This section allows you to use the Thincast Workstation Add On, in order to create a fine-grained and secure user access management for virtualized machines running on Thincast Workstation. The available virtual machines will show up in the webfeed or web interface of the subscribed user. It is even possible to start, stop or pause the virtual machines remotely.
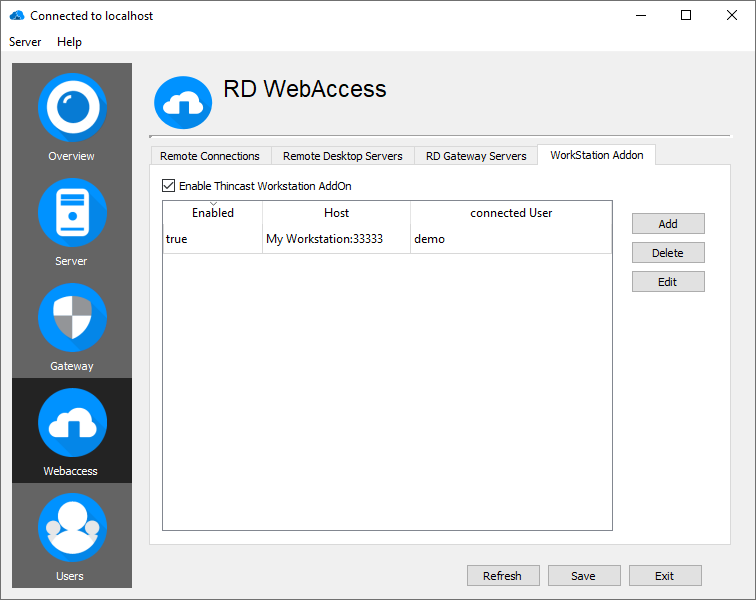
Enable Add On
To enable a Thincast Workstation instance, you need to enable the Add-On by clicking the checkbox "Enable Thincast Workstation AddOn" Then click "Save".
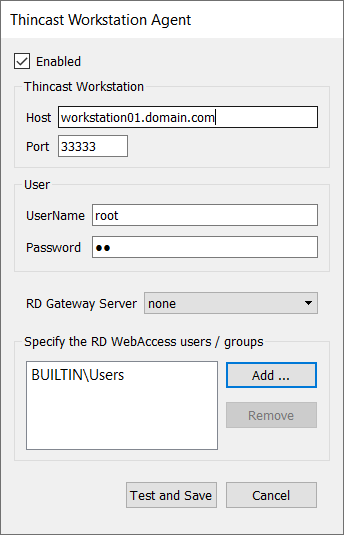
Add an instance
To add an existing Thincast Workstation instance click "Add" to open the Thincast Workstation Agent. Now specify the connection details of your Thincast Workstation instance.
Settings:
- Enabled
- Thincast Workstation
- Host
- Port (Default port is 33333)
- User
- UserName
- Password
- RD Gateway server (Default port is none)
- Specify the RD WebAccess users/groups (Default is Users)
In our scenario we would like to add one instance of Thincast Workstation and assign it to all users, which means every user in the user-group "BUILTIN/Users" should have access to the virtualized desktops.
To test the connection, click "Test and Save". The Thincast Workstation Agent will notify you if the connection settings are wrong or the instance is currently not available.
After successfully adding your Thincast Workstation instance, it will appear in the list and in the webfeed of the users after a refresh.
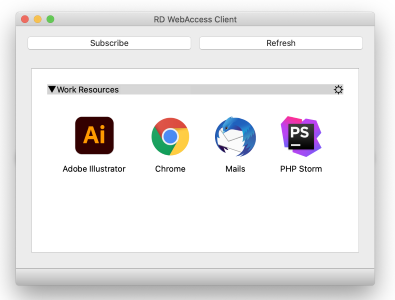
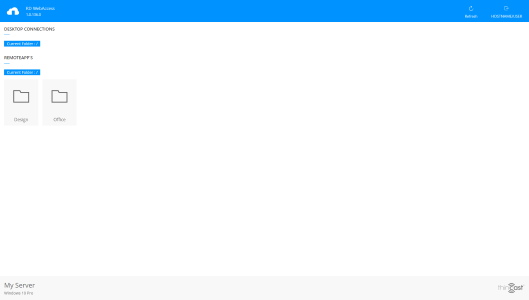
Access published resources
There are two ways users can receive published resources (RDP files):
Desktop or mobile clients
One way is through the webfeed, which is represented by a standardized XML format that the clients can parse.
Subscription to this webfeed is supported by Thincast Client or other clients, like the "RemoteApp and Desktop Connections" applet in the Windows Control Panel or the Remote Desktop Client for iOS, macOS or Android.
After the user has subscribed, the resources will automatically be added and updated in his feed.
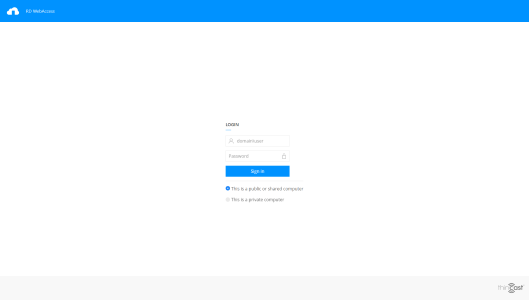
Web Application
The second way to display user's resources is through a Web browser by signing in to the website that is provided by RD WebAccess.
User Management (Linux only)
On Linux, RD WebServices uses an independent local user database for user authentication. All user and group
related settings are found in the Users pane on the left in the RD WebServices Manager.
Configure the domain
Before you can get started, a DNS and NetBIOS name needs to be configured. Both names are required for authentication and can be chosen freely:
- Open the "Domain" tab and click "Edit/Setup Domain"
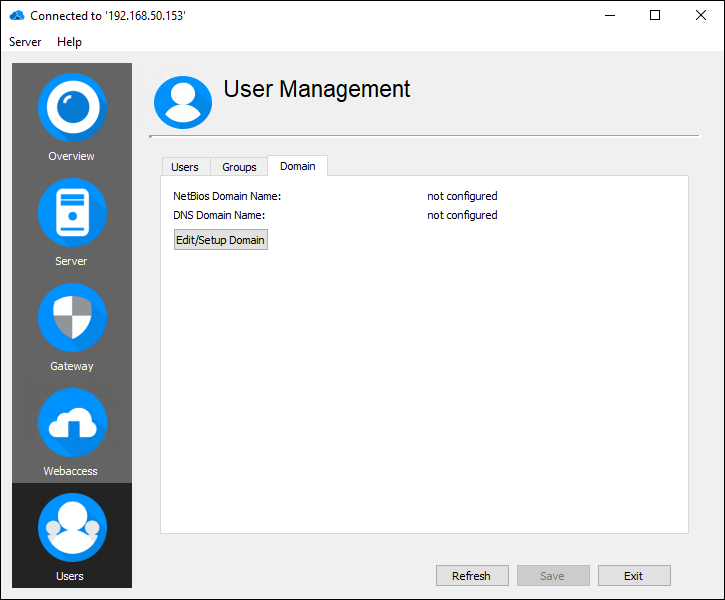
- Set the NetBIOS and DNS domain name and click "OK".
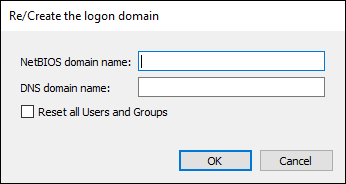
When Reset all Users and Groups is checked, all existing users and groups are deleted. This option
should be handled with care. It is not necessary if you initially setup the domain but might be
useful if you change your domain name and want to start with an empty domain.
Note: For simplicity we recommend to use a similar name for DNS and NetBIOS.
Create and manage users
In the Users tab you can manage your users.
To create a user, simply click the Add button on the right and fill out all required fields in the
dialog that is shown.
For existing users, editing or changing the password can be done by right-clicking the user.
Create and manage groups
Groups are used within RD WebServices for different purposes:
- RD Gateway
- to allow/restrict access
- for Server/Client policies
- to allow/restrict access
- RD WebAccess
- to allow/restrict access
- for resource assignment
- to allow/restrict access
- RD WebClient
- to allow/restrict access
- for Server/Client policies
- to allow/restrict access
There are two built-in groups named Users and Administrators. Users that are in the Administrators group are
entitled to manage RD
WebServices. The Users group is used for default policies and access. Newly created users are automatically added to
the Users group.
Groups are managed in the Groups tab of the Users pane.
To add a new group press the Add button on the right. Once created, you can add or remove users to
a group by editing it using the Edit button.
Set the password for the management user
Administrator is a built-in management user that cannot be removed. The user is a member of the
Administrators and Users groups.
To set the password for the Administrator user:
- In the
Userspane, go to the 'Users' tab - Right-click on the root user and choose
Set password - Once you have entered the same password twice, click 'OK'
Note: Once you have configured another user that is member of the Administrators group, the Administrator user is not needed and can be disabled.
RD Advanced Security
RD Advanced Security allows to enforce strict security policies, like controlling from where and when a client can connect to RD WebServices.
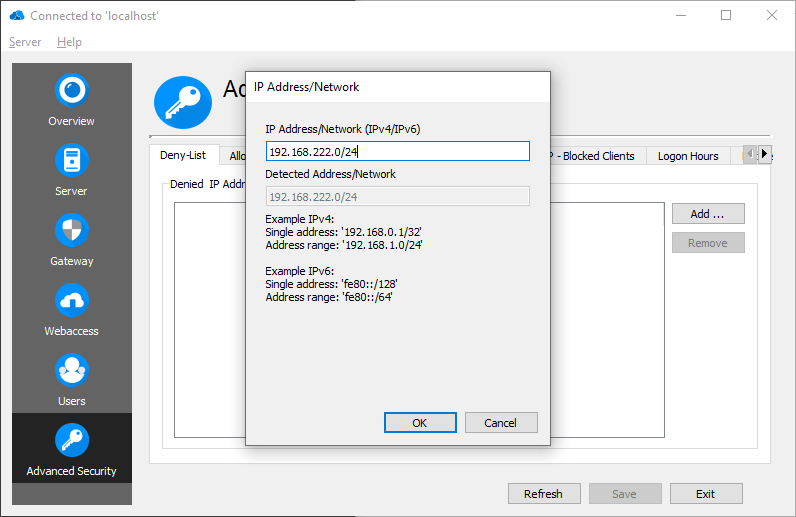
Deny-List
If there are known bad IPs (for example from an ongoing brute force attack) or subnets, it is possible to add them here. Connections from these IPs will get rejected in all cases, so no harm can be done anymore.
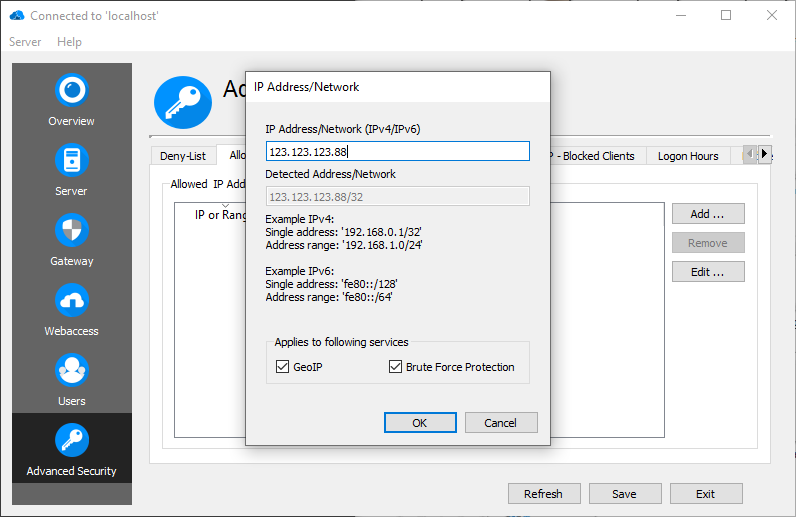
Allow-List
If an IP address is blocked because of GeoIP restrictions or an unwanted Brute Force Protection (for example a miss-configured reverse proxy, which cannot be fixed), it is possible to define an exception for an IP address or range. It is necessary to define for which service (GeoIP or Brute Force Protection) this exception applies.
GeoIP Protection
To use the GeoIP Protection a free or paid MaxMind account is required to download the GeoIP definition files and updates. The paid GeoIP database is more accurate, but in most cases the free version is enough.
The GeoIP Protection needs to be enabled to work.
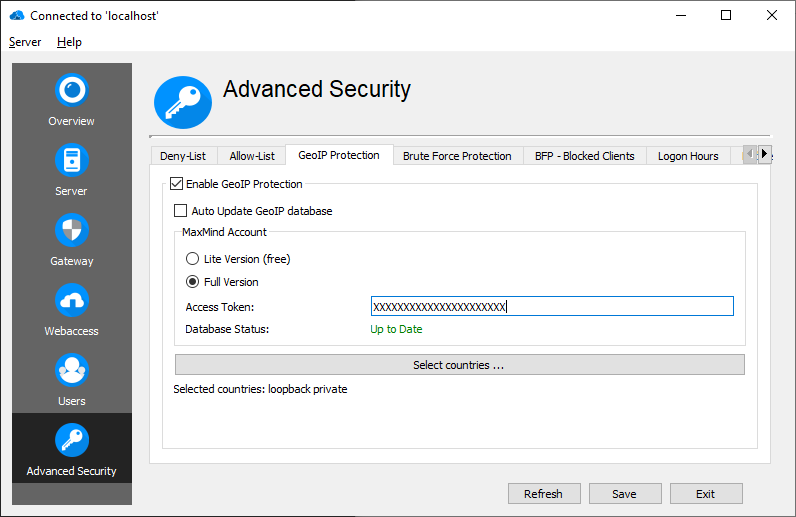
If "Auto Update GeoIP database" is checked, the GeoIP database updates are applied automatically. Otherwise, the administrator has to trigger the update manually by pressing the "Update" button, if an update is available.
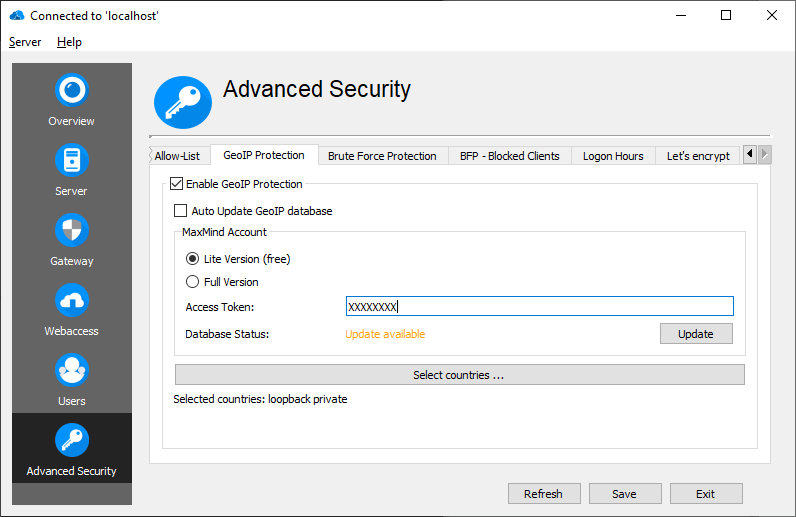
MaxMind Account
Choose your MaxMind account type. Use Lite Version (free) if a free account is used, otherwise Full Version. Next you have to generate the Access Token aka License Key in the MaxMind webinterface and enter it in the "Access Token" field.
After saving the configuration, the download of the GeoIP database should begin.
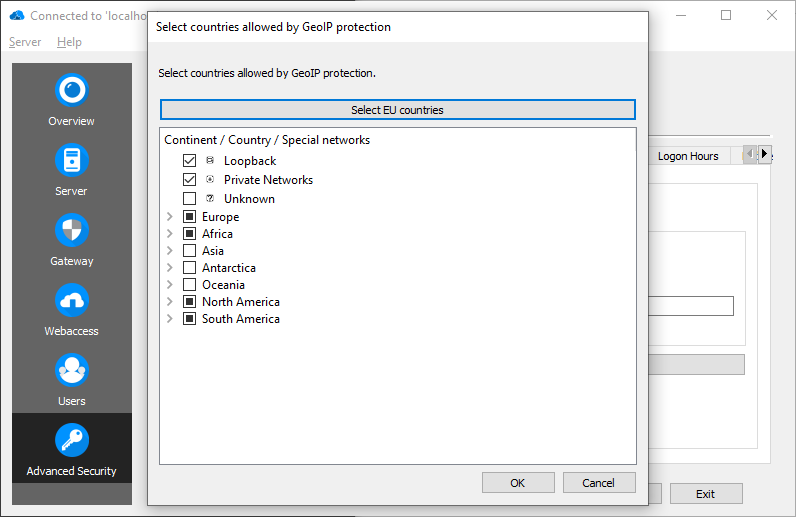
Country selection
Click "Select Countries ...." for country selection. Access is allowed from each selected country.
It is possible to select each country in the EU by clicking "Select EU countries". It is also possible to select countries by continent, using the checkbox left to the desired continent. For a more fine-grained control, each country can be selected individually.
Special networks
There are three special networks:
- Loopback, which should always be checked
- Private Networks, like 192.168.x.x or 10.x.x.x
- Unknown, if resolving to a country fails
For example if connections from a LAN network (maybe connected via VPN) should not be rejected by GeoIP Protection, the special network "Private Networks" has to be enabled.
If a reverse proxy is used, make sure the reverse proxy is added to the known reverse proxies. Otherwise, GeoIP Protection may not detect the right country.
Brute Force Protection
Enable Brute Force Protection against password guessing.
Enter the failed attempts per IP address, after which the client is blocked.
If a client is blocked, "Time before unblocking the client again" specifies the time that further connection attempts of the client are blocked/ignored. After the time has elapsed, the client might try to connect again with the defined maximum of attempts, before being blocked again.
If a reverse proxy is used, make sure the reverse proxy is added to the known reverse proxies. Otherwise, Brute Force Protection may block the whole reverse proxy.

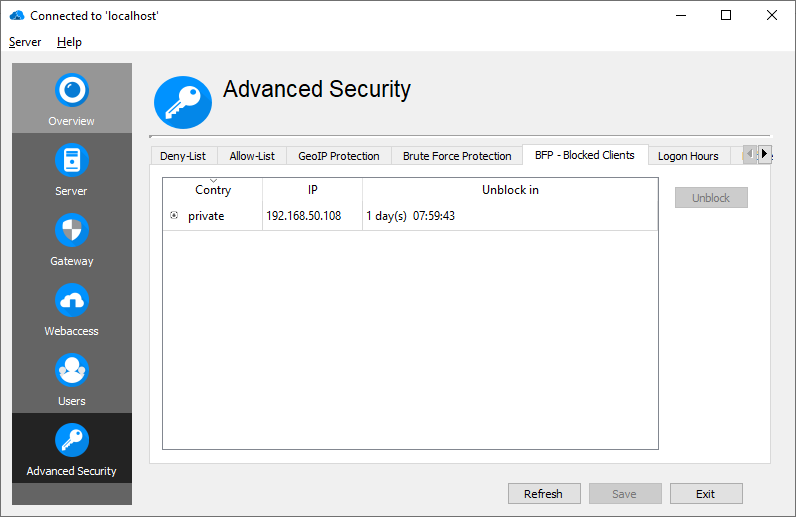
Blocked Client list
Shows the clients, blocked by Brute Force Protection.
It is possible to unblock a specific client, before the unblock timer expires, by selecting the blocked client and clicking the "Unblock" button.
Logon Hours
Enable Logon Hours to control when a user can logon and if the connection is disconnected, after Logon Hours have passed. It is possible to define Logon Hours for groups and users. If no Logon Hours are defined for a user, or a group which the user belongs to, the user is allowed to logon any time. If Logon Hours are defined for a specific user, this Logon Hours overwrite Logon Hours inherited from groups. If no Logon Hours are defined for a user, all Logon Hours of all groups the user belongs to, are merged and applied to that user.
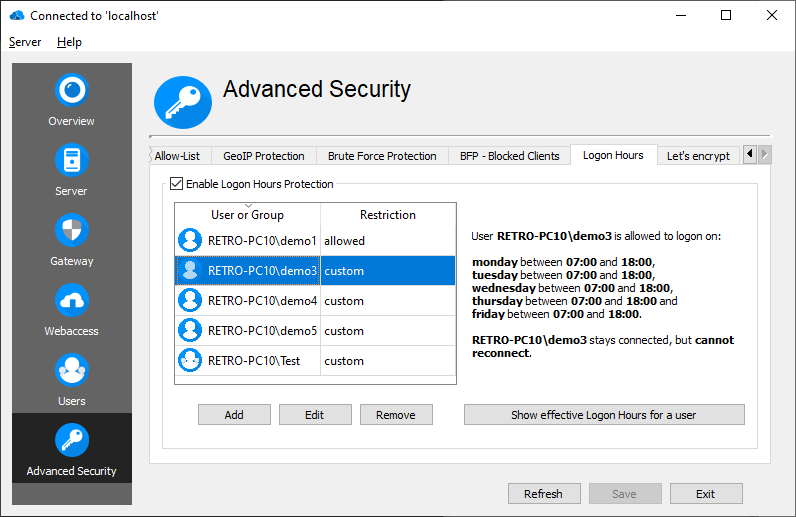
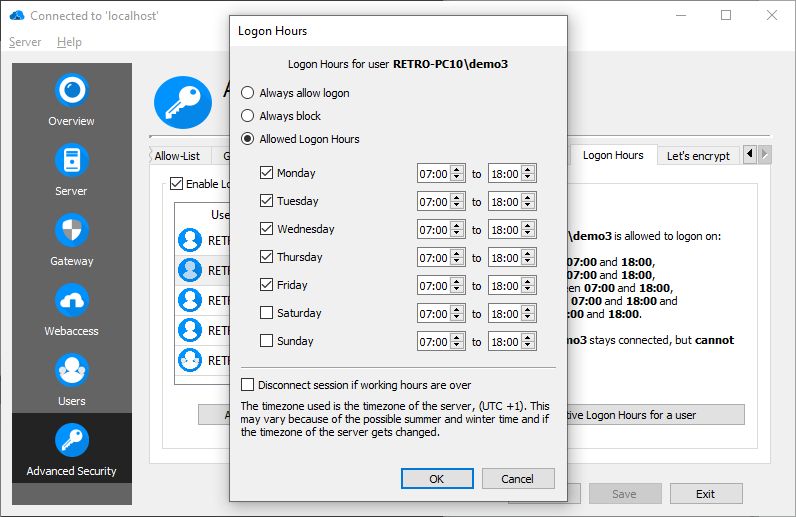
Logon Hours user / group settings
Per default, each user or group is always allowed to logon. It is possible to deny the logon for a special group or a user by selecting "Always block" or to define the allowed Logon Hours. To disconnect the user if the defined working hours are over, check "Disconnect session if working hours are over".
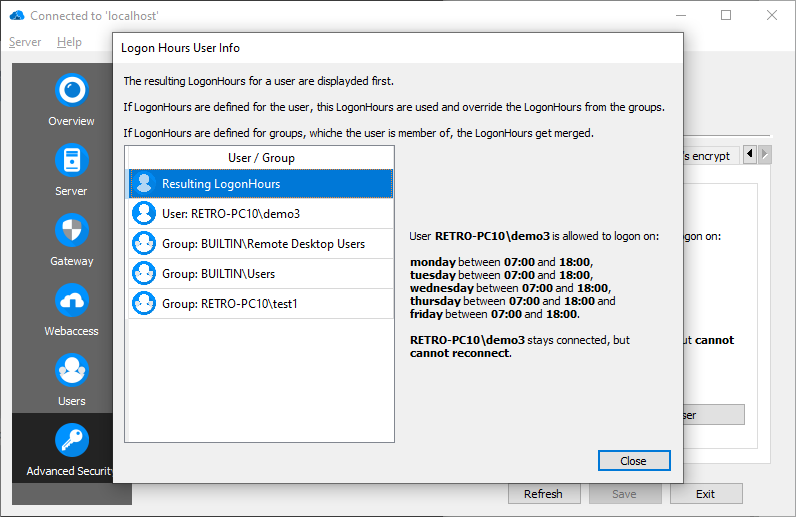
Show effective Logon Hours for a user
Since it is possible to define Logon Hours not only for users but also for groups, the Logon Hours of all groups a user belongs to get merged and applied, if no explict Logon Hours are set for this user. Click "Show effective Logon Hours for a user", enter or select a user and the effective logon hours for this user are shown. All groups, in which the user is a member of, are shown with their Logon Hours, so it is easier to find out from which group(s) the resulting Logon Hours are derived. On the left, the first element is the resulting, effective and merged Logon Hours of the selected user. The second entry shows the user's Logon Hours and the following entries show the Logon Hours of all groups the user belongs to.
ACME (Automatic Certificate Management Environment)
With the ACME protocol, it is possible to generate a free, public certificate for your custom domain. In order to do so, the ACME provider needs to verify the given custom domain by checking a challenge token.
Two validation methods are supported:
- HTTP Challenge - Port 80 must be reachable and forwarded just like port 443. If a reverse proxy is used, HTTP traffic on port 80 must also be forwarded to RD WebServices.
- Persistent DNS Challenge - A TXT record is added to your DNS zone. No additional port forwarding is required, but you must have access to your DNS zone.
You can switch between validation methods at any time after activation.
ECC (Elliptic Curve Cryptography) certificate
It is possible to request an ECC certificate instead an RSA based certificate. An ECC certificate is newer, lighter and faster, but is not supported by all clients. Windows 7 clients for example do not support ECC certificates. So an ECC certificate should only be used if all clients accessing RD WebServices support it. Every provider that supports an ECC certificate can be configured to request one.
Provider
There are several supported ACME providers which can be used and will be described later. It is even possible to define a custom provider for local or new acme providers.
Let's Encrypt
Let's Encrypt is a free and account-less ACME provider, no configuration is needed. ECC Certificates are supported.
ZeroSSL.com
ZeroSSL.com is a free ACME provider, but an account is needed. The Key Identifier and HMAC have to be configured before issuing certificates.
First create an Account at ZeroSSL.com and login.
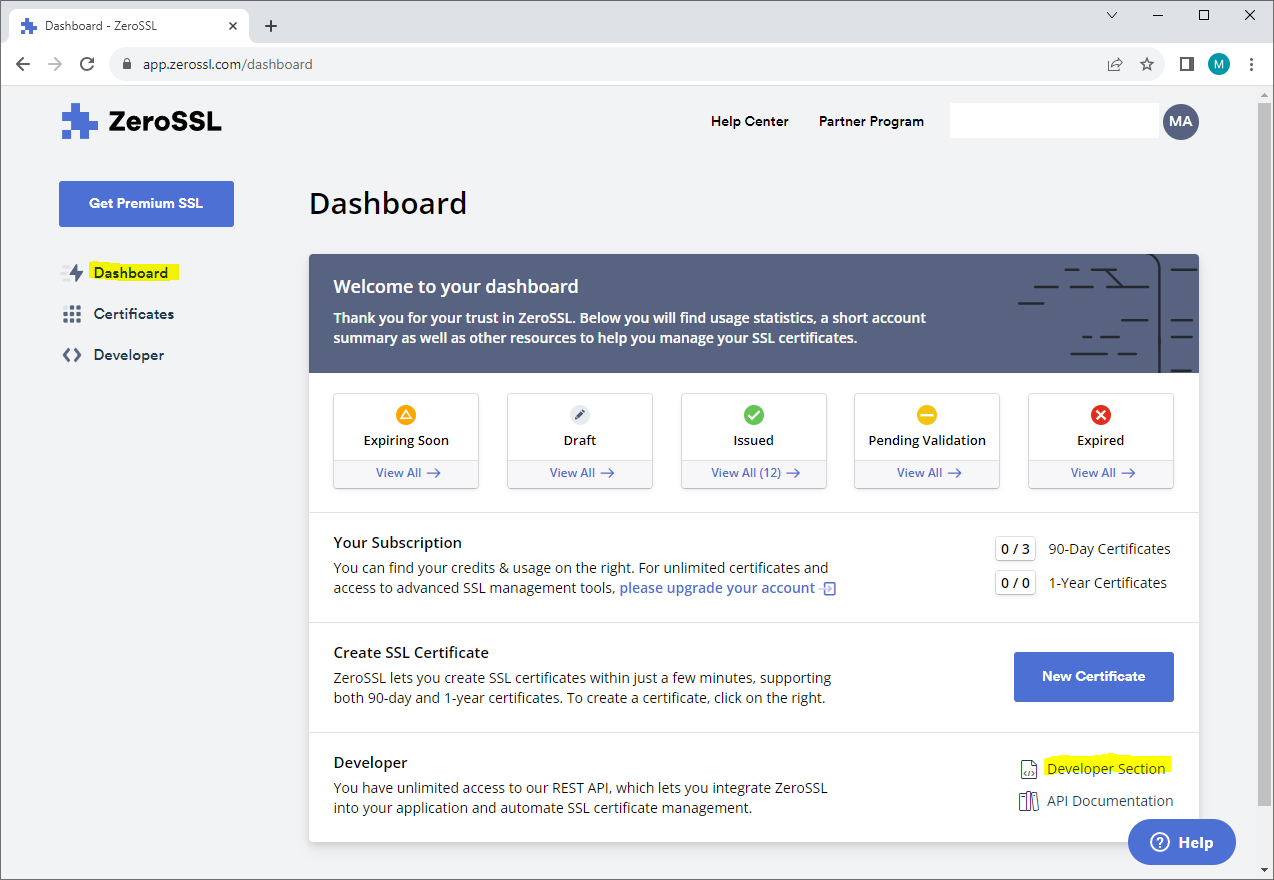
Click Left on 'Dashboard' and then bottom right on 'Developer Section'.
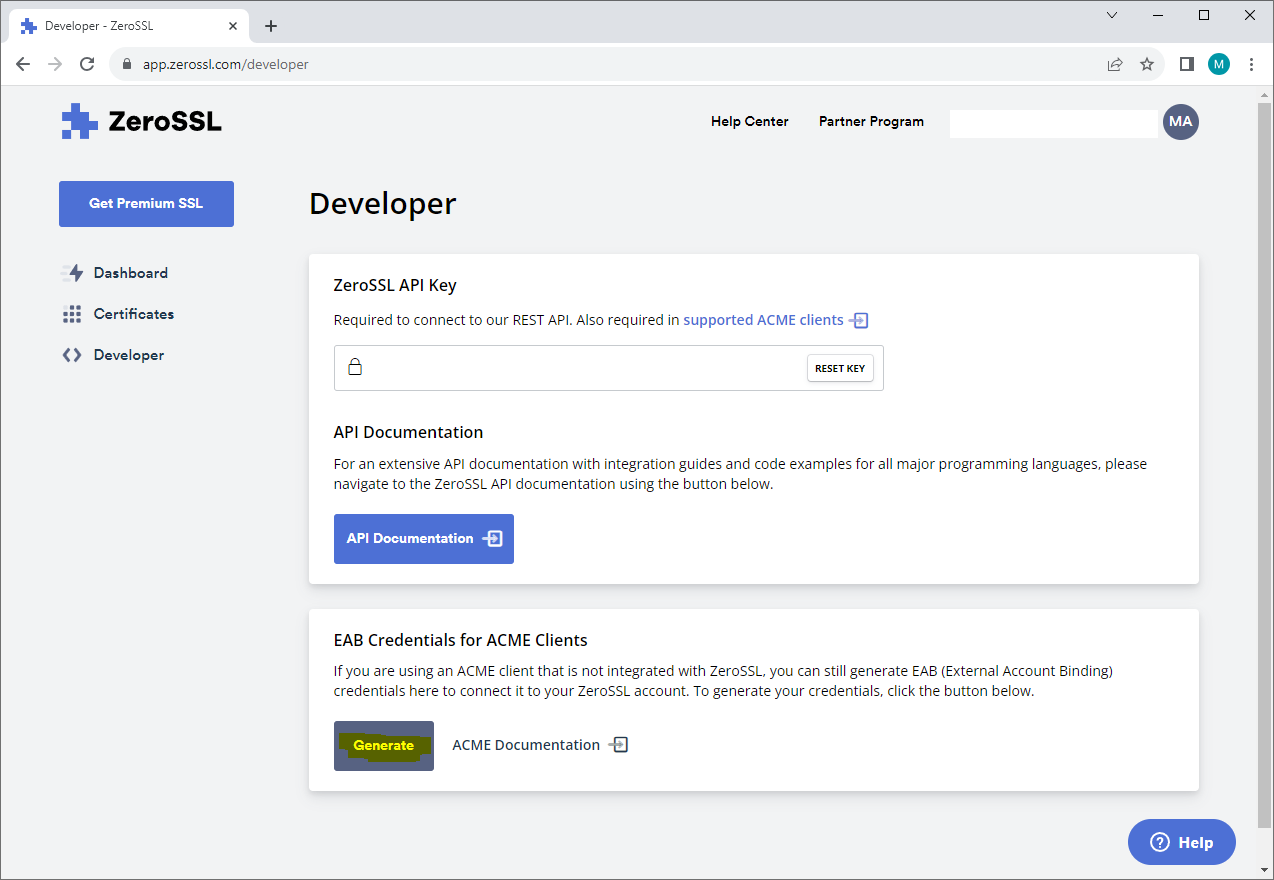
Click on Generate.
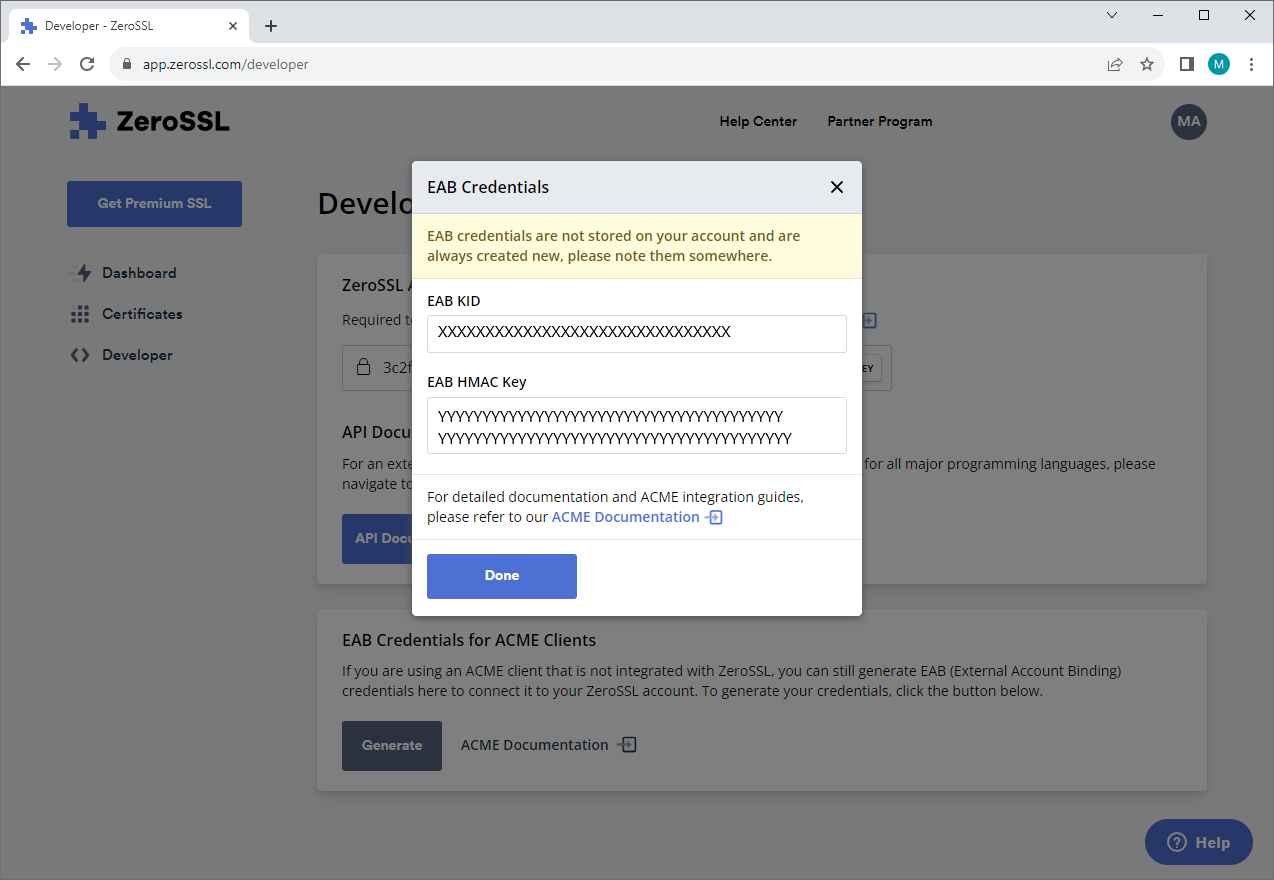
Copy the 'EAB kid' (here the XXXXX value) and paste it as Key Identifier and the 'EAB HMAC key' and paste it as HMAC.
ECC Certificates are supported.
SSL.com
SSL.com is a free ACME provider, but an account is needed. The Key Identifier and HMAC have to be configured before issuing certificates.
First create an Account at SSL.com and login.
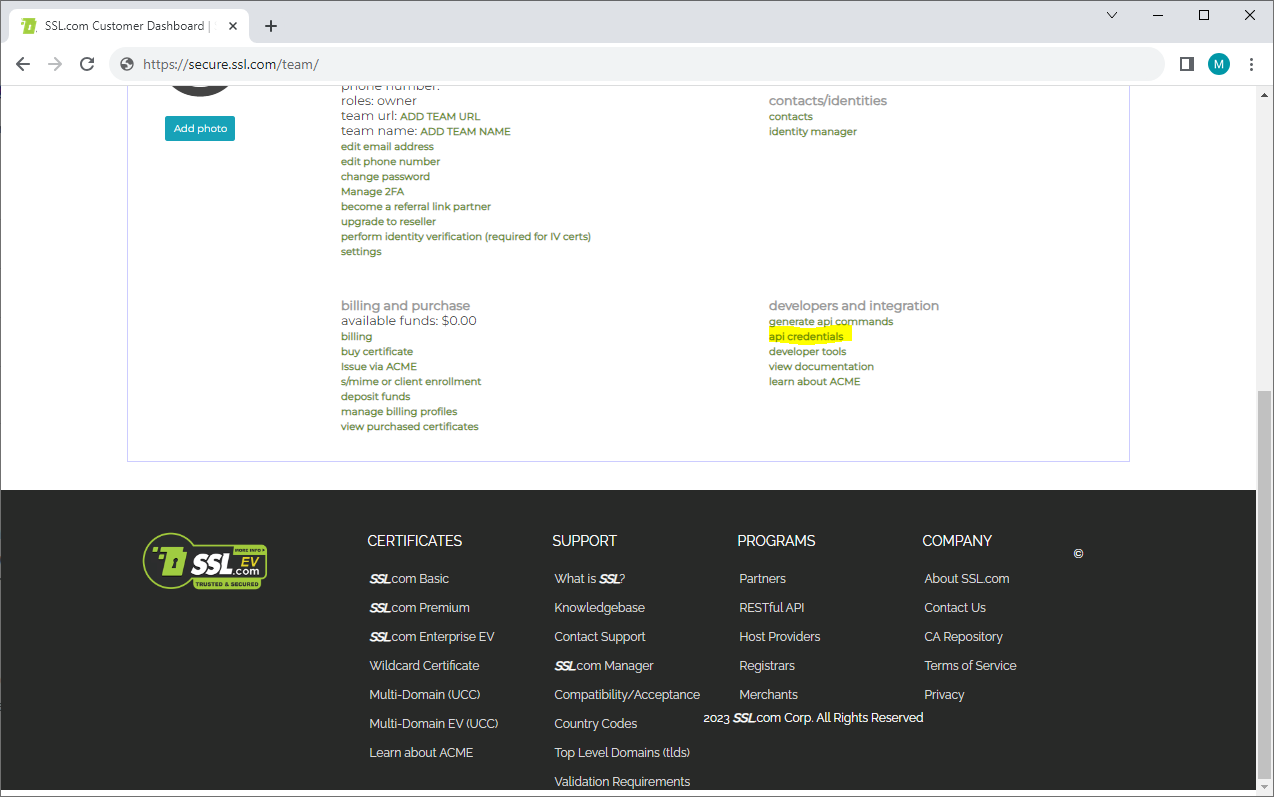
Scroll down and click 'api credentials'.
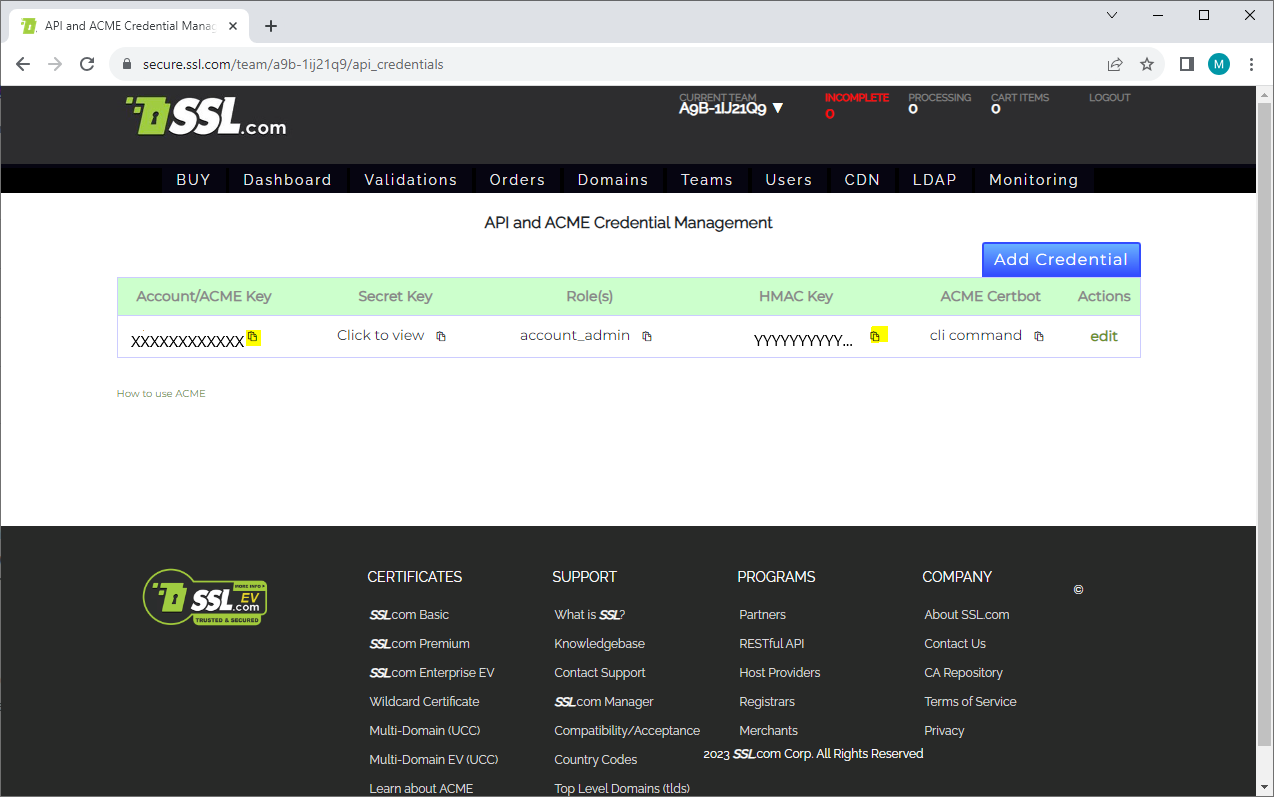
Copy the 'Account/ACME key' (here the XXXXX value) and paste it as Key Identifier and the 'HMAC Key' and paste it as HMAC.
ECC Certificates are supported.
Custom ACME Provider
For a custom ACME provider the Directory URL and, if external account binding (EAB) is used/required, the Key Identifier and the HMAC for that account are required. If no Key Identifier and HMAC are specified, no external account binding is used. If 'Request ECC Certificate' is checked, an ECC certificate request will be generated.
Hostname/s
The ACME provider generates a certificate with all hostnames added here. Each DNS hostname gets verified by the ACME provider and needs to be reachable from the internet.
Contact E-mails/s
At least one contact email address is required, in the case the ACME provider needs to contact you, i.e. if a domain certificate is shortly before expiry and no renewal was done.
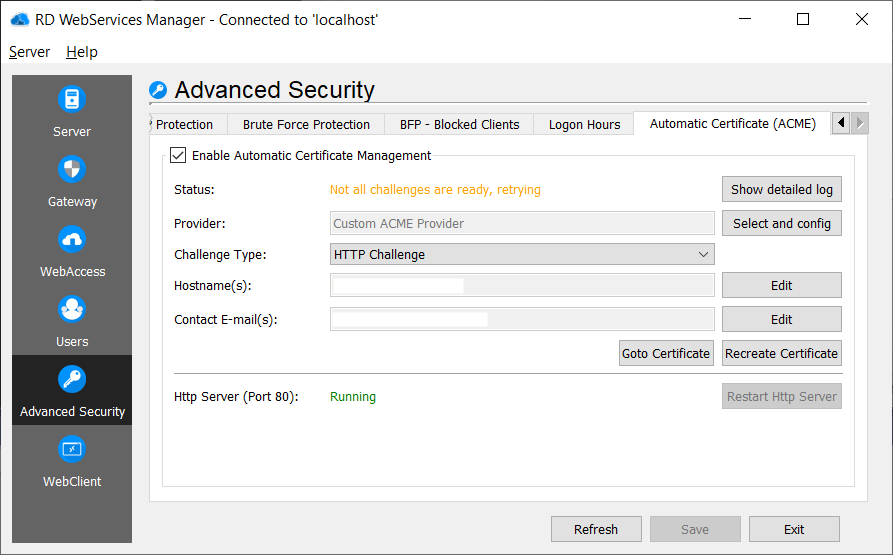
HTTP Challenge
To obtain a free ACME certificate using the HTTP Challenge method, the ACME provider must verify domain ownership by issuing an HTTP request to a predefined URI on port 80 of the domain.
Important: Port 80 is not configurable and must be made accessible in the same way as port 443.
- If port forwarding is used for port 443, it must also be configured for port 80.
- If a reverse proxy is used, HTTP requests on port 80 for the domain must also be forwarded to RD WebServices.
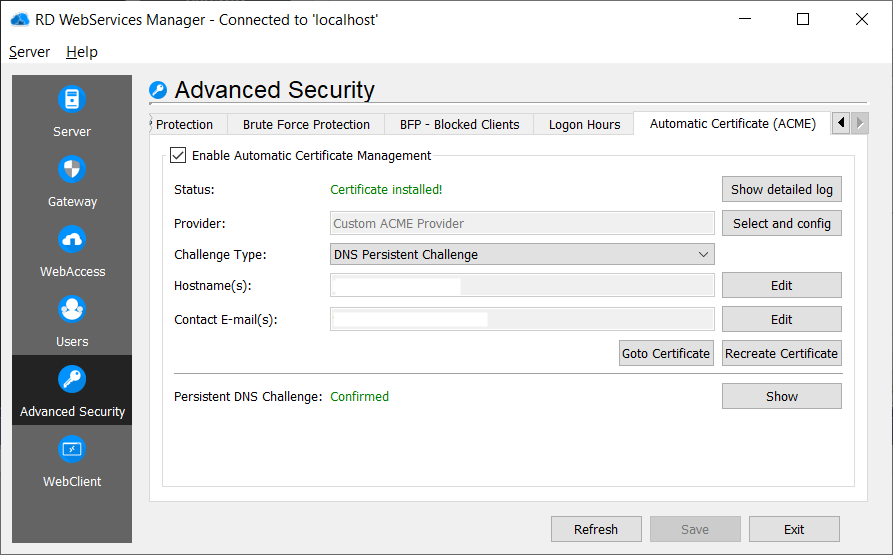
Persistent DNS Challenge
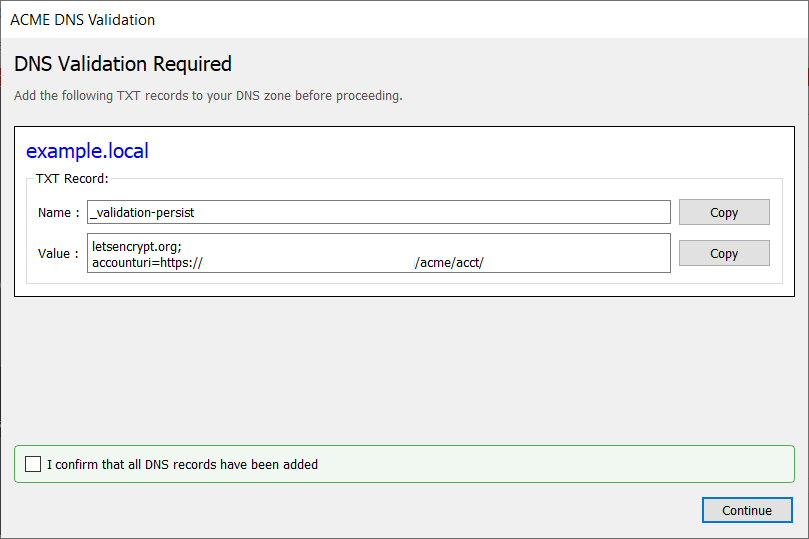
To use a persistent DNS challenge, access to the relevant DNS zones is required. Domain ownership is verified by adding a TXT record named _validation-persist to the DNS zone. This record must contain the certificate authority and the associated account URL, separated by a semicolon.
Example:
Name:  _validation-persist
Type:  TXT
Value: letsencrypt.org; accounturi=https://acme-v02.api.letsencrypt.org/acme/acct/0000000000
Note: The process of adding TXT records to a DNS zone varies depending on the DNS provider. Refer to your provider's documentation for specific instructions on managing DNS records.
RD WebClient
RD WebClient is a web based RDP client that runs entirely in a web browser.
Supported browsers are:
- Google Chrome
- Mozilla Firefox
- Apples Safari
Browsers need to be up-to-data as there might be some features that do not work correctly (or at all) with older versions.
The connection to the remote computer is made through a websocket to RD WebServices and is then proxied to the remote computer. Since the functionality is basically the same connecting with mstsc through RD Gateway, the settings for RD WebClient are taken per default from RD Gateway but can be overruled with specific RD WebClient settings.
Overview
The overview is similar to the RD Gateway overview.
Client Policies
The Client Policies are similar to RD Gateway Client Policies.
Server Policies
The Client Policies are similar to RD Gateway Client Policies.
Monitoring
The RD WebClient Monitoring are similar to RD Gateway Monitoring.
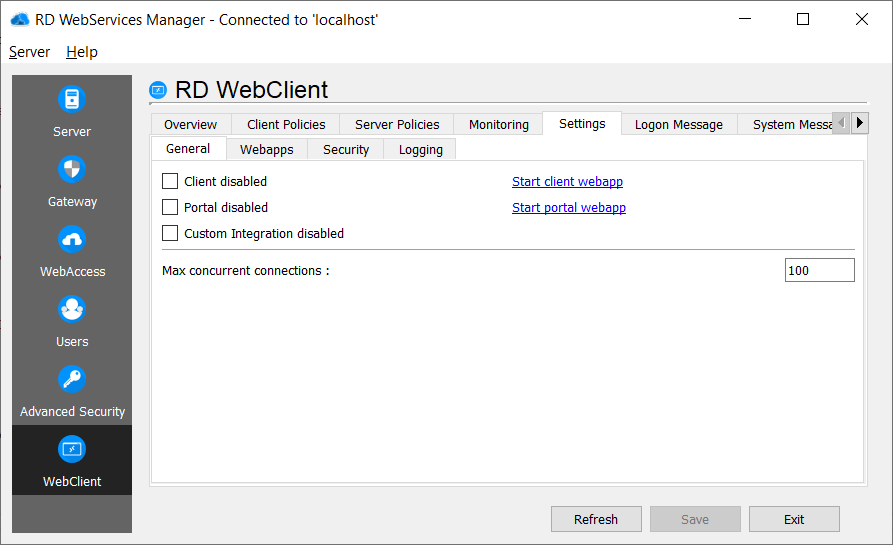
Settings
General
To disable handlers of RD WebServices, if they are not used in your setup, check the desired part:
- Client
- Portal
- Custom Integration
Configure the maximal permitted concurrent connections for this server.
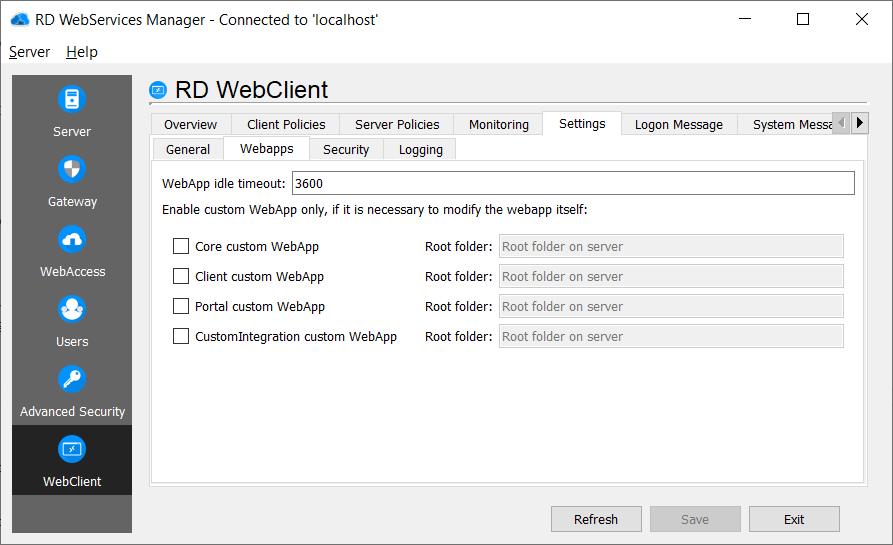
Webapps
Configure the timeout for the webapps after the client/portal closes the connection if no keyboard input or mouse was detected.
Thincast RD WebClient comes with integrated web applications. By providing the web application sources, you can customize the web application and adapt it for your clients.
By default, the integrated web application will be displayed. In case you want to deliver your customized version of the RD WebClient Client, Poral and Core web application do the following:
- Tick the corresponding checkbox .
- Specify where the folder is on your system (e.g. C:\temp\rdwebclient-webapp-external).
- Click on "Save".
You can find the source code (webapp-external-webclient-core.zip, webapp-external-webclient-client.zip and webapp-external-webclient-portal.zip) in the direcotry
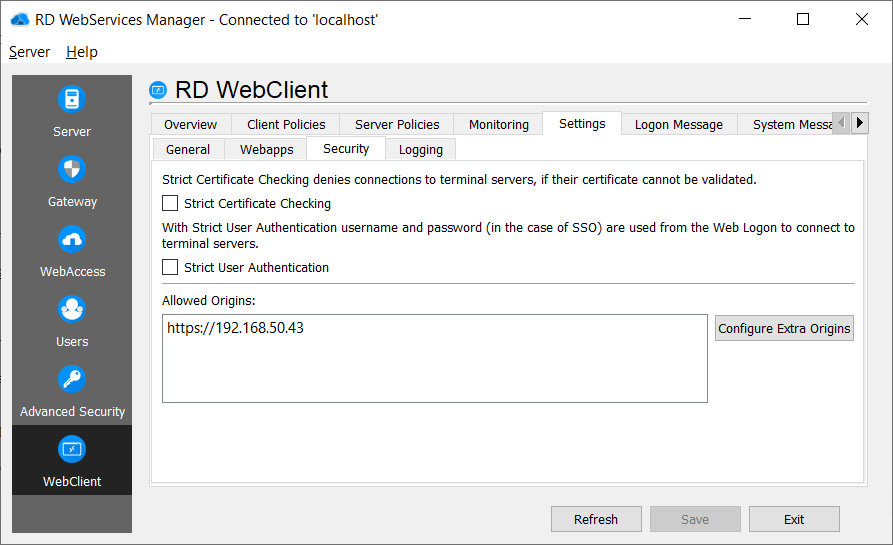
Security
Strict Certificate Checking
Strict Certificate Checking denies connections to terminal servers, if their certificate cannot be validated. The validation of the certificate is performed by the server (RD WebServices) and not the web client (browser).
Strict User Authentication
With Strict User Authentication username and password (in the case of SSO) are used from the Web Logon to connect to terminal servers. If the authentication fails for some reason, it is not possible to enter another username or password.
Allowed Origins
The first and default allowed origin is taken from the ssl certificate and is sufficient in the most cases with the default clients. If the client is for example embedded in another website, the origin of this website also needs to be added as allowed origin.
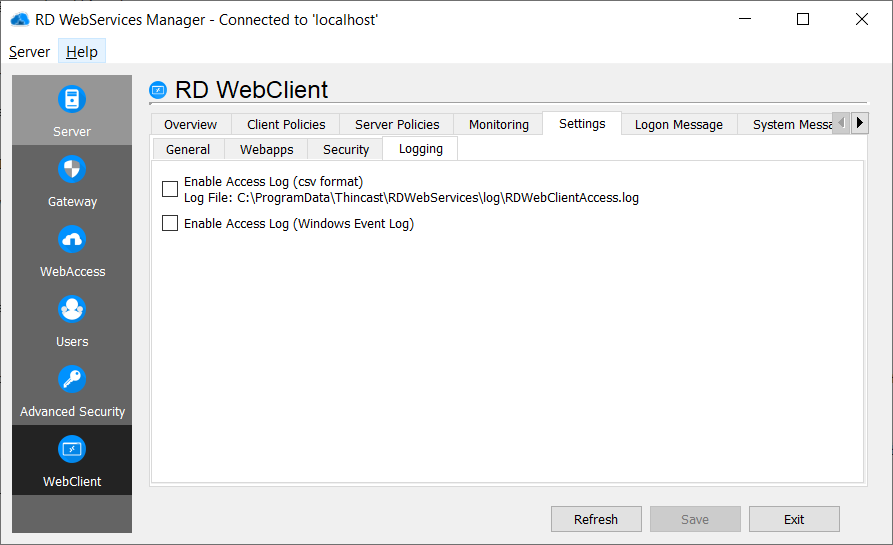
Logging
Access log
To enable the access log, tick the checkbox and click "Save".
By default, the log file is located under:
- Windows: C:\ProgramData\Thincast\RDWebServices\log\RDWebClientAccess.log
- Linux: /var/log/rdwebservices/RDWebClientAccess.log
Windows Event Access log (Windows only)
To enable the access log in the Windows Event Log, tick the checkbox and click "Save".
Logon Message
The RD WebClient Logon Message are similar to RD Gateway Logon Message.
System Message
The RD WebClient System Message are similar to RD Gateway System Message.
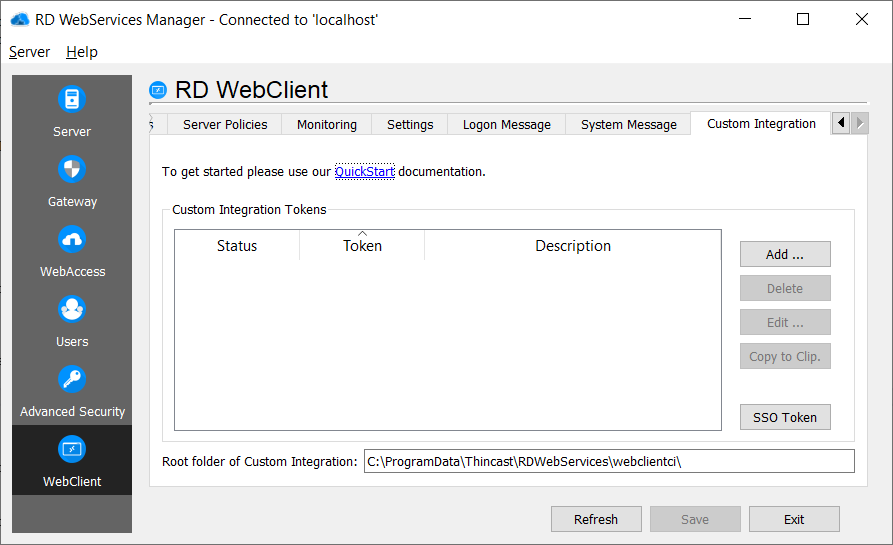
Custom Integration
Please see our quickstart guide which is linked in the RD WebServices Manager.
Thincast Authenticator App
The Thincast Authenticator App is used for two-factor authentication. After registering the Thincast Authenticator for a user (either through the RD QR Client and a QR code or by manually entering the registration information), each login needs to be authorized with the Thincast Authenticator App.
The Thincast Authenticator App is available for Android and iOS.


Initial Setup
After the first startup, the initial setup screen is shown.
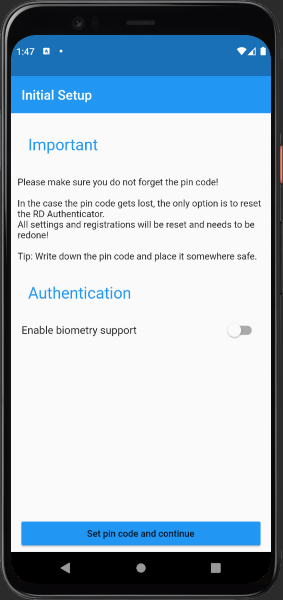
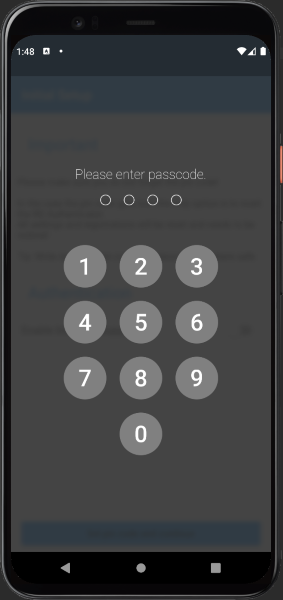
Before first use, you have to set a pin code. Its important not to lose your pin code. In the case the pin code gets lost and biometric authentication does not work, the only way is to reset the RD Authentication app and register again.
It's also possible, in addition to the pin code, to use biometric authentication, like for example your fingerprint. The biometric authentication has to be enabled and setup on your device.
Settings
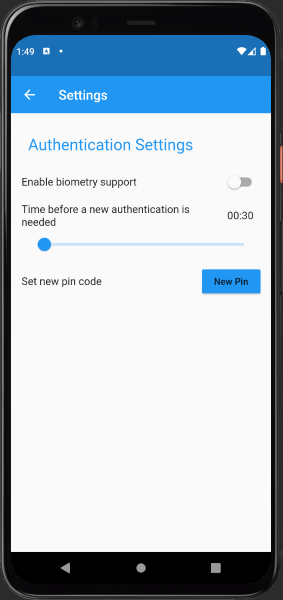
Enable biometric support
Enable to use biometric authentication, for example fingerprint instead of the pin code. The biometric authentication has to be enabled and setup on your device first.
Time before new authentication is needed
Specifies the time after a successful authentication (pin code or biometric authentication), no authentication is needed for accepting or denying requests. After the timer has expired, a new authentication is required for accepting or denying requests.
Set new pin code
To change the pin code, first enter the current pin and then two times the new pin to ensure the pin matches.
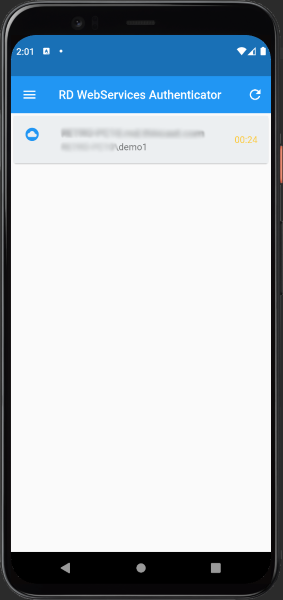
Main view
The Thincast Authenticator checks for new authentication requests every ten seconds. To refresh the list of pending authentication requests immediately, press the refresh button found on the top right of the main screen.
Registrations
To add or edit a Thincast Authenticator registration, click on the menu icon (top left in the main view) and select 'Registrations'.
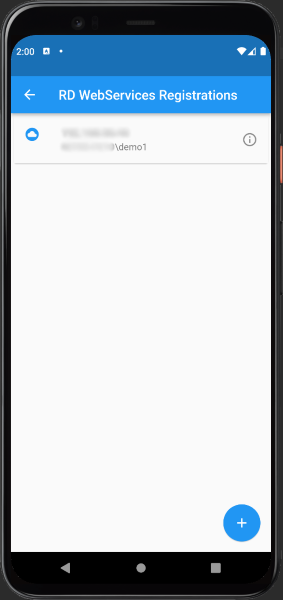
An overview of registrations is shown. If there are any issues with a registration a red warning sign will be shown along the last error.
Click on a record to show the registration details. It's also possible to delete a registration within the details view.
To delete a registration from the overview, just swipe the registrations to the left.
Registering a Thincast Authenticator
It's possible to register a Thincast Authenticator in two ways:
- Scanning a QR Code
- Entering the registration information
QR Code Registration - User
To register a Thincast Authenticator using a QR code, you need to log into the RD QR Client WebApplication. Open a browser with
the following Url: https://<YourServerDNSName>:<YourServerPort>/qrclient/index.html.
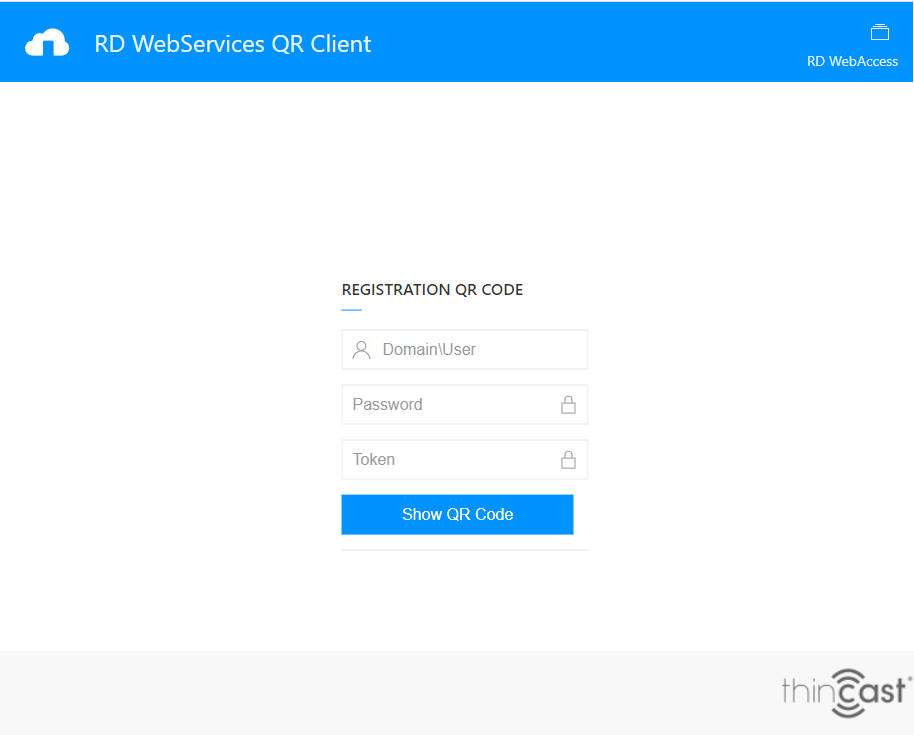
Enter username, password and an unused token (including the <number>: prefix) you received from your administrator to show the registration QR code. To use
the auto registration mode (if it's enabled and you have never registered a Thincast Authenticator), do not enter a token and instead click 'Show QR Code'.
In the Thincast Authenticator APP on your device, press the blue 'Add' Icon on the bottom right to open the QR code scanning view.
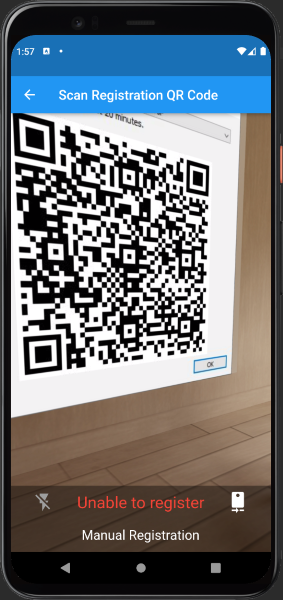
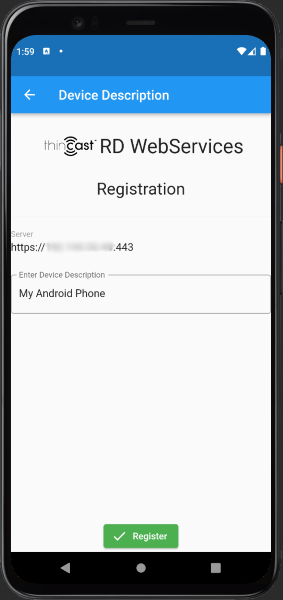
Now enter your device description and press 'Register'
If an error occurred, the view changes back to the QR code scanning view and will display the error message.
If the registration of the Thincast Authenticator was successful, the registrations overview will be displayed.
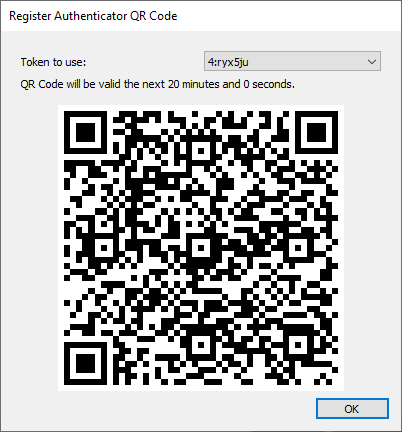
QR Code Registration - Administrator
If an administrator prepares a bunch of devices for some employees, they can register the devices on behalf of the users.
Open the RD WebServices Admin panel and connect to the RD WebServices server. Navigate to Server / 2FA-Users, select the desired user and click edit. Switch to the Tokens tab and click 'show QR code'. It's possible to change the used token by selecting another valid token from the dropdown.
Now scan the QR code with the user's device and the Thincast Authenticator APP will be registered on this server.
Entering the registration information
Either do a long press on the add icon in the overview or press 'Manual Registration' in the QR code scanning view.
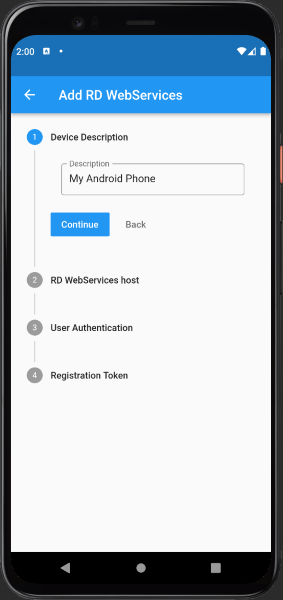
Enter device description, hostname and port, username and password and one of your registration tokens (or none if auto registration mode is enabled and no registration took place for this user so far). Press 'Register'.
Two-factor authentication requests
If two-factor authentication is required, open the (already registered) Thincast Authenticator App on your device. After the login, all pending authentication requests are loaded from the server(s) and the most recent request is opened automatically in the detailed view. If there are two or more request they will be displayed in the overview list. It's possible to allow or deny a request in the overview by swiping to the right (allow) or the left (deny). Touching a request displays more detailed information about it.
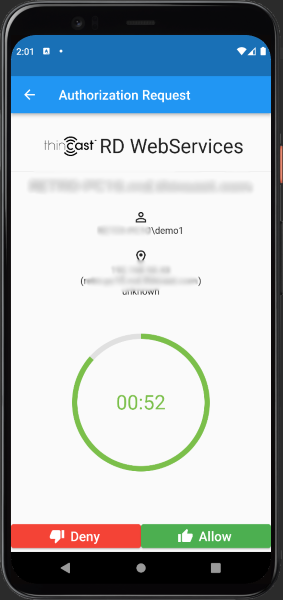
The current client name, in the case of an RD Gateway login, will be shown besides the username and the location of the client (if it is resolvable). The big progress circle shows the remaining time before the authentication requests becomes invalid.
To accept the request press 'Allow', otherwise hit 'Deny' or the back arrow to do nothing and go back to the overview.
Command Line Interface (CLI)
The command line interface (CLI) is used to administer RDWebServices from the command line. For now the CLI only supports Linux user management.
Linux user management CLI
The CLI supports full user management for Linux based RDWebServices.
Management Access Token (RDWSgetToken)
RDWSgetToken gets an authentication token, used by all CLI programs.
Usage: RDWSgetToken [options] <server> <username> <password>
  -h [ --help ]            print help
  -v [ --version ]         print version
  -s [ --server ] arg      RDWebServices server to connect to
  -o [ --port ] arg (=443) specify the port of RDWebServices
  -u [ --username ] arg    username with domain (DOMAIN\USER)
  -p [ --password ] arg    password (optional)
  -t [ --token-only ]      prints only the token

Examples:

RDWSgetToken myserver demo1
RDWSgetToken myserver demo1 mypassword
RDWSgetToken -o 443 -s myserver -u demo1 -p mypassword -t
An output may look like this:
Your Token: MTkyLjE2OC41MC4yNDo0NDMLjE2OC41MC4yNDo0NDMLjE2OC41MC4yNDo0NDMLjE2OC41MC4yNDo0NDMLjE2OC41MC4yNDo0NDMLjE2OC41MC4yNDo0NDMLjE2OC41MC4yNDo0NDMLjE2OC41MC4yNDo

Export token in your environment for other RDWS cli tools:

Linux:
export RDWS_TOKEN=MTkyLjE2OC41MC4yNDo0NDMLjE2OC41MC4yNDo0NDMLjE2OC41MC4yNDo0NDMLjE2OC41MC4yNDo0NDMLjE2OC41MC4yNDo0NDMLjE2OC41MC4yNDo0NDMLjE2OC41MC4yNDo0NDMLjE2OC41MC4yNDo

Windows:
set RDWS_TOKEN=MTkyLjE2OC41MC4yNDo0NDMLjE2OC41MC4yNDo0NDMLjE2OC41MC4yNDo0NDMLjE2OC41MC4yNDo0NDMLjE2OC41MC4yNDo0NDMLjE2OC41MC4yNDo0NDMLjE2OC41MC4yNDo0NDMLjE2OC41MC4yNDo
Either you export the RDWS_TOKEN in your environment, so each subsequent call to a CLI program can use the token, or specify the token each time as parameter.
Add a user group (RDWSaddGroup)
Use RDWSaddGroup to add a user group.
Usage: RDWSaddGroup [options] <groupname>
  -h [ --help ]            print help
  -v [ --version ]         print version
  -t [ --token ] arg       RDWebServices cli token (use RDWSgetToken to create
                           a token)
  -g [ --groupname ] arg   groupname without domain
  -d [ --description ] arg description of the group

Examples:

RDWSaddGroup group1
RDWSaddGroup group1 -d "Test group"
Delete a user group (RDWSdelGroup)
Use RDWSdelGroup to delete a user group.
Usage: RDWSdelGroup [options] <groupname>
  -h [ --help ]          print help
  -v [ --version ]       print version
  -t [ --token ] arg     RDWebServices cli token (use RDWSgetToken to create a
                         token)
  -g [ --groupname ] arg groupname without domain

Examples:

RDWSdelGroup group1
Add a user account (RDWSaddUser)
Use RDWSaddUser to add a user account.
Usage: RDWSaddUser [options] <username> <password>
  -h [ --help ]            print help
  -v [ --version ]         print version
  -t [ --token ] arg       RDWebServices cli token (use RDWSgetToken to create
                           a token)
  -u [ --username ] arg    username without domain
  -p [ --password ] arg    password (optional)
  -d [ --description ] arg description of the user
  --disabled               creates the user disabled
  -g [ --groups ] arg      group/s (comma separated) to which this user should
                           be added

Examples:

RDWSaddUser demo1 password -d Test-user
RDWSaddUser demo1 password -g "Users,Group 1;TestUsers" -d "Test-user in groups "
RDWSaddUser demo1 password --disabled -d "Disable test-user"
Delete a user account (RDWSdelUser)
Use RDWSdelUser to delete a user account.
Usage: RDWSdelUser [options] <username>
  -h [ --help ]         print help
  -v [ --version ]      print version
  -t [ --token ] arg    RDWebServices cli token (use RDWSgetToken to create a
                        token)
  -u [ --username ] arg username without domain

Examples:

RDWSdelUser demo1
Add or remove users from groups (RDWSgpasswd)
Use RDWSgpasswd to add or remove user account from user groups.
Usage: RDWSgpasswd [options] <username> <groupname>
  -h [ --help ]         print help
  -v [ --version ]      print version
  -t [ --token ] arg    RDWebServices cli token (use RDWSgetToken to create a
                        token)
  -a [ --add ]          add user to group
  -d [ --delete ]       delete user from group
  -g [ --group ] arg    group to which the user should be added/deleted
  -u [ --username ] arg user which should be added/deleted from group

Examples:

RDWSgpasswd -a user group
RDWSgpasswd -d user "group,Test Group"
Reset user account password (RDWSpasswd)
Use RDWSpasswd to set a new password for a user account.
Usage: RDWgpasswd [options] <username> <groupname>
  -h [ --help ]         print help
  -v [ --version ]      print version
  -t [ --token ] arg    RDWebServices cli token (use RDWSgetToken to create a
                        token)
  -u [ --username ] arg user which should be added/deleted from group
  -p [ --password ] arg password (optional)

Examples:

RDWSpasswd user password
RDWSpasswd user
Disable or enable a user account (RDWSusermod)
Use RDWSusermod to disable (lock) or enable (unlock) a user account.
Usage: RDWSusermod [options] <username>
  -h [ --help ]         print help
  -v [ --version ]      print version
  -t [ --token ] arg    RDWebServices cli token (use RDWSgetToken to create a
                        token)
  -L [ --lock ]         lock a user account
  -U [ --unlock ]       unlock a user account
  -u [ --username ] arg user which should be locked/unlocked

Examples:

RDWSgpasswd -L user
RDWSgpasswd -U user
List users or groups (RDWSuserList)
Use RDWSuserList to list user accounts or user groups.
Usage: RDWSuserList [options]
  -h [ --help ]             print help
  -v [ --version ]          print version
  -t [ --token ] arg        RDWebServices cli token (use RDWSgetToken to create
                            a token)
  -U [ --list-users ]       List all users
  -G [ --list-groups ]      List all groups
  -u [ --user ] arg         show information about this user
  -g [ --group ] arg        show information about this group
  -d [ --detailed ]         Detailed user/group view.
  -c [ --csv ]              CSV user/group view.
  -C [ --csv-with-header ]  CSV user/group view with header in first line.

Examples:

RDWSuserList -U
RDWSuserList -G
RDWSuserList -u demo1  -d
RDWSuserList -G -d
Wake on Lan Proxy Server
Installation
Windows
- Download the latest version of RD WebServices Wake on Lan Proxy for Windows from here.
- Open the installation package and follow the instructions.
- Check if the service 'RD WebServices Wake On Lan Proxy' is running.
Linux
On Linux follow the instructions to add our repository (see installation section) and install the package 'rdwebservices-wolproxy'.
Configuration
Per default RDWebServices Wake on Lan Proxy listens on port 1444.
Windows
The default port is 1444. Changing the port of the service requires the following steps (for example to change port to 1445):
- Stop the service. 'net stop rdwebservices-wolproxy'
- Reconfigure port. '
\RDWOLProxy.exe --config 1445' - Start the service again. 'net start rdwebservices-wolproxy'
Linux
You can change the port of the service by changing the PORT setting the file
/etc/default/rdwebservices-wolproxy:
For example if you want the service to listen on port 1445, you would change PORT to:
PORT="-p 1445"After modifying the file make sure you restart the systemd service:
systemctl restart rdwebservices-wolproxySupport
If you have any trouble with RD WebServices, please don't hesitate to contact us by filling out our contact form.
Anything you (dis-)like or miss? Please let us know - we love to hear your feedback.
Changelog
The changelog can be found here.
Appendix
RD Gateway and Reverse Proxy
In the official RD Gateway protocol non RFC conform HTTP headers are used. Therefore, a reverse proxy needs to support this in order to work with any gateway:
- For the RPC over http transport, a content size of 2 - 4 gigabytes is used, which leads to a read timeout, if the proxy tries to read the whole request.
- For the http transport, no content size is sent in headers, this also leads to a read timeout, if the content length is mandatory in the HTTP header for the reverse proxy.
We have tested the following reverse proxies:
- Apache with mod_proxy has no support, the connection will be rejected.
- HAProxy has built in-support for RD Gateway connections.
HAProxy - Configuring Remote Desktop Gateway
Other reverse proxies may also work, but have not been tested yet.
HAProxy config
Using HTTP SSL bridging mode
In this mode the ssl connection is decrypted on the frontend and encrypted on the backend using the http layer.
frontend fe_rdp_tsc
  bind :444 name rdp_web ssl crt hacert.pem
  mode http
  capture request header Host len 32
  log global
  option httplog
  timeout client 300s
  maxconn 1000
  default_backend be_rdp_tsc

backend be_rdp_tsc
  balance source
  option forwardfor
  mode http
  log global
  option httplog
  timeout connect 4s
  timeout server 300s
  option httpchk GET /status
  cookie RDPWEB insert nocache
  default-server inter 3s    rise 2  fall 3
  server srv01 192.168.50.43:443 maxconn 1000 weight 10 ssl check cookie srv01
  server srv02 192.168.50.44:443 maxconn 1000 weight 10 ssl check cookie srv02
Using TCP SSL bridging mode
In this mode the ssl connection is decrypted on the frontend and encrypted on the backend using the tcp layer.
frontend fe_rdp_tsc
  bind :444 name rdp_web ssl crt hacert.pem
  mode tcp
  log global
  option tcplog
  timeout client 300s
  maxconn 1000
  default_backend be_rdp_tsc

backend be_rdp_tsc
  balance source
  mode tcp
  log global
  option tcplog
  timeout connect 4s
  timeout server 300s
  option httpchk GET /status
  default-server inter 3s rise 2 fall 3
  server srv01 192.168.50.43:443 maxconn 1000 weight 10 ssl check check-ssl
  server srv02 192.168.50.44:443 maxconn 1000 weight 10 ssl check check-ssl
Using TCP bridging mode
A TCP connection is established between the client and the backend, therefore no ssl decryption is done by HAProxy.
This methode is not recommended since each backend server needs to use the certificate from the HAProxy, otherwise mstsc will complain because the gateway name does not match the certificate name.
frontend fe_rdp_tsc
  bind :444 name rdp_web
  mode tcp
  log global
  option tcplog
  timeout client 300s
  maxconn 1000
  default_backend be_rdp_tsc

backend be_rdp_tsc
  balance source
  mode tcp
  log global
  option tcplog
  timeout connect 4s
  timeout server 300s
  option httpchk GET /status
  default-server inter 3s rise 2 fall 3
  server srv01 192.168.50.43:443 maxconn 1000 weight 10 check check-ssl
  server srv02 192.168.50.44:443 maxconn 1000 weight 10 check check-ssl