Thincast Client Documentation
The latest version of this documentation can be found here.
Introduction
With Thincast Client you can turn your computer into a fully featured Remote Desktop Protocol (RDP) Client, making it easy to connect remotely to your company's infrastructure.
Using the Remote Desktop (RD) WebAccess Client you gain easy access to and control of published virtual machines (with Thincast Workstation), desktop sessions and applications.
Its built-in, hardware-accelerated Remote Desktop Client (RDC) delivers a rich user experience by saving valuable CPU power. Thincast Client is completely free and available for Windows, Linux and macOS.
Quick-Start
If you have already installed Thincast Remote Desktop Client, you might want jump directly to the following topics:
- System requirements
- Installation on Windows
- Installation on macOS
- Installation on Linux
- First Start
- Configure your session
- Configure Remote Desktop Gateway
- Configure RD WebAccess Client
- Keyboard shortcuts
- Command line
- Change update channel
Versions
We provide different versions:
- Stable - Official releases. Use this for production.
- Beta - Upcoming release. Beta versions are under qualification testing, and may include significant issues.
- Nightly - Development snapshot. Contains the latest features and improvements but isn't completely tested and may include severe issues.
The beta and nightly versions are mainly for preview and evaluation purposes. Don't use them in production!
It is the end users' responsibility to protect their systems and data when using beta or nightly software. It is strongly recommended that end users back up all their data prior to using beta or nightly software.
To select the preferred update channel, please go to chapter "Update".
Requirements
Systems that run Thincast Client must meet specific requirements:
Supported Operating Systems
Windows
- Windows 7 / 8 / 8.1 / 10 / 11
- Windows Server 2008 R2 / 2012 / 2012 R2 / 2016 / 2019
Thincast Client supports x64 environments.
macOS
- macOS 10.13 or later is supported
Apple silicon (M1 chip)
For now Apple Rosetta is required to run Thincast Remote Desktop Client on the newer Apple M1 chips.
Linux
Thincast Client is distributed through Flathub and Snapcraft and has been tested on the following platforms:
- Ubuntu 18.04 (bionic) / 19.10 (eoan) / 20.04 (focal)
- OpenSUSE Leap 15.1
- Fedora 30 / 31
Graphics Card
To take advantage of the hardware acceleration in Thincast RDC, your graphics card must meet the following requirements:
Windows
Hardware drawing and H.264 video decoding is available on GPUs that support at least DirectX version 9.0c. However, the GPU drivers must support DirectX 11 Feature Level 9.1 (which means the DirectX 11 API has been implemented in the GPU driver to be compatible with DirectX 9 hardware). The following list shows supported GPUs but is subject to driver support for your operating system:
- Nvidia Geforce 8 Series or higher
- AMD HD 2000 Series or higher
- Intel HD Graphics Sandy Bridge generation or higher
macOS
Hardware drawing and H.264 video decoding is supported using Metal on macOS 10.14 or later.
Linux
Hardware drawing requires a graphics card with working Vulkan drivers. Some graphics cards are known to have incomplete Vulkan support e.g., the Intel Haswell GPUs. In this case Thincast RDC falls back to software drawing. Currently there is no support for hardware accelerated H.264 video decoding available on Linux.
Network
Thincast Client requires a properly configured network to communicate with the Thincast Workstation or the resources on your network.
Installation
Prerequisites
Thincast Client supports multiple platforms. Please refer to chapter "Supported operating systems". Please make sure that you have installed all recent operating system and driver updates.
Windows
-
Download the latest version of Thincast Client for Windows from here.
-
Open the installation package.
-
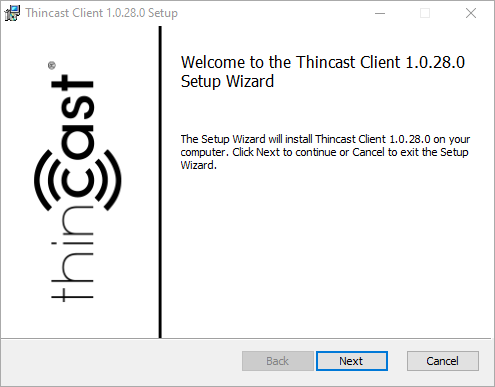
Thincast Client Setup will now open. Continue with "Next".
-
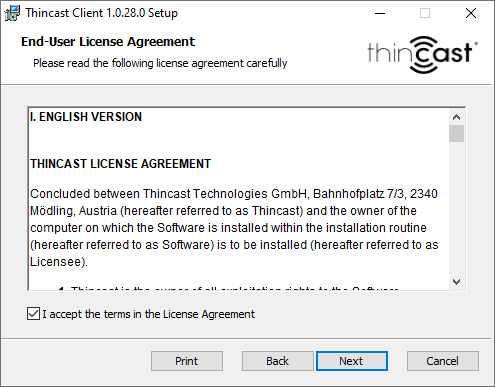
Accept the End-user License Agreement and proceed with "Next".
-
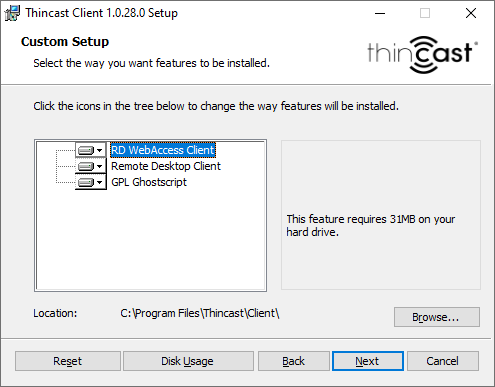
Select the destination folder for Thincast Client and click "Next".
-
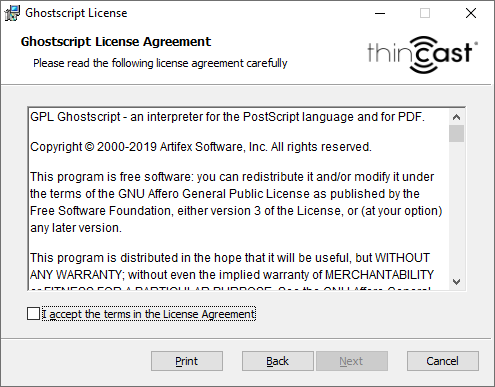
Accept the Ghost Script License Agreement and proceed with "Next".
-
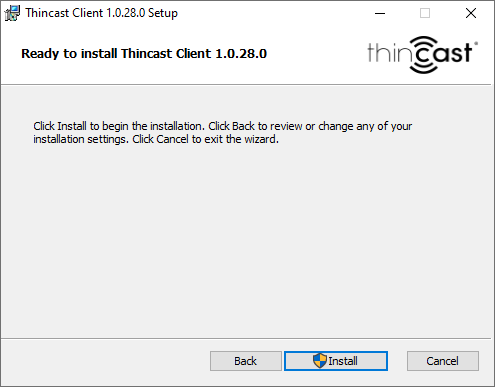
Click "Install" to begin the installation. Accept by clicking "Yes".
-
Click "Finish" to complete your installation.
You can find Thincast Client and its components under the destination folder. By default it is:
C:\Program Files\Thincast\Client\macOS
- Download the latest version of Thincast Client for macOS from here.
- Double-click the .pkg file to open Thincast Client setup and click "Continue".
- Read the End-user License Agreement and proceed with "Continue".
- Agree the End-user License Agreement by clicking on "Agree" in the pop up window.
- Click "Install" to begin the installation. It might be necessary to provide user credentials before the installation can continue.
- Click "Finish" to complete your installation.
- Delete the .pkg file by dragging it to the trash.
- You've now installed Thincast Client for macOS. The application is inside your Applications folder.
Thincast Remote Desktop Client for macOS is now located inside your Applications folder. For quick-access open the spotlight search bar (Command–Space bar) and type in "Thincast Remote Desktop Client".
Linux
Flathub
If not already installed, the following requirements must be met:
flatpakcommand line utility-
You might want to consider installing one of these plugins to correctly integrate snap in your desktop environment:
GNOME Software Flatpak PluginforGNOMEenvironmentsPlasma Discover Backend FlatpakforKDEenvironments
For individual platform instructions, consult https://flatpak.org/setup/
Thincast Client on Flathub Store:
https://flathub.org/apps/details/com.thincast.client
To install Thincast Client, use one of the following command lines:
-
Per user installation:
flatpak install --user com.thincast.client -
System-wide installation:
flatpak install --system com.thincast.clientAfter installation logout and login again.
Snapcraft
If not already installed, the following requirements must be met:
-
snapcommand line utility -
You might want to consider installing one of these plugins to correctly integrate snap in your desktop environment:
- gnome-software-plugin-snap for
GNOMEbased desktops - plasma-discover-backend-snap for
KDEbased desktops
- gnome-software-plugin-snap for
-
If you are using a desktop environment you may also install the Snap Store app as described below:
For individual platform instructions, consult https://snapcraft.io/docs/installing-snapd
Thincast Client on Snapcraft Store:
https://snapcraft.io/thincast-client
To install Thincast Client, use the following command line:
sudo snap install thincast-client
Uninstallation
Windows
-
To uninstall Thincast Client, open your Control Panel and navigate to Programs -> Uninstall a program.
-
Select Thincast Client and click on Uninstall.
-
Confirm with "Yes".
-
You've now successfully uninstalled Thincast Client.

macOS
- Quit Thincast Client.
- Open your Applications folder and drag the Thincast Client icon into the Trash.
- Empty the Trash.
- You've now successfully removed Thincast Client.
Linux Flathub
-
Quit Thincast Client
-
Depending on how you installed Thincast Client you have to run one of the following command lines:
- Per user removal:
flatpak uninstall --user com.thincast.client- System-wide removal:
flatpak uninstall --system com.thincast.client -
You've now successfully removed Thincast Client.
Linux Snapcraft
-
Quit Thincast Client
-
Run the following command line:
sudo snap remove thincast-client -
You've now successfully removed Thincast Client.
Update
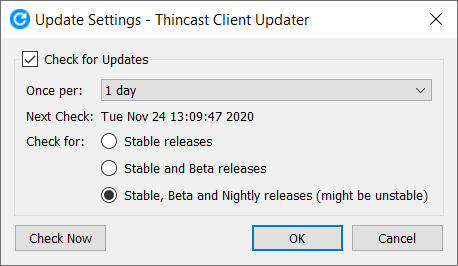
Thincast Client has a built-in auto-update feature. By default, this feature is enabled and checks for new updates on a daily basis. To change this period or to disable the auto-update feature, click on the "About" button in left corner of the configuration dialog and after that on "Update".
Usage
The installation package of Thincast Client contains two main components: the Remote Desktop Client and the Remote Desktop WebAccess Client. The RD WebAccess Client allows you to quickly access network resources, such as virtual machines running on Thincast Workstation or pre-configured seamless applications and full desktop sessions published with RD WebAccess.
It's completely free and available for Windows, MacOS and Linux.
Thincast Remote Desktop Client
The Thincast Remote Desktop Client is a multi-platform RDP (Remote Desktop Protocol) Client. It comes with a variety of up-to-date features and can be easily integrated into your existing infrastructure.
Quick Start
After installation, you can start Thincast Remote Desktop as follows:
-
On a Windows system, just type "Thincast Remote Desktop Client" in the search box of the "Start" menu.
-
On macOS, open the Finder and double-click on the "Thincast Remote Desktop Client" item in the "Applications" folder.
-
On Linux, either use the menu entry if your desktop environment has one, or start the application from the command line:
- Flatpak:
flatpak run com.thincast.client- Snapcraft:
snap run thincast-clientor/snap/bin/thincast-clientKeychain, local removable media, microphone support and printer redirection
When using Thincast Client with Snapcraft some features like keychain, microphone, local removable media and local printer redirection support are not auto-connected and must be connected manually:
- Password Manager
snap connect thincast-client:password-manager-service- Local removable media (CD, USB-Sticks)
snap connect thincast-client:removable-media- Local printer redirection
snap connect thincast-client:cups-control- Audio recording
snap connect thincast-client:audio-record- Webcam access
snap connect thincast-client:camera
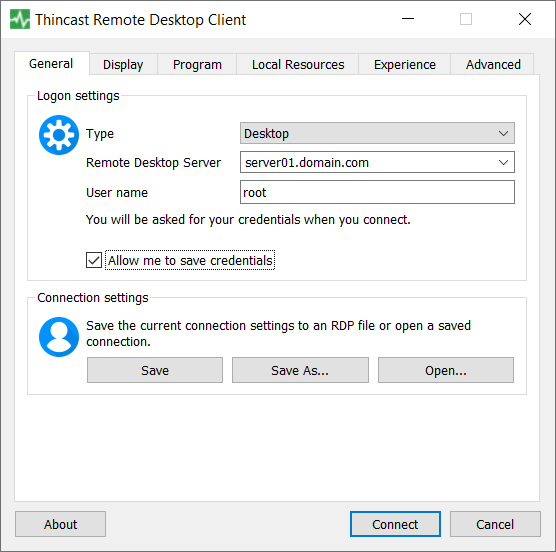
After launching the app you can enter the hostname of your destination server and user name. Click on Connect to establish the connection.
By default it will launch a simple Remote Desktop session to the host which you have entered in the "Remote Desktop Server" field.
Configuration
Logon settings
In the Logon settings tab you can specify the type of the connection, Remote Desktop Server and user name. You can also save and open a previously saved .rdp connection file.

Type
From this list you can choose the type of connection you want to establish. This can be either a full desktop experience or a seamlessly integrated remote application.
Remote Desktop Server
This is where you specify the remote computer to which you would like to connect. You can use a NetBIOS name, an FQDN or an IP address.
User name
Specifies the user that will be used to authenticate on the target server.
Connection Settings
The Thincast RDC supports importing server settings from a standard Microsoft Windows .rdp file. To import a .rdp file click "Open".
To save the current connection settings click "Save" All server settings will be kept and you will be able to connect more quickly to your Remote Desktop Server.
You can also export your server settings to a .rdp file. This is very useful for distributing your connection file in your environment. To export a .rdp file click on "Save As" Copy this file to your desired client computer and import it there as described in the first paragraph of this section.
Display
Display Configuration
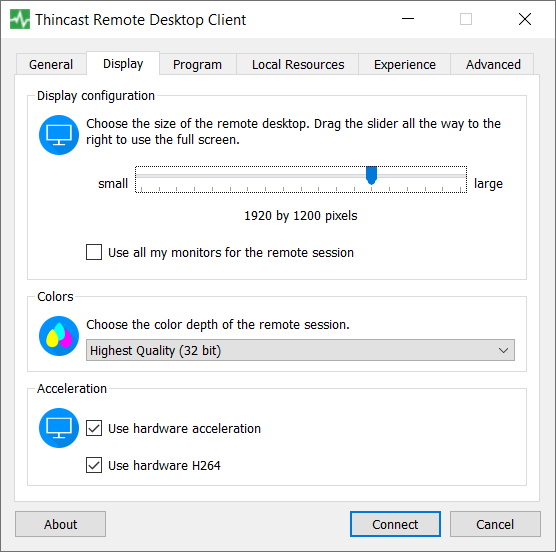
Using the slider you can choose the resolution of the remote desktop. If you move the slider to the far right side the remote desktop will use the same resolution as your local desktop and the session will be displayed in full screen mode.
If you want to use all your monitors for the remote session the application automatically uses full screen mode.
Note: The display configuration panel is only available if you have selected the "Desktop" connection type.
Colors
Colors allow you to configure the color depth. The options are as follows:
- High color (15 bit)
- High color (16 bit)
- True color (24 bit)
- Highest color (32 bit)
Note: The colors panel is only available if you have selected the "Desktop" connection type.
Acceleration
To deliver a richer user experience and to save valuable CPU power you can take advantage of the client-side hardware acceleration by enabling this setting. Please go to the chapter "Graphics Cards" to find out more about this topic.
Program
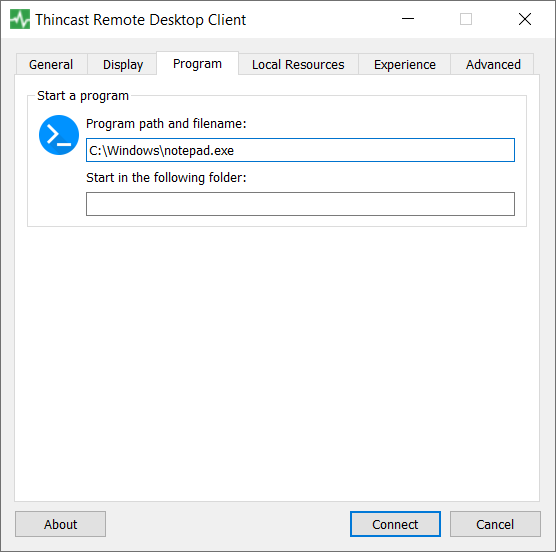
Start a program
-
Program path and filename:
Specify the path of the application that you want to launch e.g., C:\Windows\notepad.exe
-
Use the following command line arguments:
Depending on your application you might want to add additional command line arguments e.g., C:\data\test.txt to open a file.
Note: This setting is only available when the connection type is set to Remote Application.
-
Start in the following folder:
Select the folder that the application should use as its working directory.
Local Resources
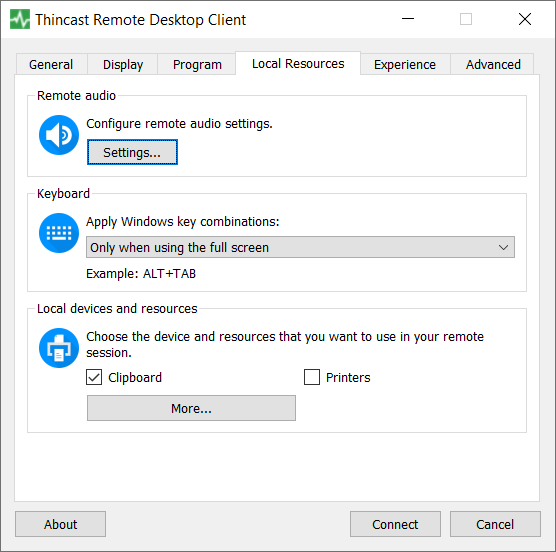
The Local Resources tab is very important. It is used to configure whether or not resources on the client system can be accessed inside the Remote Desktop session. The configuration includes remote audio, keyboard, and local devices and resources. From a security standpoint, the local devices and resources option is the most important.
Remote audio
The remote audio option is used to configure audio playback and recording.
-
Remote Audio Playback
Choose this if audio should be played on the remote computer, local computer or be muted.
-
Remote Audio Recording
Choose this if you want to record audio from your local computer.
Keyboard
Lets you specify how keyboard commands like WIN or ALT+TAB will be processed. The default is to send them to the session only when the connection is in full screen mode.
Local devices and resources
You must be careful when allowing local resources to be used within a Remote Desktop session. If you enable local resource usage, then the server you are connecting to gains access to resources on your system. If you do not trust the remote system, you should not enable local resource usage. You can configure the following items:
- Smart Cards
- Cameras (Video capture device redirection, such as webcams from the client to a Remote Desktop Protocol server.)
- Drives
One of the key items that can be configured here are disk drives. Enabling disk drives can potentially give harmful code on a remote server access to all the files on your local system. Therefore, you must be very careful when enabling this option.
Experience
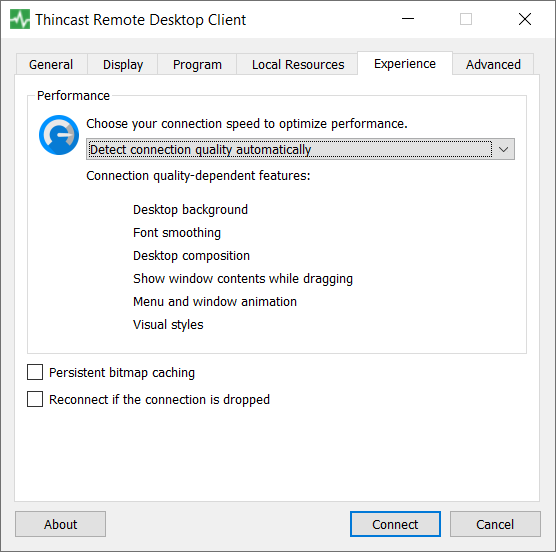
The Experience tab allows you to configure options that affect the user experience.
Performance
The Performance section allows you to configure options based on your connection speed. These different options use up different amounts of bandwidth. So, based on your connection, the Remote Desktop Client will provide a recommended configuration that is optimized for your bandwidth.
The configuration provides a selection of predefined profiles for different connectivity scenarios. If you do not know exactly what you are doing, you should always use the default option which allows the Client to automatically detect and adjust to your current network characteristics:
- Detect connection quality automatically (default)
- Modem (56 Kbps)
- Low-speed broadband (256 Kbps - 2 Mbps)
- Satellite (2 Mbps - 16 Mbps with high latency)
- High-speed broadband (2 Mbps - 10 Mbps)
- WAN (10 Mbps or higher with high latency)
- LAN (10 Mbps or higher)
Based on the bandwidth option chosen, the following features will be enabled or disabled by default:
- Desktop background
- Font smoothing
- Desktop composition
- Show window contents while dragging
- Menu and window animation
- Visual styles
The Experience tab also allows you to enable the "Reconnect if the connection is dropped" option. When a client loses network connectivity, Automatic Reconnection informs you that it is trying to reconnect to the disconnected session. You can turn on Automatic Reconnection with this option.
Advanced
Server authentication
Server authentication is used to verify that the server you are connecting to is the server you intended to connect to. What you configure here is what will be followed if the server authentication fails.
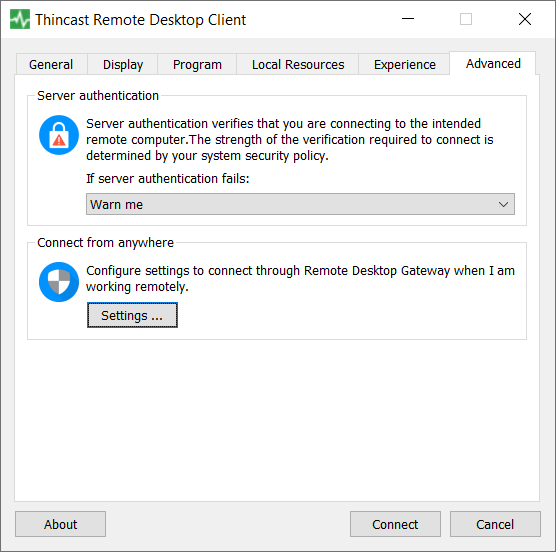
The options are as follows:
Connect and don't warn me
This is the least secure option. If the server authentication fails, the connection will still be made. In addition, the user will not be notified of the failure.
Warn me
This option is more secure and it gives the user a choice. If the server authentication fails, the user will be notified. The user can then choose whether or not to make the connection.
Do not connect
This is the most secure option. If the server authentication fails, the connection will not be made to the remote server.
Connect from anywhere
A Remote Desktop Gateway (RD Gatway) lets you connect to a remote computer on a corporate network from anywhere on the internet. You can create and manage your gateways using the Thincast Remote Desktop Client. If you want more information about the server part, you can take a look at the RD Gateway documentation available here.
In the "Connect from Anywhere" section, tap "Settings".
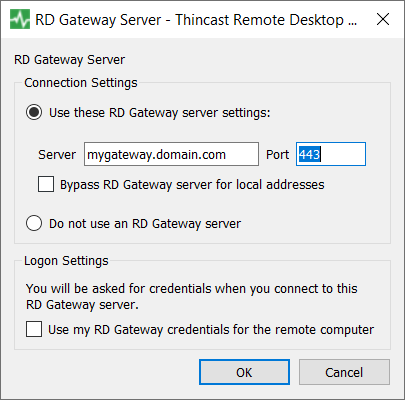
To set up a new gateway, enter the following information:
Connection settings
The name of the computer you want to use as a gateway. This can be a Windows computer name, an internet domain name or an IP address. You can also add port information to the server name (for example: mygateway.domain.com - Port 443 or 10.0.0.1 Port 443).
Logon Settings
Select Use my RD Gateway credentials desktop to use the same credentials as those used for the remote desktop connection.
Session Window
Upon successful connection to a remote server or virtual machine you will see the session window.
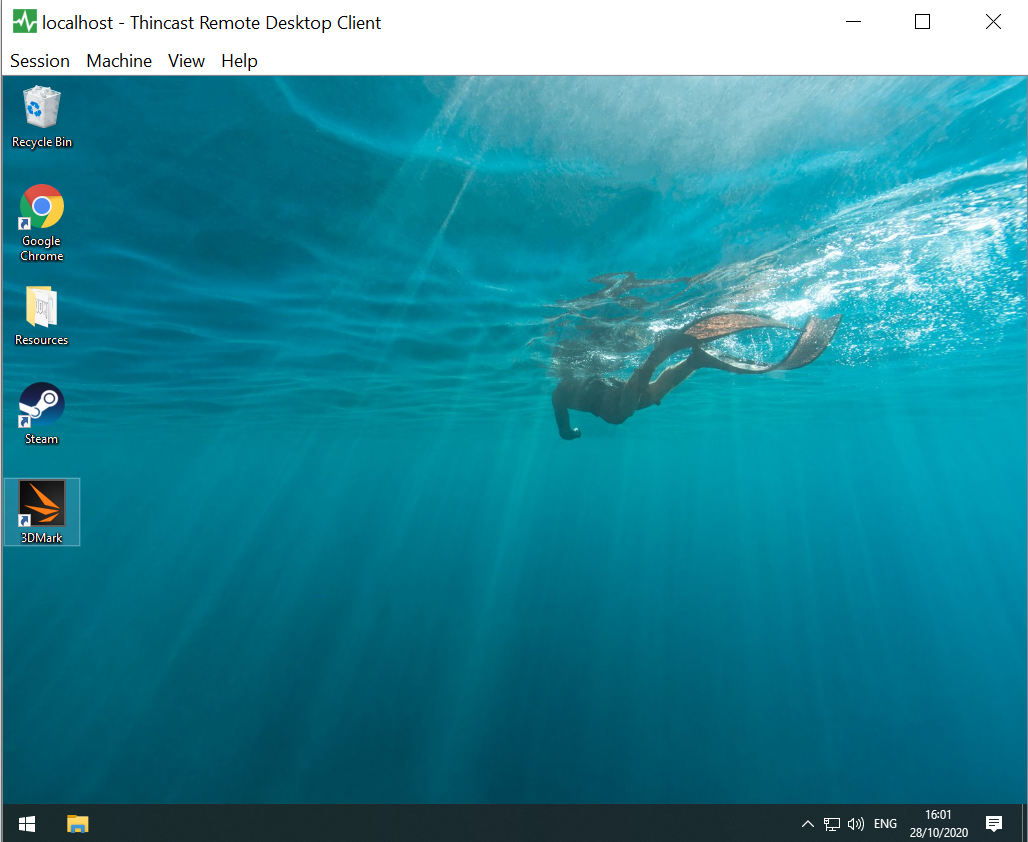
The majority of the window is taken up by the session view, displaying the content of your current session.
The following options are available in the main menu (these options vary depending on whether you are connected to an RDP server or a VM):
| Session | Machine | View | Help |
|---|---|---|---|
| (Only available when connected to a VM) | |||
| Copy screen to clipboard | Pause | Toggle fullscreen | Update |
| Send Ctrl + Alt + Del | Reset | Fit session now | Shortcuts |
| Grab keyboard | Stop | Fit window now | Manual |
| Grab mouse | Install Guest Additions | Auto-fit session | About |
| Close | Auto-fit window |
Keyboard shortcuts
By pressing a certain key combination you can perform actions that normally can only be accessed through the menu.
To use a keyboard shortcut, hold down at least one special key while pressing the last key of the shortcut. For example, to use the "Toggle Fullscreen" shortcut, hold down the Command/Right Ctrl key, press the Shift key, press the Enter key, and then release the keys again.
On Windows or Linux the Right Ctrl key is assigned to access shortcuts. The Left Ctrl key is intented to pass the usual key combinations into your Remote Desktop Session, when keyboard grabbing is enabled.
On macOS use the Command key (or Cmd key) ⌘ to access your shortcuts.
Menu
The session menu provides access to the following functions:
Copy screen to clipboard
Take a screenshot. Screenshots will be saved to the clipboard and can be pasted into other applications.
⌘/Right Ctrl + Shift + C
Send Ctrl + Alt + Del
Access up the Task Manager, log off, change the user or access the lock screen on your remote system.
⌘/Right Ctrl + Shift + E
Type clipboard text
Sends the current content of the clipboard to the session as a sequence of key strokes. This will only work if the clipboard contains text.
Grab keyboard
Exclusively take control of the keyboard and forward all input to the session.
There are three options available:
- Do not grab
⌘/Right Ctrl+Shift+K - Always
⌘/Right Ctrl+K - Fullscreen only
⌘/Right Ctrl+G
Note: This might not work on all platforms.
Grab mouse
Exclusively take control of the mouse and forward all input to the session.
The mouse can be freed by using the shortcut ⌘/Right Ctrl + M
Note: This might not work on all platforms.
Close
Disconnect from your VM and close the window.
⌘/Right Ctrl + Q
Machine
The machine menu is only available when connected to a virtual machine running on Thincast Workstation.
Following functions are available:
Pause
Pause your VM and preserve its current state.
⌘/Right Ctrl + Shift+ P
Reset
Resets your VM and reboots.
⌘/Right Ctrl + Shift+ R
Stop
Shuts down the VM. You can choose between ACPI Shutdown and Power down.
- ACPI Shutdown
⌘/Right Ctrl+Shift+A - Power Off
⌘/Right Ctrl+Shift+D
Install Guest Additions Mounts the Thincast Guest Additions ISO image into your VM.
⌘/Right Ctrl + Shift+ M
Please refer to chapter "Installing Thincast Guest Additions" for more information.
View
The view menu offers various options to control the look and behavior of the application window:
Toggle fullscreen
Switches the window between fullscreen and windowed mode.
⌘/Right Ctrl + Shift + Return
Fit session now
Adapt your session's resolution to the current window size.
⌘/Right Ctrl + S
Fit window now
Adapt the window size to your session's current resolution.
⌘/Right Ctrl + W
Auto Fit Session
Automatically adapt your session's resolution to the current window size.
⌘/Right Ctrl + Shift+ S
Auto Fit Window
Automatically adapt the window size to your session's current resolution.
⌘/Right Ctrl + Shift+ W
Help
The help menu has the following entries:
Update
Opens the update dialog with various options to control update checking.
⌘/Right Ctrl + Shift+ U
Shortcuts
Displays an overview of all shortcuts available in Thincast Client.
Manual
Opens the product manual in the default browser:
- Windows/Linux:
Right Ctrl+F1 - macOS:
⌘+Shift+?
Note: an active internet connection is required!
About
Shows technical and legal information about the application.
Thincast RD WebAccess Client
RD WebAccess Client shows you a list of managed resources you can access, such as apps and desktops, by subscribing to a feed usually provided by your Administrator. When you subscribe, the resources become available on your local PC. The Thincast RD WebAccess Client currently supports resources published from Thincast Workstation, Thincast RD WebAccess, Microsoft RD WebAccess or any other server implementing the Microsoft specification (MS-TSWP).
After you have subscribed, the Thincast RD WebAccess Client will update automatically on a regular basis. Resources may be added, changed or removed based on changes made by your admin.
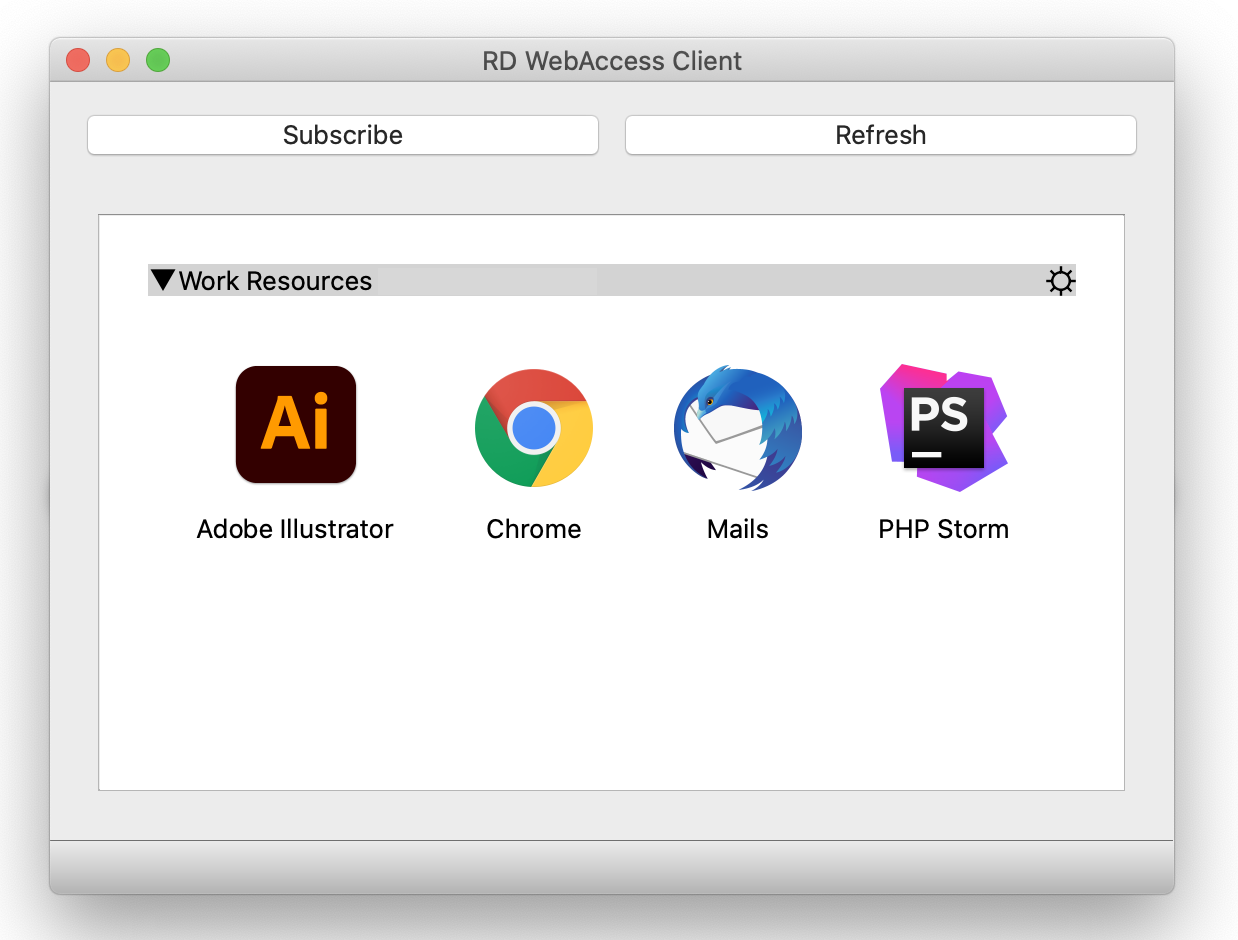
Double-click on a resource to launch it.
Quick Start
After installation, you can start the RD WebAccess Client as follows:
-
On a Windows system, type "RD WebAccess Client" in the search box of the "Start" menu.
-
On macOS, open the Finder and double-click on the "RD WebAccess Client" item in the "Applications" folder.
-
On Linux, either use the menu entry, if your desktop environment has one, or start the application from the command line:
- Flatpak:
flatpak run --command=rdwebaccessclient com.thincast.client- Snap:
/snap/bin/thincast-client.thincast-webaccess
Subscribe to a feed
-
From the main page of the client tap "Subscribe".
-
Enter the connection URL of your feed and tap "Add". To use the current user credentials of your session, click on "use logged on user (SSO)".
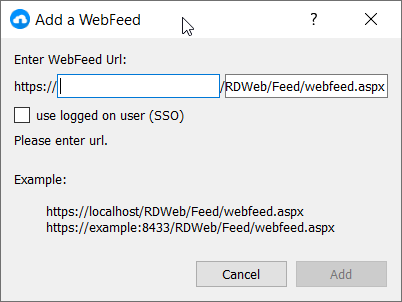
-
Sign in with your user account when prompted.
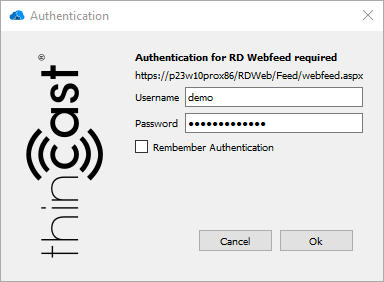
Click on Remember Authentication if you wish to save your credentials.
-
The resources will appear in the Connection center grouped by connection type.

Double-click on a resource to launch it.
Unsubscribe from a feed
This section will teach you how to unsubscribe from a feed. You might want to unsubscribe to remove your resources from the system.
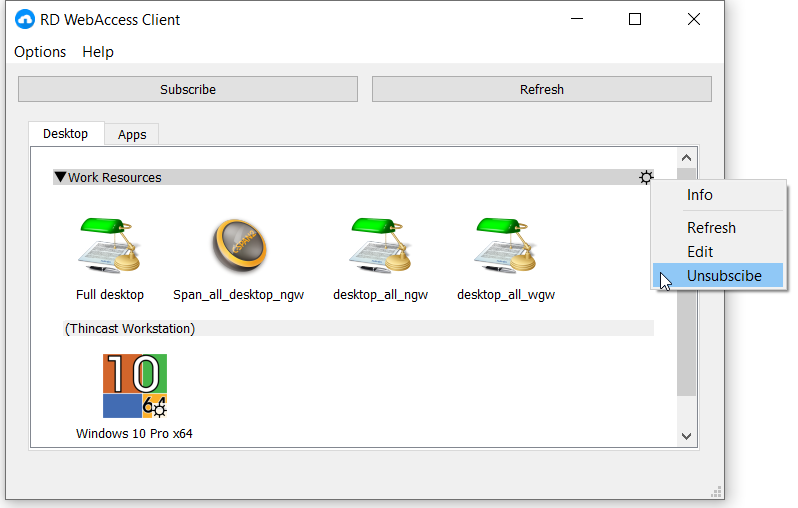
- From the Connection Center, tap the settings icon on the right side of the Work Resources pane.
- Select "Unsubscribe" from the drop-down menu.
- Review the dialog box and confirm with "Yes".
Edit a feed
A feed can be edited to change the URL of a feed or enable/disable single sign on (SSO). After a feed is edited, a new authentication is required.
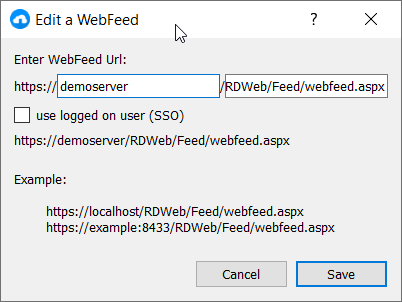
- From the Connection Center, tap the settings icon on the right side of the Work Resources pane.
- Select "Edit" from the drop-down menu.
- Edit the settings and click "Save".
- Refresh the resource (tap the settings icon on the right side of the Work Resources pane and select "Refresh" from the drop-down menu).
- Enter your credentials.
Change remembered feed credential
To change the authenticated user for a feed, clear the feed credential and re-authenticate.
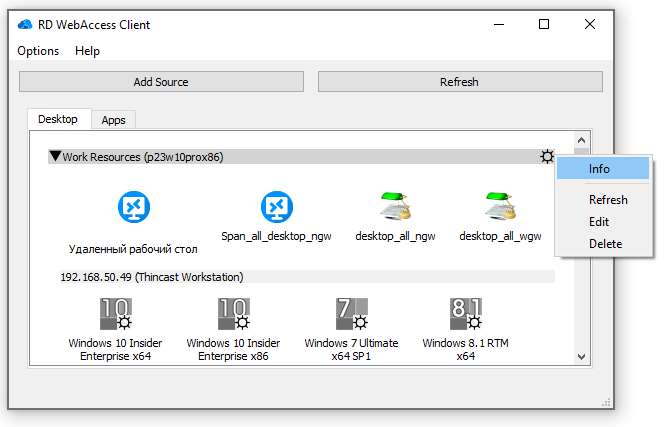
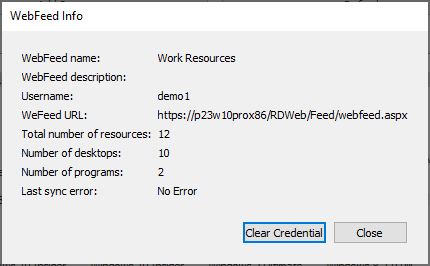
- From the Connection Center, tap the settings icon on the right side of the Work Resources pane.
- Select "Info" from the drop-down menu.
- Click "Clear Credential" to remove the saved credential.
- Close the info dialog box.
- Refresh the resource (tap the settings icon on the right side of the Work Resources pane and select "Refresh" from the drop-down menu).
- Enter your credentials.
Thincast Workstation Integration
If you have installed Thincast Workstation in your environment or are using the Thincast Workstation Add-On in RD WebAccess, all available virtualized desktops will be displayed under Desktop as separate collections.
Double-click on a virtual machine to connect to it.
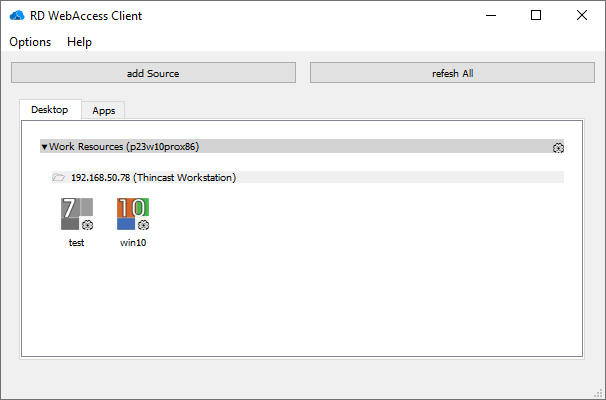
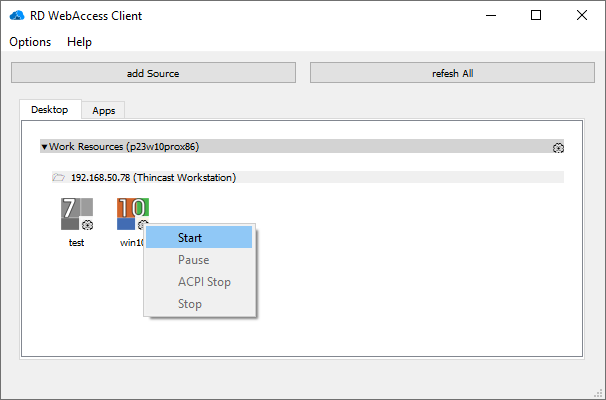
You can also start, pause and stop your virtual machines running on Thincast Workstation remotely. Tap the settings icon next to one of your virtual machines, or right-click one of your virtual machines and select the desired action from the drop-down menu.
Menu
Options menu
The options menu has the following entries:
Show folders - Arranges your collection items in folder
Separate Views - Separates your resources according to the connection type, such as Desktop and Apps.
RDP Client - Specify your default Remote Desktop client
Icon Size - Increase or decrease the size of the displayed icons
WebFeed options - Specify the time when Thincast RD WebAccess Client should update the subscribed feed automatically.
Help Menu
The help menu has the following entries:
About - Shows technical and legal information about the application.
Website - Shows technical and legal information about the application.
Check for Updates - Checks if there is a newer version of RD WebAccess Client available.
Update settings - Opens the update dialog with various options to control update checking.
Online Manual - Opens the product manual in the default browser. Note: an active internet connection is required!
Command line
Thincast Remote Desktop Client uses the same command-line syntax and options as FreeRDP, allowing a consistent interface between RDP implementations:
- Linux:
snap run thincast-client[file] [options] [/v:<server>[:port]] - Windows:
C:\Program Files\Thincast\Client>rdc.exe [options] [/v:<server>[:port]]
A good reference for the most commonly used settings .rdp file settings can be found here.
Support
We are eager to hear about your experience and any troubles you may have with Thincast Client! Please let us know by filling out our contact form.
Please keep in mind that Thincast Client does not carry any warranties or support services.
Changelog
The changelog can be found on our website.
Third-party Licenses
Licenses of open-source software used in Thincast Client can be found in the about dialog by tapping the "Licenses" button.


